Rear Seat Outer Belt Assembly (For Extra Cab) Installation
Seat Belt. Hilux. Tgn26, 36 Kun25, 26, 35, 36 Ggn25
INSTALL REAR NO. 1 SEAT OUTER BELT ASSEMBLY LH
INSTALL QUARTER INSIDE TRIM BOARD LH
INSTALL FRONT DOOR OPENING TRIM LH
INSTALL FRONT DOOR SCUFF PLATE LH
INSTALL REAR SEATBACK ASSEMBLY
INSTALL UPPER BACK PANEL GARNISH
INSTALL LOWER BACK PANEL GARNISH
INSTALL REAR SEAT CUSHION ASSEMBLY LH (w/ Seat Cushion)
INSTALL REAR SEAT CUSHION ASSEMBLY RH (w/ Seat Cushion)
Rear Seat Outer Belt Assembly (For Extra Cab) -- Installation |
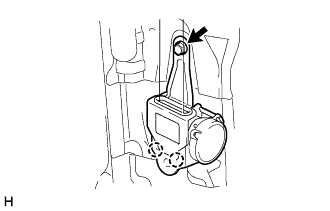
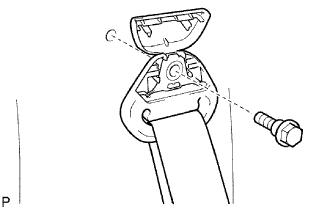
| 1. INSTALL REAR NO. 1 SEAT OUTER BELT ASSEMBLY LH |
Align the rear No. 1 seat outer belt assembly LH positioning holes with the claws.
Install the rear No. 1 seat outer belt assembly LH with the bolt.
- Torque:
- 4.8 N*m{49 kgf*cm, 42 in.*lbf}for bolt B
Install the rear No. 1 seat outer belt shoulder anchor with the bolt.
- Torque:
- 42 N*m{428 kgf*cm, 31 ft.*lbf}
Attach the 2 claws to close the rear No. 1 seat outer belt shoulder anchor cover.
| 2. INSTALL QUARTER INSIDE TRIM BOARD LH |
Attach the 7 clips, 3 guides and 4 claws to install the quarter inside trim board.
Connect the rear No. 1 seat outer belt floor anchor with the bolt.
- Torque:
- 42 N*m{428 kgf*cm, 31 ft.*lbf}
Connect the front seat outer belt floor anchor with the bolt.
- Torque:
- 42 N*m{428 kgf*cm, 31 ft.*lbf}
| 3. INSTALL FRONT DOOR OPENING TRIM LH |
Align the paint mark on the front door opening trim with the mark position on the vehicle and install the front door opening trim as shown in the illustration.
Text in Illustration*1
| Paint Mark
|
*2
| Mark Position
|
| 4. INSTALL FRONT DOOR SCUFF PLATE LH |
Attach the 4 clips and 8 claws to install the front door scuff plate.
| 5. INSTALL REAR SEATBACK ASSEMBLY |
Place the rear seatback assembly in the cabin.
- NOTICE:
- Be careful not to damage the vehicle body.
Attach the 2 hooks to the vehicle body.
Install the rear seatback assembly with the 2 bolts.
- Torque:
- 39 N*m{398 kgf*cm, 29 in.*lbf}
| 6. INSTALL UPPER BACK PANEL GARNISH |
Attach the 5 clips and 4 claws to install the upper back panel garnish.
| 7. INSTALL LOWER BACK PANEL GARNISH |
Attach the 5 clips, 2 guides and 6 claws to install the lower back panel garnish.
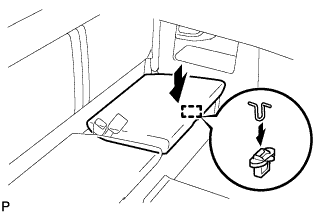
| 8. INSTALL REAR SEAT CUSHION ASSEMBLY LH (w/ Seat Cushion) |
Attach the 2 hooks.
Attach the hook to install the rear seat cushion assembly LH.
| 9. INSTALL REAR SEAT CUSHION ASSEMBLY RH (w/ Seat Cushion) |
- HINT:
- Use the same procedures described for the LH side.