Vacuum Pump (For 1Kd-Ftv, 2Kd-Ftv) -- Installation |
| 1. INSTALL VACUUM PUMP BEARING |
Using a press, press in a new bearing to the shaft.
 |
| 2. INSTALL VACUUM PUMP SHAFT |
Using SST and a press, press in the shaft to the housing.
- SST
- 09608-04031
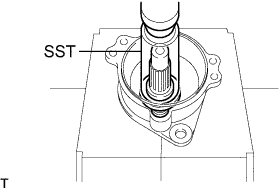 |
Using snap ring pliers, install a new snap ring.
- NOTICE:
- Make sure that the snap ring is firmly installed to the groove.
| 3. INSTALL VACUUM PUMP GEAR |
Temporarily install the woodruff key and gear to the pump with the gear lock nut.
Mount the gear in a vise.
- NOTICE:
- Place aluminum plates on the vise to prevent damage to the gear.
Tighten the gear lock nut.
- Torque:
- 110 N*m{1125 kgf*cm, 81 ft.*lbf}
| 4. INSTALL VACUUM PUMP BLADE |
Apply engine oil to the rotor, and install the rotor to the housing.
Text in Illustration *a Round End
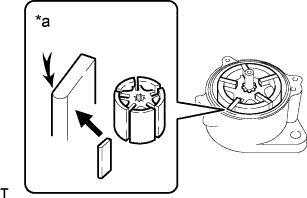 |
Install 5 new blades with the round ends facing outward.
- HINT:
- Apply engine oil to the blades.
- Make sure that the blades are flush with the rotor surface.
| 5. INSTALL VACUUM PUMP END COVER |
Mount the pump in a vise.
- NOTICE:
- Place aluminum plates on the vise to prevent damage to the pump.
Apply engine oil to 2 new O-rings.
Install the 2 O-rings.
Install the end cover and temporarily install the 3 bolts.
Using a 5 mm pin punch and hammer, tap in the 2 straight pins.
Tighten the 3 bolts.
- Torque:
- 7.9 N*m{80 kgf*cm, 69 in.*lbf}
| 6. INSTALL CHECK VALVE SUB-ASSEMBLY |
Install a new gasket and the check valve.
- Torque:
- 74 N*m{749 kgf*cm, 54 ft.*lbf}
Install 2 new gaskets and the union with the union bolt.
- Torque:
- 14 N*m{140 kgf*cm, 10 ft.*lbf}
- HINT:
- Insert the union pin into the hole of the casing.
| 7. INSTALL VACUUM PUMP ASSEMBLY |
Install 2 new O-rings.
Install the pump to the engine with the 2 nuts.
- Torque:
- 21 N*m{210 kgf*cm, 15 ft.*lbf}
Connect the 2 hoses to the pump with the clip.
| 8. INSTALL NO. 1 TIMING BELT COVER (for 1KD-FTV) |
Install the timing belt cover and 6 washers with the 6 bolts.
- Torque:
- 6.0 N*m{61 kgf*cm, 53 in.*lbf}
| 9. INSTALL NO. 1 TIMING BELT COVER (for 2KD-FTV) |
Install the timing belt cover and 6 washers with the 6 bolts.
- Torque:
- 6.0 N*m{61 kgf*cm, 53 in.*lbf}
| 10. REMOVE RADIATOR ASSEMBLY |
for 1KD-FTV:
(HILUX_TGN26 RM00000144D01IX.html)
for 2KD-FTV:
(HILUX_TGN26 RM00000144D01JX.html)
| 11. CHECK VACUUM PUMP ASSEMBLY |
Disconnect the vacuum hose from the vacuum pump.
Connect the hose of a vacuum gauge to the pump.
Text in Illustration *1 Vacuum Gauge *2 Plug
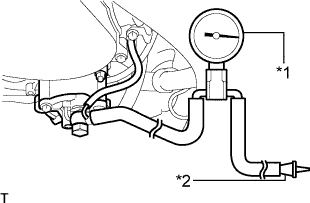 |
Insert a plug into the other hose of the gauge.
Start the engine and warm it up for more than 2 minutes.
With the engine idling, check the negative pressure of the pump.
- Standard negative pressure:
- More than 86.7 kPa (650 mmHg, 26 in.Hg)
- HINT:
- The vacuum pump assembly is listed as one of the 200000 km (124000 mile) maintenance parts. Make sure to disassemble and inspect it every 200000 km (124000 miles) and replace parts as necessary.
Remove the gauge from the pump.
Connect the hose to the pump with the clip.
| 12. INSTALL NO. 2 ENGINE UNDER COVER (for 4WD and Pre-Runner) |
- Torque:
- 28 N*m{286 kgf*cm, 21 ft.*lbf}
| 13. INSTALL NO. 1 ENGINE UNDER COVER (for 4WD and Pre-Runner) |
- Torque:
- 28 N*m{286 kgf*cm, 21 ft.*lbf}