Vacuum Pump (For 1Kd-Ftv, 2Kd-Ftv) Removal
Brake. Hilux. Tgn26, 36 Kun25, 26, 35, 36 Ggn25
REMOVE NO. 1 ENGINE UNDER COVER (for 4WD and Pre-Runner)
REMOVE NO. 2 ENGINE UNDER COVER (for 4WD and Pre-Runner)
REMOVE RADIATOR ASSEMBLY
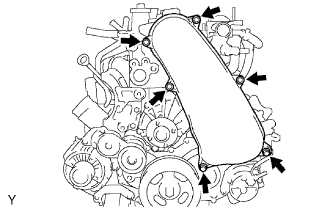
REMOVE NO. 1 TIMING BELT COVER (for 1KD-FTV)
REMOVE NO. 1 TIMING BELT COVER (for 2KD-FTV)
REMOVE VACUUM PUMP ASSEMBLY
REMOVE CHECK VALVE SUB-ASSEMBLY
REMOVE VACUUM PUMP END COVER
REMOVE VACUUM PUMP BLADE
REMOVE VACUUM PUMP GEAR
REMOVE VACUUM PUMP SHAFT
REMOVE VACUUM PUMP BEARING
Vacuum Pump (For 1Kd-Ftv, 2Kd-Ftv) -- Removal |
| 1. REMOVE NO. 1 ENGINE UNDER COVER (for 4WD and Pre-Runner) |
| 2. REMOVE NO. 2 ENGINE UNDER COVER (for 4WD and Pre-Runner) |
| 3. REMOVE RADIATOR ASSEMBLY |
for 1KD-FTV:
(HILUX_TGN26 RM00000144G01HX.html)
for 2KD-FTV:
(HILUX_TGN26 RM00000145H014X.html)
| 4. REMOVE NO. 1 TIMING BELT COVER (for 1KD-FTV) |
Remove the 6 bolts, 6 washers and timing belt cover.
| 5. REMOVE NO. 1 TIMING BELT COVER (for 2KD-FTV) |
Remove the 6 bolts, 6 washers and timing belt cover.
| 6. REMOVE VACUUM PUMP ASSEMBLY |
Disconnect the 2 vacuum hoses from the pump.
Remove the 2 nuts and pull out the pump from the engine.
Remove the 2 O-rings.
| 7. REMOVE CHECK VALVE SUB-ASSEMBLY |
Mount the pump in a vise
- NOTICE:
- Place aluminum plates on the vise to prevent damage to the pump.
Remove the union bolt, union and 2 gaskets.
Remove the check valve and gasket.
| 8. REMOVE VACUUM PUMP END COVER |
Remove the 3 bolts.
Using a 5 mm pin punch and hammer, tap out the 2 straight pins.
Remove the end cover and 2 O-rings.
| 9. REMOVE VACUUM PUMP BLADE |
Remove the rotor together with the 5 blades.
- NOTICE:
- Be careful not to drop the blades.
Remove the 5 blades from the rotor.
| 10. REMOVE VACUUM PUMP GEAR |
Mount the gear in a vise.
- NOTICE:
- Place aluminum plates on the vise to prevent damage to the gear.
Remove the gear lock nut.
Remove the gear and woodruff key.
| 11. REMOVE VACUUM PUMP SHAFT |
Using snap ring pliers, remove the snap ring.
Using a plastic-faced hammer, tap out the shaft.
| 12. REMOVE VACUUM PUMP BEARING |
Using a 17 mm socket wrench and press, press out the bearing.