Front Shock Absorber (For 4Wd And Pre-Runner) Installation
Suspension. Hilux. Tgn26, 36 Kun25, 26, 35, 36 Ggn25
INSTALL FRONT COIL SPRING LH
INSTALL FRONT SUSPENSION SUPPORT SUB-ASSEMBLY
INSTALL FRONT SHOCK ABSORBER CUSHION
INSTALL FRONT SHOCK ABSORBER CUSHION RETAINER
INSTALL FRONT SUPPORT TO FRONT SHOCK ABSORBER NUT
TEMPORARILY INSTALL FRONT SHOCK ABSORBER WITH COIL SPRING
INSTALL FRONT STABILIZER BAR
INSTALL FRONT STABILIZER BRACKET
INSTALL FRONT STABILIZER LINK ASSEMBLY LH
INSTALL FRONT STABILIZER LINK ASSEMBLY RH
INSTALL FRONT WHEEL
STABILIZE SUSPENSION
TIGHTEN FRONT SHOCK ABSORBER WITH COIL SPRING
INSPECT AND ADJUST FRONT WHEEL ALIGNMENT
Front Shock Absorber (For 4Wd And Pre-Runner) -- Installation |
- HINT:
- Use the same procedure for the RH and LH sides.
- The procedure listed below is for the LH side.
| 1. INSTALL FRONT COIL SPRING LH |
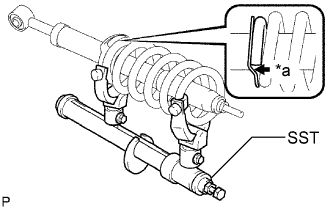
Using SST, compress the coil spring.
- SST
- 09727-30021(09727-00010,09727-00031)
09727-00060
Attach the arm of SST to the diameter of the coil spring.
- CAUTION:
- Make sure that the coil spring is installed so that the distance between the upper and lower hooks of SST is at the maximum.
- Make sure that the claws of the hooks are securely attached.
Using SST, compress the coil spring.
- CAUTION:
- If the coil spring bends during the compression, immediately stop the compression and reinstall SST.
- Do not compress the spring until the coil springs contact each other.
- Do not use an impact wrench.
Install the coil spring to the shock absorber. Fit the lower end of the coil spring into the recess of the spring lower seat.
Text in Illustration*a
| Recess
|
| 2. INSTALL FRONT SUSPENSION SUPPORT SUB-ASSEMBLY |
Install the cushion retainer to the shock absorber.
Install the suspension support to the shock absorber.
| 3. INSTALL FRONT SHOCK ABSORBER CUSHION |
Install the cushion to the shock absorber.
| 4. INSTALL FRONT SHOCK ABSORBER CUSHION RETAINER |
Install the cushion retainer to the shock absorber.
| 5. INSTALL FRONT SUPPORT TO FRONT SHOCK ABSORBER NUT |
Align the suspension support and absorber bush as shown in the illustration.
Text in Illustration*1
| Suspension Support
|
*2
| Absorber Bush
|
*a
| for LH
|
*b
| Front
|
*c
| for RH
|
Install a new lock nut.
- Torque:
- 18 N*m{184 kgf*cm, 13 ft.*lbf}
- NOTICE:
- Do not use an impact wrench. It will damage the shock absorber rod.
Release the coil spring while checking the position of the spring lower seat and suspension support.
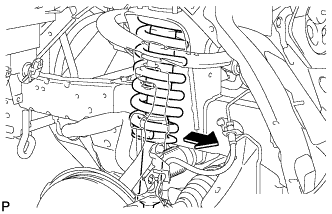
| 6. TEMPORARILY INSTALL FRONT SHOCK ABSORBER WITH COIL SPRING |
Install the shock absorber to the body so that the lower end of the coil spring faces the rear of the vehicle.
Install the 3 nuts to the upper side of the shock absorber with coil spring.
- Torque:
- 40 N*m{408 kgf*cm, 30 ft.*lbf}
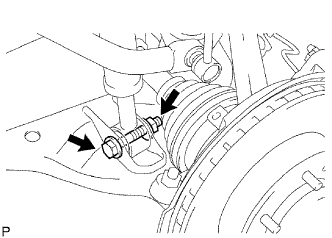
Temporarily install the bolt and nut as shown in the illustration.
- HINT:
- Fix the nut in place and temporarily install the bolt.
| 7. INSTALL FRONT STABILIZER BAR |
Install the front stabilizer bar to the vehicle body.
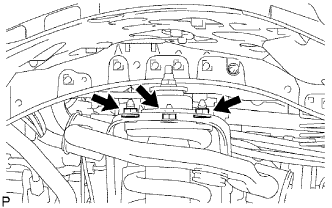
| 8. INSTALL FRONT STABILIZER BRACKET |
Install the 2 brackets with the 4 bolts.
- Torque:
- 48 N*m{489 kgf*cm, 35 ft.*lbf}
- HINT:
- Make sure the bracket's arrows face the front of the vehicle.
| 9. INSTALL FRONT STABILIZER LINK ASSEMBLY LH |
Connect the stabilizer link to the steering knuckle with the nut.
- Torque:
- 70 N*m{714 kgf*cm, 52 ft.*lbf}
- HINT:
- If the ball joint turns together with the nut, use a 6 mm hexagon wrench to hold the stud in place.
| 10. INSTALL FRONT STABILIZER LINK ASSEMBLY RH |
- HINT:
- Use the same procedure described for the LH side.
Install the front wheel.
- Torque:
- 105 N*m{1071 kgf*cm, 77 ft.*lbf}
Lower the vehicle.
Press down on the vehicle several times to stabilize the suspension.
| 13. TIGHTEN FRONT SHOCK ABSORBER WITH COIL SPRING |
Fix the nut in place and tighten the bolt.
- Torque:
- 95 N*m{969 kgf*cm, 70 ft.*lbf}
- NOTICE:
- Do not tighten the nut.
| 14. INSPECT AND ADJUST FRONT WHEEL ALIGNMENT |
(HILUX_TGN26 RM0000037JW00RX.html)