Front Crankshaft Oil Seal -- Installation |
| 1. INSTALL FRONT CRANKSHAFT OIL SEAL |
Apply MP grease to the lip of a new oil seal.
- NOTICE:
- Do not allow foreign matter to contact the lip of the oil seal.
- Do not allow MP grease to contact the dust seal.
 |
Temporarily install the oil seal to the timing chain cover.
Using SST and a hammer, tap in the oil seal until its surface is flush with the chain cover edge.
- SST
- 09223-75010
09950-70010(09951-07100)
- NOTICE:
- Keep the lip free from foreign matter.
- Do not tap the oil seal at an angle.
| 2. INSTALL CRANKSHAFT PULLEY |
Align the pulley set key with the key groove of the pulley, and slide on the pulley.
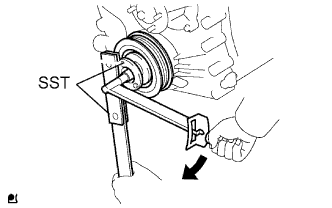 |
Using SST, install the crankshaft pulley bolt.
- SST
- 09213-54015(91651-60855)
09330-00021
- Torque:
- 260 N*m{2651 kgf*cm, 192 ft.*lbf}
- NOTICE:
- Do not reuse the pulley bolt.
| 3. INSTALL FAN SHROUD |
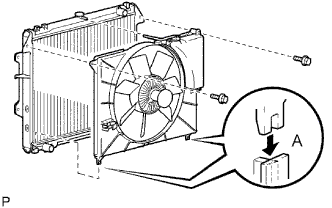 |
Install the fan pulley to the engine water pump.
Place the shroud together with the fluid coupling fan between the radiator and engine.
- NOTICE:
- Be careful not to damage the radiator core.
Install the coupling fan to the water pump with the 4 nuts. Tighten the nuts as much as possible by hand.
Attach the shroud's claws to the radiator as shown in A in the illustration.
Install the fan shroud with the 2 bolts.
- Torque:
- 5.0 N*m{51 kgf*cm, 44 in.*lbf}
Connect the reservoir hose to the radiator tank upper.
Install the fan and generator V belt (HILUX_TGN26 RM000000YMN01PX.html).
Tighten the 4 nuts of the fluid coupling fan.
- Torque:
- 25 N*m{255 kgf*cm, 18 ft.*lbf}
| 4. INSTALL AIR PUMP INLET |
Connect the air pump inlet to the radiator with the bolt.
- Torque:
- 8.5 N*m{87 kgf*cm, 75 in.*lbf}
| 5. CONNECT RADIATOR HOSE INLET |
Connect the radiator hose inlet to the radiator.
| 6. ADD ENGINE COOLANT |
Tighten all the plugs and fill the radiator with TOYOTA Super Long Life Coolant (SLLC).
- Torque:
- for Cylinder block drain cock plug:
- 13 N*m{130 kgf*cm, 9 ft.*lbf}
- Standard Capacity:
Item Specified Condition A/T 8.1 liters (8.6 US qts, 7.1 Imp. qts) M/T 7.8 liters (8.2 US qts, 6.9 Imp. qts)
- NOTICE:
- Never use water as a substitute for engine coolant.
- HINT:
- TOYOTA vehicles are filled with TOYOTA SLLC at the factory. In order to avoid damage to the engine cooling system and other technical problems, only use TOYOTA SLLC or similar high quality ethylene glycol based non-silicate, non-amine, non-nitrite, non-borate coolant with long-life hybrid organic acid technology (coolant with long-life hybrid organic acid technology is a combination of low phosphates and organic acids).
- Please contact your TOYOTA dealer for further details.
Fill the radiator reservoir with TOYOTA SLLC to the F line.
Press the inlet and outlet radiator hoses several times by hand, and then check the level of the coolant.
If the coolant level drops below the F line, add TOYOTA SLLC to the F line.
Install the radiator cap.
Bleed air from the cooling system.
Warm up the engine until the thermostat opens.
While the thermostat is open, circulate the coolant for several minutes.Maintain the engine speed at 2500 to 3000 rpm.
Press the inlet and outlet radiator hoses several times by hand to bleed air.
- CAUTION:
- When pressing the radiator hoses:
- Wear protective gloves.
- Be careful as the radiator hoses are hot.
- Keep your hands away from the radiator fan.
Stop the engine and wait until the coolant cools down to ambient temperature.
- CAUTION:
- Do not remove the radiator cap while the engine and radiator are still hot. Pressurized, hot engine coolant and steam may be released and cause serious burns.
Check the coolant level in the radiator reservoir.
If the coolant level is below the L line, add SLLC up to the reservoir F line.
| 7. INSPECT FOR COOLANT LEAK |
- CAUTION:
- Do not remove the radiator cap while the engine and radiator are still hot. Pressurized, hot engine coolant and steam may be released and cause serious burns.
Fill the radiator with coolant and attach a radiator cap tester.
Warm up the engine.
Using a radiator cap tester, increase the pressure inside the radiator to 118 kPa (1.2 kgf/cm2, 17 psi), and check that the pressure does not drop.
If the pressure drops, check the hoses, radiator and water pump for leaks. If no external leaks are found, check the cylinder block and cylinder head.
| 8. INSPECT FOR OIL LEAK |
Start the engine, and check that there are no oil leaks after performing maintenance.
| 9. INSPECT ENGINE OIL LEVEL |
Warm up the engine, and then stop the engine and wait for 5 minutes.
If the oil level is low, check for leakage and add oil up to the full level mark.
Check that the engine oil level is between the low level and full level marks on the dipstick.
If low, check for leakage and add oil up to the full level mark.- NOTICE:
- Do not fill engine oil above the full level mark.
| 10. INSTALL NO. 1 ENGINE UNDER COVER |
- Torque:
- 28 N*m{286 kgf*cm, 21 ft.*lbf}