Windshield Glass (For Hatchback) Removal
REMOVE WINDSHIELD WIPER MOTOR AND LINK
REMOVE INNER REAR VIEW MIRROR ASSEMBLY
REMOVE ROOF HEADLINING ASSEMBLY (for 5 Door)
REMOVE ROOF HEADLINING ASSEMBLY (for 3 Door)
REMOVE WINDSHIELD OUTSIDE MOULDING
REMOVE WINDSHIELD GLASS
REMOVE WINDOW GLASS ADHESIVE DAM
REMOVE NO. 1 WINDSHIELD GLASS STOPPER (for 1-piece Type)
REMOVE NO. 2 WINDSHIELD GLASS STOPPER (for 2-piece Type)
REMOVE NO. 1 WINDSHIELD GLASS STOPPER (for 2-piece Type)
Windshield Glass (For Hatchback) -- Removal |
| 1. REMOVE WINDSHIELD WIPER MOTOR AND LINK |
(YARIS_NCP93 RM000001OV3023X.html)
| 2. REMOVE INNER REAR VIEW MIRROR ASSEMBLY |
(YARIS_NCP93 RM0000026UW00XX.html)
| 3. REMOVE ROOF HEADLINING ASSEMBLY (for 5 Door) |
(YARIS_NCP93 RM0000036M500YX.html)- HINT:
- It is not necessary to remove the roof headlining completely. Slightly lower the front section of the roof headlining.
| 4. REMOVE ROOF HEADLINING ASSEMBLY (for 3 Door) |
(YARIS_NCP93 RM0000036M5010X.html)- HINT:
- It is not necessary to remove the roof headlining completely. Slightly lower the front section of the roof headlining.
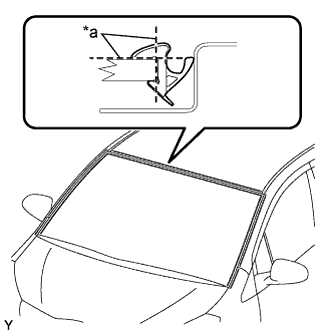
| 5. REMOVE WINDSHIELD OUTSIDE MOULDING |
Using a knife, cut off the windshield outside moulding, as shown in the illustration.
Text in Illustration*a
| Cut
|
- NOTICE:
- Do not damage the vehicle body with the knife.
| 6. REMOVE WINDSHIELD GLASS |
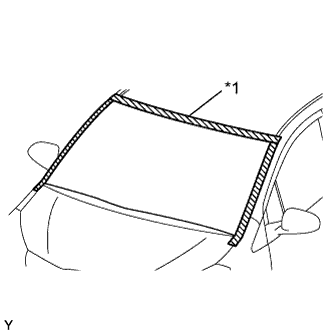
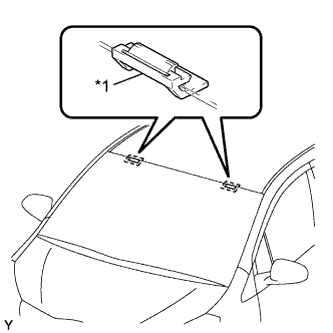
Apply protective tape to the installation area on the windshield glass on the vehicle body.
Text in Illustration*1
| Protective Tape
|
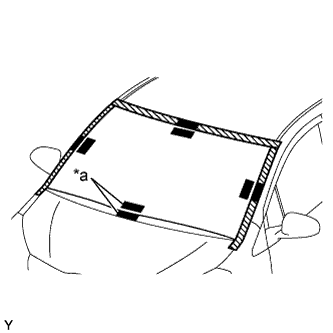
Place matchmarks on the windshield glass and vehicle body on the locations indicated in the illustration.
Text in Illustration*a
| Mark
|
- HINT:
- Matchmarks do not need to be placed if the windshield glass is not going to be reused.
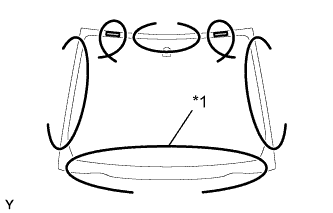
Pass a piano wire between the vehicle body and glass from the interior.
Text in Illustration*1
| Piano Wire
|
Tie both wire ends to wooden blocks or similar objects.
Cut off the adhesive by pulling the piano wire around the windshield glass.
- NOTICE:
- When separating the windshield glass, take care not to damage the paint or the interior and exterior ornaments.
- To prevent the safety pad from being scratched when removing the windshield glass, place a plastic sheet between the piano wire and safety pad.
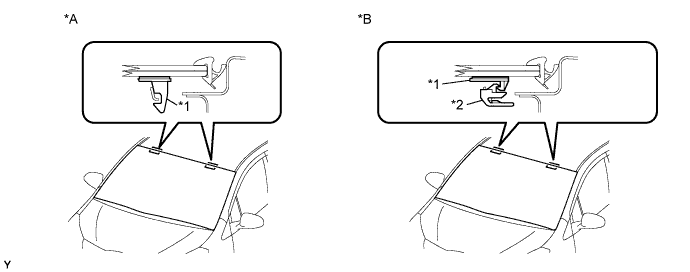
Using suction cups, disengage the windshield glass stopper and remove the windshield glass.
Text in Illustration*A
| for 1 - piece Type
| *B
| for 2 - piece Type
|
*1
| No. 1 Windshield Glass Stopper
| *2
| No. 2 Windshield Glass Stopper
|
- NOTICE:
- Be careful not to drop the windshield glass.
- Leave as much adhesive on the vehicle body as possible when removing the windshield glass.
- To prevent the windshield glass from dropping when performing this operation, be sure to hold the windshield glass using suction cups.
- There are windshield glass stopper and No. 1 windshield glass stoppers on the windshield glass. Be careful not to damage the windshield glass when cutting off the adhesive.
- HINT:
- Depending on vehicles, 1-piece or 2-piece type stoppers are used.
| 7. REMOVE WINDOW GLASS ADHESIVE DAM |
Using a scraper, remove the windshield glass adhesive dam.
- NOTICE:
- Be careful not to damage the windshield glass.
- Be sure to replace the window glass adhesive dam with a new one.
| 8. REMOVE NO. 1 WINDSHIELD GLASS STOPPER (for 1-piece Type) |
Using a scraper, remove the 2 No. 1 windshield glass stoppers.
- NOTICE:
- Be careful not to damage the windshield glass.
- Be sure to replace the windshield glass stoppers with new ones.
| 9. REMOVE NO. 2 WINDSHIELD GLASS STOPPER (for 2-piece Type) |
Using a scraper, remove the 2 No. 2 windshield glass stoppers.
- NOTICE:
- Be careful not to damage the windshield glass.
- Be sure to replace the windshield glass stoppers with new ones.
| 10. REMOVE NO. 1 WINDSHIELD GLASS STOPPER (for 2-piece Type) |
Remove the 2 No. 1 windshield glass stoppers.
Text in Illustration*1
| No. 1 Windshield Glass Stopper
|
- NOTICE:
- Be sure to replace the windshield glass stoppers with new ones.