Front Passenger Airbag Assembly (For Sedan) Installation
REMOVE INSTRUMENT PANEL WIRE ASSEMBLY
INSTALL FRONT PASSENGER AIRBAG ASSEMBLY (w/ Front Passenger Airbag)
INSTALL UPPER INSTRUMENT PANEL SUB-ASSEMBLY
INSTALL GLOVE COMPARTMENT DOOR ASSEMBLY
INSTALL FRONT PILLAR GARNISH RH
INSTALL FRONT PILLAR GARNISH LH
INSTALL FRONT DOOR OPENING TRIM WEATHERSTRIP RH
INSTALL FRONT DOOR OPENING TRIM WEATHERSTRIP LH
INSTALL COMBINATION METER ASSEMBLY
INSTALL INSTRUMENT CLUSTER FINISH PANEL NO.1
INSTALL INSTRUMENT PANEL FINISH PANEL END RH
INSTALL INSTRUMENT PANEL FINISH PANEL END LH
INSTALL INSTRUMENT PANEL FINISH PANEL LOWER CENTER
CONNECT CABLE TO NEGATIVE BATTERY TERMINAL
CHECK SRS WARNING LIGHT
Front Passenger Airbag Assembly (For Sedan) -- Installation |
- CAUTION:
- Some of these service operations affect the SRS airbag system. Read the precautionary notices concerning the SRS airbag system before servicing (YARIS_NCP93 RM000000KT10D1X.html).
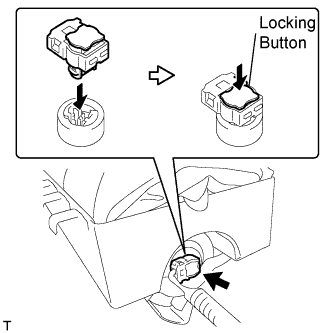
| 1. REMOVE INSTRUMENT PANEL WIRE ASSEMBLY |
Connect the 2 airbag connectors to install the instrument panel wire.
- NOTICE:
- Lock the locking button securely.
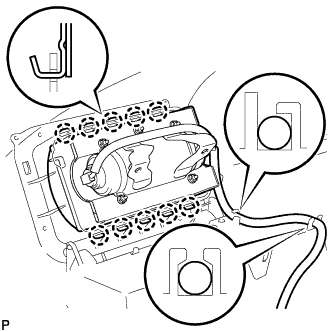
| 2. INSTALL FRONT PASSENGER AIRBAG ASSEMBLY (w/ Front Passenger Airbag) |
Engage the 10 hooks so that the connector side faces the outside of the vehicle, and install the instrument panel passenger airbag.
Install the wire harness onto the 2 claws of the instrument panel.
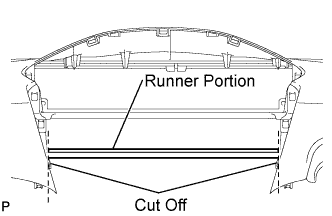
| 3. INSTALL UPPER INSTRUMENT PANEL SUB-ASSEMBLY |
Using a nipper, cut off both ends of the runner portion shown in the illustration (When installing a new one).
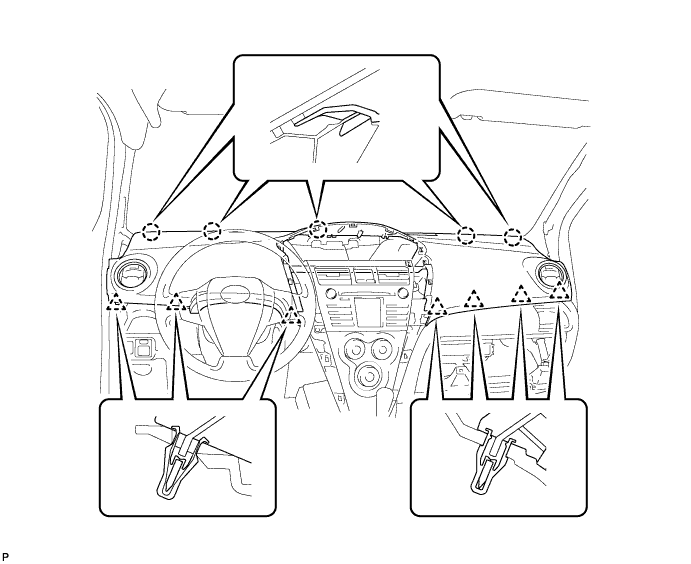
Engage the 5 claws at the front side of the instrument panel.
Engage the 7 clips at the rear side of the instrument panel.
Install the upper instrument panel with the 2 <C> bolts and the 2 <B> screws.
- Torque:
- 20 N*m{204 kgf*cm, 15 ft.*lbf} for bolt <C>
Connect the passenger airbag connector and clamp.
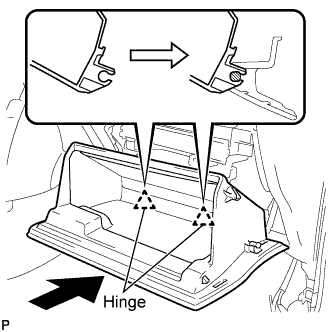
| 4. INSTALL GLOVE COMPARTMENT DOOR ASSEMBLY |
Engage the claws of the hinge portions by pushing the glove compartment door in the horizontal direction to install the glove compartment door assembly.
- NOTICE:
- Engage the claw by pushing it in the horizontal direction, otherwise, installation failure caused by excessive play around the hinge portion will result.
Slightly flex the upper portion of the glove compartment door assembly to engage the stopper.
Install the 2 glove compartment door stoppers onto the glove compartment door.
| 5. INSTALL FRONT PILLAR GARNISH RH |
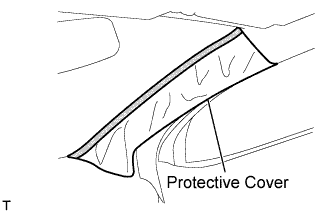
w/ Curtain Shield Airbag:
Remove the piece of cloth or nylon.
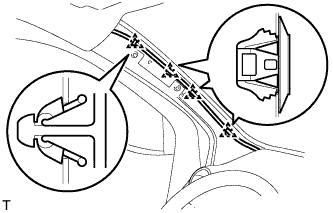
Install the 3 clamps.
Connect the antenna connector.
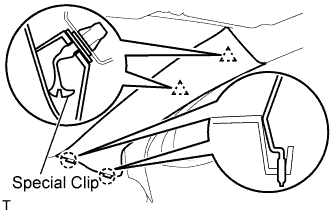
w/ Curtain Shield Airbag:
Install 2 new special clips and the clip onto the front pillar garnish.
Engage the 2 clips and the 2 claws and install the front pillar garnish.
w/o Curtain Shield Airbag:
Engage the 2 clips and the 2 claws and install the front pillar garnish.
| 6. INSTALL FRONT PILLAR GARNISH LH |
w/ Curtain Shield Airbag:
Remove the piece of cloth or nylon.
Install the 4 clamps.
w/ Curtain Shield Airbag:
Install 2 new special clips and the clip onto the front pillar garnish.
Engage the 2 clips and the 2 claws and install the front pillar garnish.
w/o Curtain Shield Airbag:
Engage the 2 clips and the 2 claws and install the front pillar garnish.
| 7. INSTALL FRONT DOOR OPENING TRIM WEATHERSTRIP RH |
(YARIS_NCP93 RM000001EEW049X_01_0022.html)
| 8. INSTALL FRONT DOOR OPENING TRIM WEATHERSTRIP LH |
(YARIS_NCP93 RM000001EEW049X_01_0023.html)
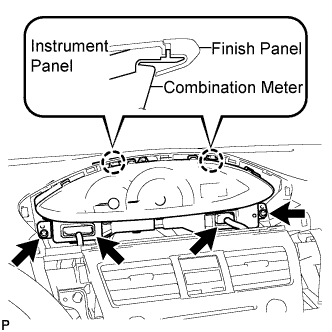
| 9. INSTALL COMBINATION METER ASSEMBLY |
Install the combination meter assembly with the 2 screws.
- NOTICE:
- Install the meter by inserting the ribbed portions of the meter between the instrument panel and meter cluster.
Connect the 2 connectors.
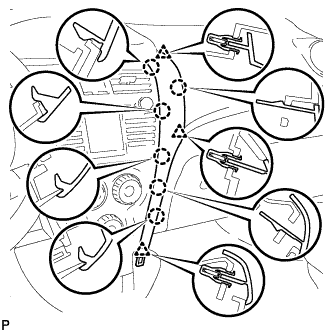
| 10. INSTALL INSTRUMENT CLUSTER FINISH PANEL NO.1 |
Fit the 2 claws of the instrument cluster finish panel into the upper instrument cluster finish panel center.
Engage the 5 claws and 5 clips and install the instrument cluster finish panel.
| 11. INSTALL INSTRUMENT PANEL FINISH PANEL END RH |
Engage the 6 claws and 3 clips and install the instrument panel finish panel end RH.
| 12. INSTALL INSTRUMENT PANEL FINISH PANEL END LH |
Engage the 6 claws and 3 clips and install the instrument panel finish panel end LH.
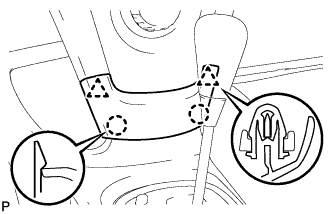
| 13. INSTALL INSTRUMENT PANEL FINISH PANEL LOWER CENTER |
Engage the 2 claws and 2 clips and install the instrument panel finish panel lower center.
| 14. CONNECT CABLE TO NEGATIVE BATTERY TERMINAL |
- Torque:
- 5.4 N*m{55 kgf*cm, 48 in.*lbf}
| 15. CHECK SRS WARNING LIGHT |
(YARIS_NCP93 RM000000XFD0CVX.html)