Meter / Gauge System (For Hatchback) Operating Light Control Rheostat Does Not Change Light Brightness
DESCRIPTION
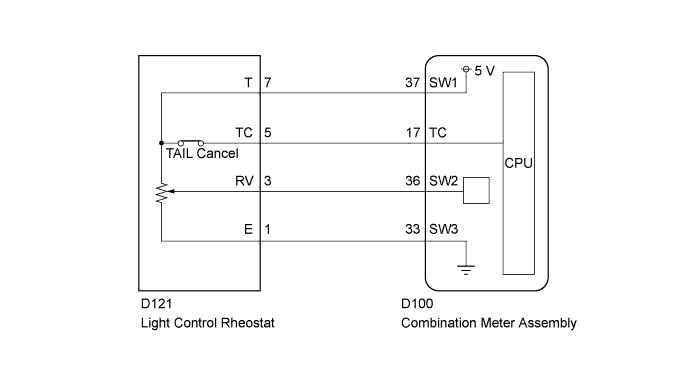
WIRING DIAGRAM
INSPECTION PROCEDURE
READ VALUE USING TECHSTREAM (LIGHT CONTROL RHEOSTAT)
INSPECT LIGHT CONTROL RHEOSTAT
CHECK HARNESS AND CONNECTOR (COMBINATION METER - LIGHT CONTROL RHEOSTAT)
METER / GAUGE SYSTEM (for Hatchback) - Operating Light Control Rheostat does not Change Light Brightness |
DESCRIPTION
The illumination intensity of the combination meter and accessory meter is increased by turning the knob of the light control rheostat upward, and decreased by turning the knob downward.
WIRING DIAGRAM
INSPECTION PROCEDURE
| 1.READ VALUE USING TECHSTREAM (LIGHT CONTROL RHEOSTAT) |
Operate the Techstream according to the display and select "Data List" (YARIS_NCP93 RM000001F8Q018X.html).
- OK:
- Light brightness can be changed within specified range by manual operation.
Combination MeterTester Display
| Measurement Item/Range
| Normal Condition
| Diagnostic Note
|
Tail Cancel SW
| Tail cancel switch/
OFF or ON
| OFF: Tail cancel switch off
ON: Tail cancel switch on
| -
|
Rheostat value
| Rheostat value/
Min.: 0
Max.: 100
| Light control rheostat switch is Dark (0) → Bright (100)
| Unit: %
|
| 2.INSPECT LIGHT CONTROL RHEOSTAT |
Inspect the light control rheostat (YARIS_NCP93 RM000000W3O015X.html).
| 3.CHECK HARNESS AND CONNECTOR (COMBINATION METER - LIGHT CONTROL RHEOSTAT) |
Disconnect the D100 combination meter assembly connector.
Disconnect the D121 light control rheostat connector.
Measure the resistance according to the value(s) in the table below.
- Standard Resistance:
Tester Connection
| Condition
| Specified Condition
|
D100-37 (SW1) - D121-7 (T)
| Always
| Below 1 Ω
|
D100-36 (SW2) - D121-3 (RV)
| Always
| Below 1 Ω
|
D100-33 (SW3) - D121-1 (E)
| Always
| Below 1 Ω
|
D100-17 (TC) - D121-5 (TC)
| Always
| Below 1 Ω
|
| | REPAIR OR REPLACE HARNESS OR CONNECTOR |
|
|