Rear Door Lock (For Hatchback) Removal
REMOVE REAR DOOR FRAME GARNISH
REMOVE REAR DOOR WINDOW REGULATOR HANDLE ASSEMBLY (w/o Power Window)
REMOVE REAR DOOR ARMREST BASE UPPER PANEL (w/ Power Window)
REMOVE REAR DOOR ARMREST BASE UPPER PANEL (w/o Power Window)
REMOVE REAR DOOR TRIM BOARD SUB-ASSEMBLY
REMOVE REAR DOOR SERVICE HOLE COVER
REMOVE REAR DOOR WINDOW DIVISION BAR SUB-ASSEMBLY
REMOVE REAR DOOR GLASS SUB-ASSEMBLY
REMOVE REAR DOOR GLASS RUN
REMOVE REAR DOOR LOCK ASSEMBLY (w/ Power Door Lock)
REMOVE REAR DOOR LOCK ASSEMBLY (w/o Power Door Lock)
REMOVE REAR DOOR LOCK REMOTE CONTROL CABLE ASSEMBLY
REMOVE REAR DOOR INSIDE LOCKING CABLE ASSEMBLY
Rear Door Lock (For Hatchback) -- Removal |
- HINT:
- Use the same procedure for both the RH and LH sides.
- The procedure described below is for the RH side.
| 1. REMOVE REAR DOOR FRAME GARNISH |
Disengage the 2 clips and claw.
Disengage the guide and remove the rear door frame garnish.
| 2. REMOVE REAR DOOR WINDOW REGULATOR HANDLE ASSEMBLY (w/o Power Window) |
Insert a clip remover between the plate and front door trim board.
Turn the handle with the clip remover inserted, as shown in the illustration.
Remove the front door window regulator handle and clip.
Remove the window regulator handle plate.
| 3. REMOVE REAR DOOR ARMREST BASE UPPER PANEL (w/ Power Window) |
Using a moulding remover, disengage the 9 claws and 3 guides.
Disconnect the connector and remove the rear armrest base upper panel.
| 4. REMOVE REAR DOOR ARMREST BASE UPPER PANEL (w/o Power Window) |
Using a moulding remover, disengage the 5 claws and 2 guides and remove the rear armrest base upper panel.
| 5. REMOVE REAR DOOR TRIM BOARD SUB-ASSEMBLY |
Using a screwdriver with its tip wrapped in protective tape, disengage the claw and open the cover.
Text in Illustration*1
| Protective Tape
|
Remove the 3 screws.
Disengage the 7 clips.
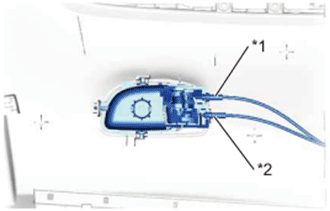
Disconnect the rear door lock remote control cable assembly and the rear door inside locking cable assembly and remove the rear door trim board.
Text in Illustration*1
| Rear Door Lock Remote Control Cable Assembly
|
*2
| Rear Door Inside Locking Cable Assembly
|
| 6. REMOVE REAR DOOR SERVICE HOLE COVER |
Remove the rear door service hole cover.
- HINT:
- Remove any tape remaining on the door side.
| 7. REMOVE REAR DOOR WINDOW DIVISION BAR SUB-ASSEMBLY |
Remove the 3 bolts and nut, and the rear door window division bar.
| 8. REMOVE REAR DOOR GLASS SUB-ASSEMBLY |
Slide the lower section of the rear door glass as indicated by the arrow as shown in the illustration.
Remove the rear door glass as indicated by the arrows in the order shown in the illustration.
- NOTICE:
- Do not damage the rear door glass.
| 9. REMOVE REAR DOOR GLASS RUN |
Remove the clip.
Disengage the 2 guides and remove the rear door glass run.
| 10. REMOVE REAR DOOR LOCK ASSEMBLY (w/ Power Door Lock) |
Disconnect the connector.
Using a T30 "TORX" wrench, remove the 3 screws.
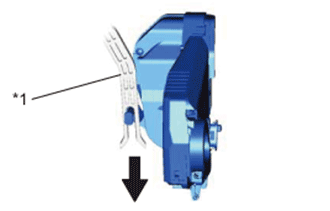
Slide the rear door lock downward, and remove the rear door lock from the release plate.
Text in Illustration*1
| Release Plate
|

| Slide Direction
|
Remove the door lock wire harness seal from the rear door lock.
| 11. REMOVE REAR DOOR LOCK ASSEMBLY (w/o Power Door Lock) |
Using a T30 "TORX" wrench, remove the 3 screws.
Slide the rear door lock downward, and remove the rear door lock from the release plate.
Text in Illustration*1
| Release Plate
|
| Slide Direction
|
Remove the door lock wire harness seal from the rear door lock.
| 12. REMOVE REAR DOOR LOCK REMOTE CONTROL CABLE ASSEMBLY |
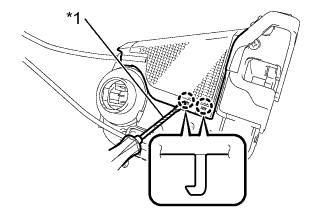
Using a screwdriver with its tip wrapped in protective tape, disengage the 2 claws.
Text in Illustration*1
| Protective Tape
|
Remove the rear door lock remote control cable from rear door lock.
| 13. REMOVE REAR DOOR INSIDE LOCKING CABLE ASSEMBLY |
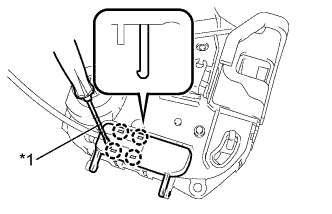
Using a screwdriver with its tip wrapped in protective tape, disengage the 4 claws.
Text in Illustration*1
| Protective Tape
|
Remove the rear door inside locking cable from rear door lock.