Front Door Lock (For Sedan) -- Removal |
- HINT:
- Use the same procedure for both the RH and LH sides.
- The procedure described below is for the LH side.
| 1. DISCONNECT CABLE FROM NEGATIVE BATTERY TERMINAL |
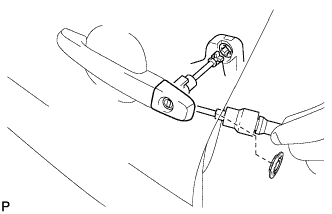
| 2. REMOVE FRONT DOOR WINDOW REGULATOR HANDLE ASSEMBLY (w/o Power Window) |
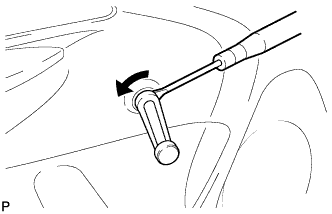 |
Insert a clip remover between the plate and door trim.
Turn the handle with the clip remover inserted, as shown in the illustration.
Remove the front door window regulator handle and clip.
Remove the window regulator handle plate.
| 3. REMOVE FRONT DOOR LOWER FRAME BRACKET GARNISH |
 |
Disengage the claw and clip and remove the front door lower frame bracket garnish.
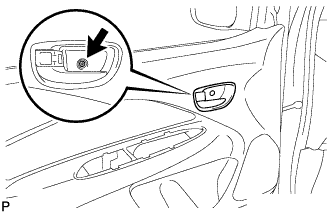
| 4. REMOVE FRONT ARMREST BASE UPPER PANEL |
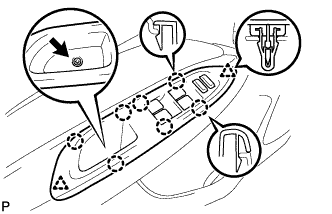 |
for Driver side with power window:
Remove the screw.
Disengage the 7 claws and 2 clips and remove the front armrest base upper panel.
Disconnect the connector.
for Front passenger side with power window:
Remove the screw.
Disengage the 7 claws and 2 clips and remove the front armrest base upper panel.
Disconnect the connector.
 |
w/o Power window:
Remove the screw.
Disengage the 5 claws and 2 clips and remove the front armrest base upper panel.
 |
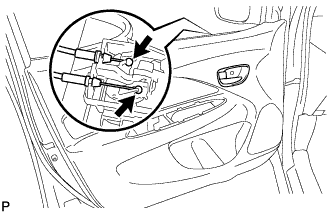
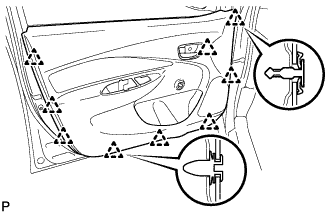
| 5. REMOVE FRONT DOOR TRIM BOARD SUB-ASSEMBLY |
w/ Power window:
Remove the screw.
Disengage the 9 clips.
Disconnect the front door lock remote control cable and front door inside locking cable and remove the front door trim board.

 |
w/o Power window:
Remove the screw.
Disengage the 9 clips.
Disconnect the front door lock remote control cable and front door inside locking cable and remove the front door trim board.

 |
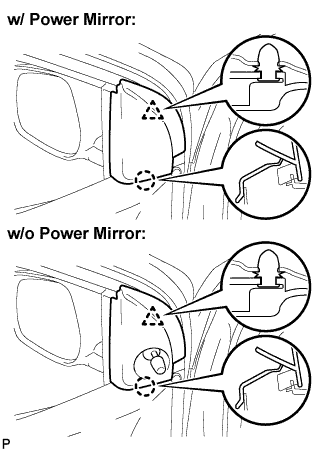
| 6. REMOVE OUTER REAR VIEW MIRROR |
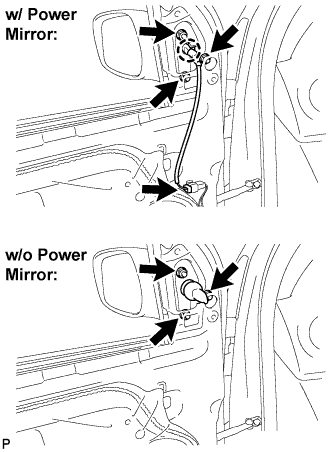 |
w/ Power mirror:
Disconnect the connector.
Remove the 3 nuts, disengage the claw and remove the outer rear view mirror.
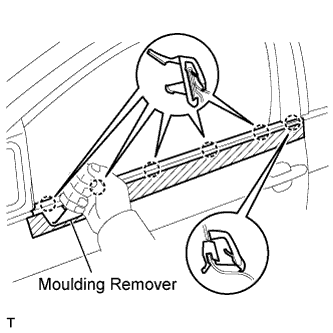
| 7. REMOVE FRONT DOOR BELT MOULDING |
Apply protective tape to the door panel in the periphery of the front door belt moulding.
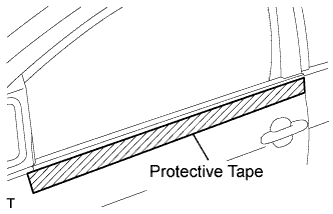 |
Using a moulding remover, disengage the 6 claws and remove the front door belt moulding.
 |
| 8. REMOVE FRONT DOOR TRIM BRACKET |
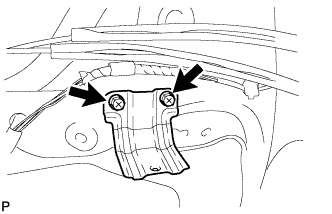 |
Remove the 2 screws and front door trim bracket.
| 9. REMOVE FRONT DOOR SERVICE HOLE COVER |
 |
Disconnect the connectors and clamps, then remove the front door service hole cover.
- NOTICE:
- Remove any tape remaining on the door side.
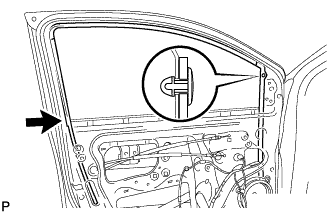
| 10. REMOVE FRONT DOOR GLASS SUB-ASSEMBLY |
w/ Power window:
Driver side:
Provisionally install the power window regulator master switch.Passenger side:
Provisionally install the power window regulator switch.
w/o Power window:
Provisionally install the front door window regulator handle.
Move the front door glass until the 2 bolts can be seen through the service holes.
 |
Remove the 2 bolts.
- NOTICE:
- Do not drop or damage the front door glass when removing the bolts.
Remove the front door glass in the direction indicated by the arrows in the illustration.
- NOTICE:
- Do not damage the glass.
 |
w/ Power window:
Driver side:
Remove the power window regulator master switch.Passenger side:
Remove the power window regulator switch.
w/o Power window:
Remove the front door window regulator handle.
| 11. REMOVE FRONT DOOR WINDOW REGULATOR SUB-ASSEMBLY |
 |
w/ Power window:
Disconnect the connector.
Loosen bolt A.
Remove the 5 bolts, then remove the front door window regulator.
- NOTICE:
- Do not drop or damage the window regulator when removing the bolts.
- HINT:
- Remove the window regulator through the service hole.
w/o Power window:
Loosen bolt A.
Remove the 5 bolts, then remove the front door window regulator.
- NOTICE:
- Do not drop or damage the window regulator when removing the bolts.
- HINT:
- Remove the window regulator through the service hole.
 |
| 12. REMOVE FRONT DOOR GLASS RUN |
 |
Disengage the clip, then remove the front door glass run.
| 13. REMOVE FRONT DOOR FRAME SUB-ASSEMBLY REAR LOWER |
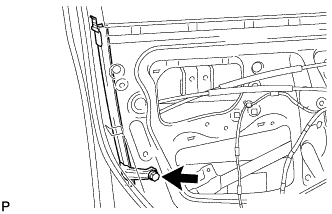 |
Remove the bolt, then remove the front door frame sub-assembly rear lower.
- NOTICE:
- Do not drop or damage the front door frame sub-assembly rear lower when removing the bolt.
- HINT:
- Remove the front door frame sub-assembly rear lower through the service hole.
| 14. REMOVE FRONT DOOR OUTSIDE HANDLE COVER |
 |
Remove the hole plug.
Using "Torx" socket wrench T30, loosen the screw and remove the cover with the door lock key cylinder installed.
| 15. REMOVE FRONT DOOR LOCK |
 |
Using "Torx" socket wrench T30, loosen the 3 screws.
- NOTICE:
- Do not drop or damage the front door lock when removing the screws.
Move the front door lock downward, remove the outside handle frame link and remove the front door lock.
- HINT:
- Remove the front door lock through the service hole.
Open the cover.
 |
Disconnect the front door lock remote control cable and the front door inside locking cable.
 |
Remove the door lock wire harness seal.