Front Brake (For Sedan) -- Installation |
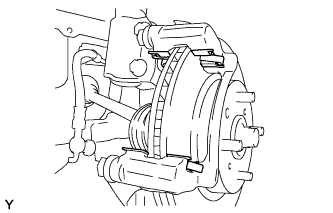
| 1. INSTALL FRONT DISC |
 |
Align the matchmarks of the disc and axle hub and install the disc.
- NOTICE:
- When replacing the disc, select the position that gives the minimum disc runout.
| 2. INSTALL FRONT DISC BRAKE CYLINDER MOUNTING |
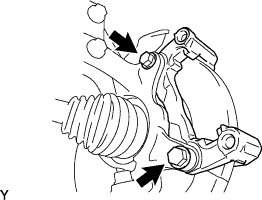 |
Install the disc brake cylinder mounting onto the steering knuckle with the 2 bolts.
- Torque:
- 107 N*m{1,089 kgf*cm, 79 ft.*lbf}
| 3. INSTALL NO. 1 BUSH DUST BOOT |
Apply lithium soap base glycol grease to 2 new dust boots.
- HINT:
- Apply at least 0.3 g (0.01 oz.) of lithium soap base glycol grease to each front disc brake bush dust boot.
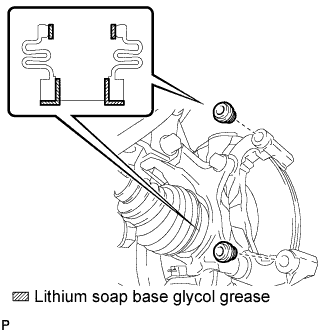 |
Install the 2 dust boots onto the disc brake cylinder mounting.
| 4. INSTALL FRONT DISC BRAKE CYLINDER SLIDE BUSH |
Apply lithium soap base glycol grease to the slide pins and a new slide bush, as shown in the illustration.
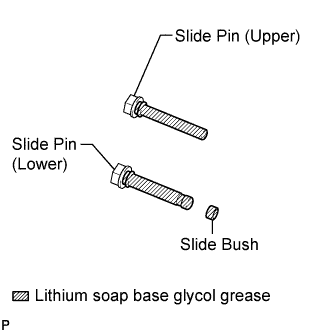 |
Install the slide bush onto the slide pin (lower).
| 5. INSTALL FRONT DISC BRAKE CYLINDER SLIDE PIN |
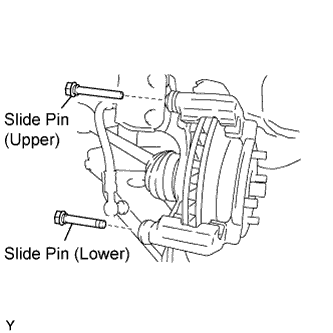 |
Install the slide pin (upper) and slide pin (lower) onto the cylinder mounting.
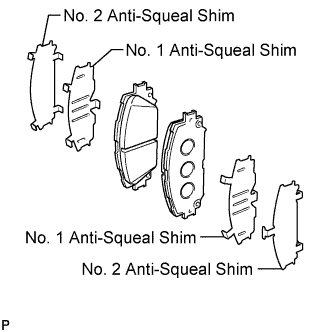
| 6. INSTALL FRONT ANTI SQUEAL SHIM KIT |
 |
Install the 4 disc brake pad support plates onto the disc brake cylinder mounting.
Install the indicator plates onto the upper side of the brake pad.
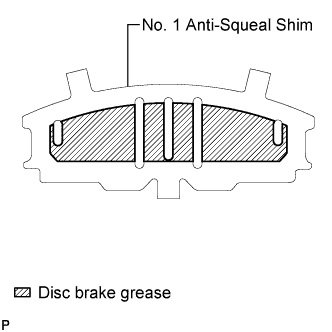
Apply disc brake grease to both sides of each No. 1 anti-squeal shim.
 |
Install the anti squeal shims onto each brake pad.
 |
| 7. INSTALL FRONT DISC BRAKE PAD KIT (PAD ONLY) |
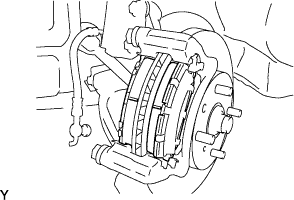 |
Install the 2 disc brake pads onto the disc brake cylinder mounting.
- NOTICE:
- There should be no oil or grease on the friction surfaces of the disc brake pads or the front disc.
| 8. INSTALL DISC BRAKE CYLINDER ASSEMBLY |
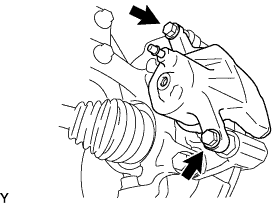 |
Install the disc brake cylinder onto the disc brake cylinder mounting with the 2 bolts.
- Torque:
- 34 N*m{347 kgf*cm, 25 ft.*lbf}
| 9. CONNECT FRONT FLEXIBLE HOSE |
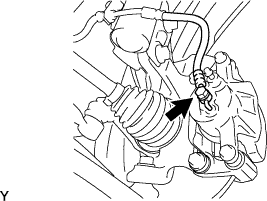 |
Connect the flexible hose with a new union bolt and a new gasket.
- Torque:
- 30 N*m{310 kgf*cm, 22 ft.*lbf}
- HINT:
- Install the flexible hose lock securely into the lock hole in the disc brake cylinder.
| 10. FILL RESERVOIR WITH BRAKE FLUID |
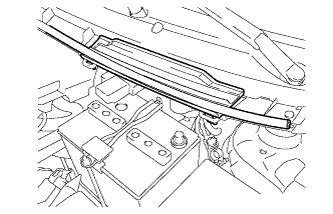 |
Disengage the 3 clips and separate the hood to cowl top seal.
Remove the cowl top ventilator louver.
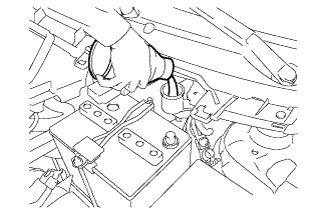
Set the brake fluid can upside down on the reservoir.
- Fluid:
- SAE J1703 or FMVSS No. 116 DOT3
 |
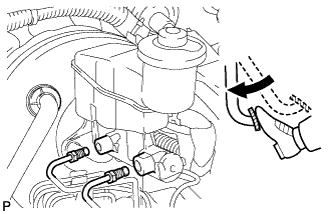
| 11. BLEED MASTER CYLINDER |
- HINT:
- If the master cylinder has been disassembled or if the reservoir becomes empty, bleed the air from the master cylinder.
Using a union nut wrench, disconnect the brake tubes from the master cylinder.
 |
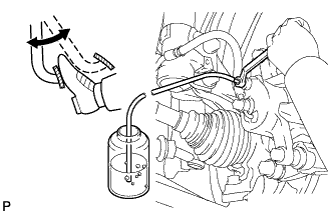
Slowly depress the brake pedal and hold it there (Step A).
 |
Block the outer holes with your fingers, and release the brake pedal (Step B).
 |
Repeat step A and B 3 or 4 times.
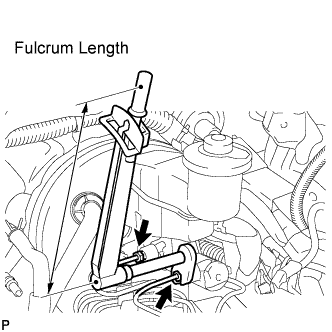
Using a union nut wrench, connect the brake tubes to the master cylinder.
- Torque:
- without union nut wrench:
- 15 N*m{155 kgf*cm, 11 ft.*lbf}
- with union nut wrench:
- 14 N*m{144 kgf*cm, 10 ft.*lbf}
- HINT:
- This torque value can be obtained by using a torque wrench with a fulcrum length of 300 mm (11.8 in.) and a union nut wrench with a fulcrum length of 22 mm (0.866 in.) (YARIS_NCP93 RM000000UYX0BYX.html).
- This torque value is effective when the union nut wrench is parallel to the torque wrench.
 |
| 12. BLEED BRAKE LINE |
 |
Connect the vinyl tube to the bleeder plug.
Depress the brake pedal several times, then loosen the bleeder plug with the pedal depressed (Step C).
At the point where the fluid stops coming out, tighten the bleeder plug, then release the brake pedal (Step D).
Repeat step C and D until all the air in the fluid is completely bled out.
Tighten the bleeder plug.
- Torque:
- 8.3 N*m{85 kgf*cm, 73 in.*lbf}
Repeat the above procedure to bleed the air out of the brake line for each wheel.
| 13. BLEED BRAKE ACTUATOR (w/ VSC) |
- NOTICE:
- After bleeding the air from the brake system, if the height or feel of the brake pedal cannot be obtained, perform air bleeding of the brake actuator with the Techstream by following the procedure below.
Depress the brake pedal more than 20 times with the engine off.
Connect the Techstream to the DLC3, and turn the ignition switch ON.
- NOTICE:
- Do not start the engine.
Select "Air Bleeding" on the Techstream.
- HINT:
- Refer to the tester operator's manual for further details.
Bleed the air out of the brake line when Step 1: Increase appears on the Techstream display.
- NOTICE:
- Bleed the air by following the steps displayed on the Techstream.
- Make sure that the master cylinder reservoir tank does not become empty.
Connect the vinyl tube to either one of the bleeder plugs.
Depress the brake pedal several times, then loosen the bleeder plug connected to the vinyl tube with the pedal depressed (Step E).
When fluid stops coming out, tighten the bleeder plug and release the brake pedal (Step F).
Repeat Steps E and F until all the air in the fluid is completely bled out.
Tighten the bleeder plug completely.
- Torque:
- Front brake:
- 8.3 N*m{85 kgf*cm, 73 in.*lbf}
- Torque:
- Rear brake:
- 8.5 N*m{87 kgf*cm, 75 in.*lbf}
Repeat the above procedure for each wheel to bleed the air out of the brake line.
Bleed the air out of the suction line when Step 2: Inhalation appears on the Techstream display.
- NOTICE:
- Bleed the air by following the steps displayed on the Techstream.
- Make sure that the master cylinder reservoir tank does not become empty.
Connect the vinyl tube to the bleeder plug at the right front wheel or the right rear wheel and loosen the bleeder plug.
Operate the brake actuator to bleed the air using the Techstream (Step G).
- NOTICE:
- Release the brake pedal at this time.
- HINT:
- This operation stops automatically after 4 seconds.
Check if the operation has stopped by referring to the Techstream display and tighten the bleeder plug (Step H).
Repeat Steps G and H until all the air in the fluid is completely bled out.
Tighten the bleeder plug.
- Torque:
- Front brake:
- 8.3 N*m{85 kgf*cm, 73 in.*lbf}
- Torque:
- Rear brake:
- 8.5 N*m{87 kgf*cm, 75 in.*lbf}
Repeat the above procedure for the other wheels to bleed the air out of the brake line.
Bleed the air out of the pressure reduction line when Step 3: Decrease appears on the Techstream display.
- NOTICE:
- Bleed the air by following the steps displayed on the Techstream.
- Make sure that the master cylinder reservoir tank does not become empty.
Connect a vinyl tube to either one of the bleeder plugs.
Loosen the bleeder plug (Step I).
Using the Techstream, operate the brake actuator assembly, completely depress the brake pedal and hold it there (Step J).
- NOTICE:
- During this procedure, the pedal will feel heavy, but completely depress it so that the brake fluid comes out of the bleeder plug.
- Hold the brake pedal depressed. Do not depress and release the pedal repeatedly.
- HINT:
- The operation stops automatically after 4 seconds. When performing this procedure continuously, set an interval of at least 20 seconds.
- When the operation is complete, the brake pedal goes down slightly. This is a normal phenomenon caused when the solenoid opens.
Tighten the bleeder plug, then release the brake pedal (Step K).
Repeat Steps I to K until all the air in the fluid is completely bled out.
Tighten the bleeder plug.
- Torque:
- Front brake:
- 8.3 N*m{85 kgf*cm, 73 in.*lbf}
- Torque:
- Rear brake:
- 8.5 N*m{87 kgf*cm, 75 in.*lbf}
Repeat the above procedure for the other wheels to bleed the air out of the brake line.
Bleed the air out of the brake line again when Step 4: Increase appears on the Techstream display.
- NOTICE:
- Bleed the air by following the steps displayed on the Techstream.
- Make sure that the master cylinder reservoir tank does not become empty.
Connect the vinyl tube to either one of the bleeder plugs.
Depress the brake pedal several times, then loosen the bleeder plug connected to the vinyl tube with the pedal depressed (Step L).
When fluid stops coming out, tighten the bleeder plug, then release the brake pedal (Step M).
Repeat Steps L and M until all the air in the fluid is completely bled out.
Tighten the bleeder plug.
- Torque:
- Front brake:
- 8.3 N*m{85 kgf*cm, 73 in.*lbf}
- Torque:
- Rear brake:
- 8.5 N*m{87 kgf*cm, 75 in.*lbf}
Repeat the above procedure for the other wheels to bleed the air out of the brake line.
Make sure that the air bleeding is complete by referring to the Techstream display and turn off the Techstream.
Disconnect the Techstream from the DLC3.
Turn the ignition switch OFF.
| 14. CHECK FLUID LEVEL IN RESERVOIR |
Check the fluid level and add fluid if necessary.
- Fluid:
- SAE J1703 or FMVSS No. 116 DOT3
| 15. CHECK FOR BRAKE FLUID LEAKAGE |
| 16. INSTALL FRONT WHEEL |
- Torque:
- 103 N*m{1,050 kgf*cm, 76 ft.*lbf}