Fuel Injector (For Hatchback) Removal
DISCHARGE FUEL SYSTEM PRESSURE
REMOVE NO. 2 CYLINDER HEAD COVER
REMOVE NO. 1 IGNITION COIL
REMOVE VENTILATION HOSE
REMOVE FUEL VAPOR FEED HOSE ASSEMBLY
REMOVE CYLINDER HEAD COVER SUB-ASSEMBLY
REMOVE FUEL TUBE SUB-ASSEMBLY
REMOVE FUEL DELIVERY PIPE SUB-ASSEMBLY
REMOVE NO. 1 DELIVERY PIPE SPACER
REMOVE INJECTOR VIBRATION INSULATOR
REMOVE FUEL INJECTOR ASSEMBLY
Fuel Injector (For Hatchback) -- Removal |
| 1. DISCHARGE FUEL SYSTEM PRESSURE |
(YARIS_NCP93 RM000001GNO017X.html)
| 2. REMOVE NO. 2 CYLINDER HEAD COVER |
Remove the 4 nuts and No. 2 cylinder head cover.
| 3. REMOVE NO. 1 IGNITION COIL |
Disconnect the 4 No. 1 ignition coil connectors.
Remove the 4 bolts and the 4 No. 1 ignition coils.
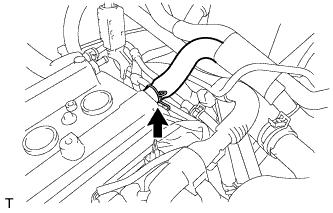
| 4. REMOVE VENTILATION HOSE |
Disconnect the ventilation hose.
| 5. REMOVE FUEL VAPOR FEED HOSE ASSEMBLY |
Disconnect the fuel vapor feed hose assembly.
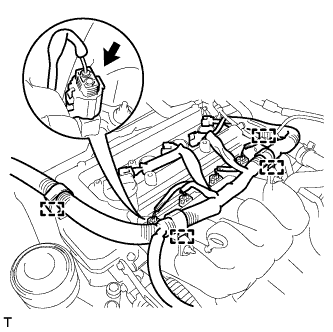
| 6. REMOVE CYLINDER HEAD COVER SUB-ASSEMBLY |
Disconnect the fuel injector connectors.
Disconnect the connector and 4 wire harness clamps shown in the illustration and disconnect the engine wire harness.
Remove the bolt and the wire harness bracket.
Remove the 9 bolts, 2 nuts and 2 seal washers and then remove the cylinder head cover sub-assembly.
| 7. REMOVE FUEL TUBE SUB-ASSEMBLY |
Remove the EFI fuel pipe clamp.
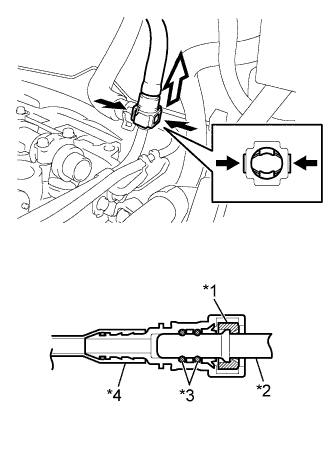
Pinch the retainer of the fuel tube connector, then pull the fuel tube connector to disconnect the fuel tube out of the fuel delivery pipe sub-assembly.
Text in Illustration*1
| Retainer
|
*2
| Fuel Pipe
|
*3
| O-Ring
|
*4
| Nylon Tube
|

| Pinch
|

| Pull
|
- NOTICE:
- Remove any dirt and foreign matter from the fuel tube connector before performing this work.
- Do not allow any scratches or foreign matter on the parts when disconnecting, as the fuel tube connector has the O-ring that seals the pipe.
- Perform this work by hand. Do not use any tools.
- Do not forcibly bend, twist or turn the nylon tube.
- Protect the disconnected parts by covering them with a vinyl bag after disconnecting the fuel tube.
- If the fuel tube connector and pipe are stuck, push and pull to release them.
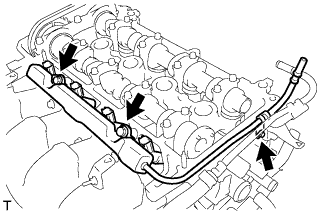
| 8. REMOVE FUEL DELIVERY PIPE SUB-ASSEMBLY |
Remove the 3 bolts and the fuel delivery pipe sub-assembly with 4 fuel injectors.
- NOTICE:
- Do not drop the fuel injectors when removing the fuel delivery pipe sub-assembly.
| 9. REMOVE NO. 1 DELIVERY PIPE SPACER |
Remove the 2 No. 1 delivery pipe spacers.
| 10. REMOVE INJECTOR VIBRATION INSULATOR |
Remove the 4 injector vibration insulators.
| 11. REMOVE FUEL INJECTOR ASSEMBLY |
Pull the 4 fuel injector assemblies out of the fuel delivery pipe sub-assembly.
- NOTICE:
- If a component has been dropped or subjected to a strong impact, replace it.
Text in Illustration
| Pull
|