Front Crankshaft Oil Seal (For Hatchback) Removal
REMOVE FRONT WHEEL RH
REMOVE ENGINE UNDER COVER RH
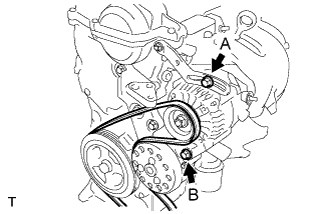
REMOVE FAN AND GENERATOR V BELT
REMOVE ENGINE MOUNTING INSULATOR SUB-ASSEMBLY RH
REMOVE CRANKSHAFT DAMPER SUB-ASSEMBLY
REMOVE OIL PUMP SEAL
Front Crankshaft Oil Seal (For Hatchback) -- Removal |
| 2. REMOVE ENGINE UNDER COVER RH |
| 3. REMOVE FAN AND GENERATOR V BELT |
Loosen bolts A and B.
Release the fan and generator V belt tension and remove the fan and generator V belt.
| 4. REMOVE ENGINE MOUNTING INSULATOR SUB-ASSEMBLY RH |
Place a wooden block on a jack underneath the engine.
Remove the 4 bolts, 2 nuts and the engine mounting insulator sub-assembly RH.
| 5. REMOVE CRANKSHAFT DAMPER SUB-ASSEMBLY |
Set the No. 1 cylinder to TDC/compression.
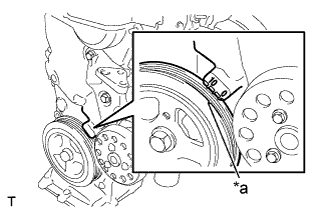
Turn the crankshaft damper sub-assembly, and align its timing notch with timing mark "0" of the oil pump.
Text in Illustration*a
| Timing Notch
|
Check that the timing marks on the camshaft timing sprocket and the camshaft timing gear are all facing upward as shown in the illustration.
Text in Illustration*a
| Timing Marks
|
If not, turn the crankshaft 1 complete revolution (360°) and align the marks as above.
Using SST, loosen the bolt while holding the crankshaft damper sub-assembly.
Text in Illustration*a
| Hold
|
*b
| Loosen
|
- SST
- 09213-58014(90201-08131,91111-50845)
09330-00021(09330-00030)
- NOTICE:
- Check the SST installation positions when installing them, to avoid the SST fixing bolts from coming into contact with the oil pump assembly.
Remove the SSTs and the bolt.
Remove the crankshaft damper sub-assembly.
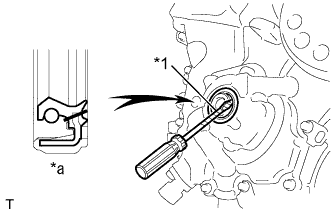
Using a knife, cut off the oil seal lip.
Text in Illustration*1
| Protective Tape
|
*a
| Cut Position
|
Using a screwdriver with its tip wrapped with protective tape, pry out the oil seal.
- NOTICE:
- After removing, check the crankshaft for damage. If damaged, smooth the surface with 400-grit sandpaper.


