Audio And Visual System (W/ Multi-Display Without Dvd Player) -- Operation Check |
| CHECK PANEL & STEERING SWITCH |
- HINT:
- The radio and display receiver assembly panel switches and steering switches are checked in the following procedure.
- Illustrations may differ from the actual vehicle screen depending on the device settings and options. Therefore, some detailed areas may not be shown exactly the same as on the actual vehicle screen.
Enter diagnostic mode (COROLLA_ZRE142 RM0000011BU0KAX.html).
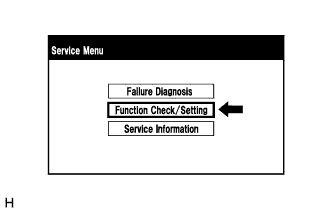
Select "Function Check/Setting" from the "Service Menu" screen.
Select "Panel & Steering Switch" from the "Function Check/Setting I" screen.
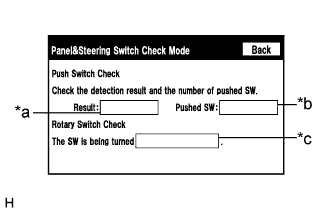
Panel & Steering Switch Check Mode
Screen Description Display Content *a: Switch condition "Pushed" is displayed when any switch is pushed *b: Number of switches pushed - Number of switches pushed at once is displayed
- If more than 3 switches are pushed at once, "More than 3" is displayed
*c: Rotary switch direction Direction of rotary switch is displayed Operate each switch and check that the switch conditions are correctly displayed.
- NOTICE:
- When the "SETUP" switch is pressed and held for 3 seconds or more, diagnostic mode will be canceled.
- Number of switches pushed at once is displayed
 |
 |
 |
| CHECK TOUCH SWITCH |
- HINT:
- The touch switches on the screen are checked in the following procedure.
- Illustrations may differ from the actual vehicle screen depending on the device settings and options. Therefore, some detailed areas may not be shown exactly the same as on the actual vehicle screen.
Enter diagnostic mode (COROLLA_ZRE142 RM0000011BU0KAX.html).
Select "Function Check/Setting" from the "Service Menu" screen.
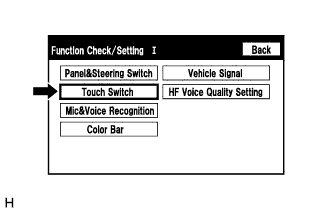
Select "Touch Switch" from the "Function Check/Setting I" screen.
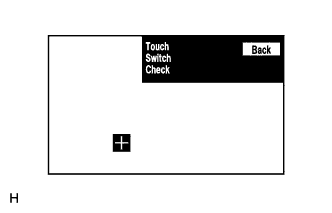
Touch Switch Check
Touch the display anywhere in the open area to perform the check when the "Touch Switch Check" screen is displayed.
- HINT:
- A "+" mark is displayed where the display is touched.
- The "+" mark remains on the display even after the finger is removed.
|
 |
 |
| CHECK MICROPHONE & VOICE RECOGNITION |
- HINT:
- The microphone and microphone input level are checked in the following procedure.
- Illustrations may differ from the actual vehicle screen depending on the device settings and options. Therefore, some detailed areas may not be shown exactly the same as on the actual vehicle screen.
Enter diagnostic mode (COROLLA_ZRE142 RM0000011BU0KAX.html).
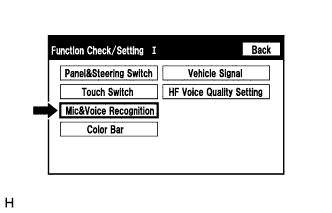
Select "Function Check/Setting" from the "Service Menu" screen.
Select "Mic & Voice Recognition" from the "Function Check/Setting I" screen.
Microphone & Voice Recognition Check
Screen Description Display Content *a: Microphone input level meter Monitors the microphone input level every 0.1 seconds and displays the results in 8 different levels. When speaking into the microphone, check that the microphone input level meter changes according to the input level.
- HINT:
- The microphone is active at all times when this screen is displayed.
|
 |
 |
| CHECK COLOR BAR |
- HINT:
- The display color on the screen is checked in the following procedure.
- Illustrations may differ from the actual vehicle screen depending on the device settings and options. Therefore, some detailed areas may not be shown exactly the same as on the actual vehicle screen.
Enter diagnostic mode (COROLLA_ZRE142 RM0000011BU0KAX.html).
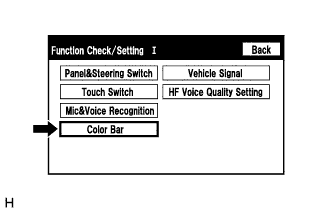
Select "Function Check/Setting" from the "Service Menu" screen.
Select "Color Bar" from the "Function Check/Setting I" screen.
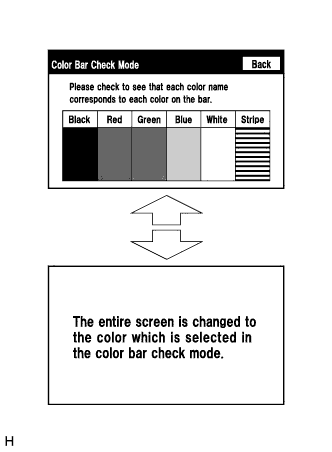
Color Bar Check Mode
Select a color bar from the "Color Bar Check Mode" screen.
Check the display color.
- HINT:
- The entire screen turns to the color or stripe selected.
- Touching the display will return to the "Color Bar Check Mode" screen.
|
 |
 |
| CHECK VEHICLE SIGNAL |
- HINT:
- Vehicle signals received by the radio and display receiver assembly are checked in the following procedure.
- Illustrations may differ from the actual vehicle screen depending on the device settings and options. Therefore, some detailed areas may not be shown exactly the same as on the actual vehicle screen.
Enter diagnostic mode (COROLLA_ZRE142 RM0000011BU0KAX.html).
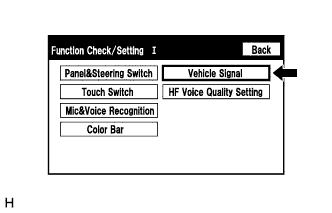
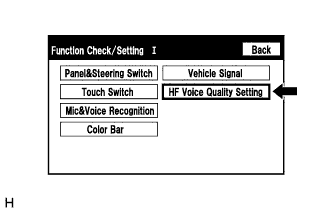
Select "Function Check/Setting" from the "Service Menu" screen.
Select "Vehicle Signal" from the "Function Check/Setting I" screen.
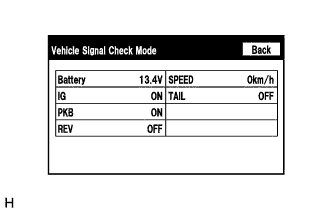
Vehicle Signal Check Mode
Screen Description Display Content Battery Battery voltage is displayed. IG Ignition switch ON/OFF state is displayed. PKB Parking brake ON/OFF state is displayed. REV Reverse signal ON/OFF state is displayed. SPEED Vehicle speed is displayed in km/h. TAIL Tail signal (Light control switch) ON/OFF state is displayed. - HINT:
- Only items sending vehicle signals will be displayed.
- This screen displays vehicle signals input to the radio and display receiver assembly.
- This screen is updated once per second when vehicle input signals change.
When the "Vehicle Signal Check Mode" screen is displayed, check all the vehicle signal conditions.
|
 |
 |
| CHECK HANDS-FREE VOICE QUALITY AND VOLUME SETTING |
- HINT:
- The hands-free volume of a "Bluetooth" compatible phone can be adjusted using the following procedure.
- Illustrations may differ from the actual vehicle screen depending on the device settings and options. Therefore, some detailed areas may not be shown exactly the same as on the actual vehicle screen.
Enter diagnostic mode (COROLLA_ZRE142 RM0000011BU0KAX.html).
Select "Function Check/Setting" from the "Service Menu" screen.
Select "HF Voice Quality Setting" from the "Function Check/Setting I" screen.
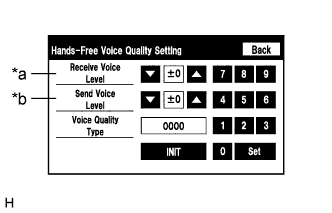
Hands-Free Voice Quality Setting (Receive/Send Voice Level adjustment)
Screen Description Display Content *a: Receive voice level adjustment Setting for the voice level received from "Bluetooth" compatible phones. *b: Send voice level adjustment Setting for the voice level sent from "Bluetooth" compatible phones. - NOTICE:
- Sound quality may deteriorate when the receive voice or send voice level is changed more than necessary. For this reason, check that the received voice or sent voice quality is still acceptable after changing this setting.
If the voice level is low, press the up button, and if the voice level is loud, press the down button.
- HINT:
- Each voice level setting is reflected when going back to the normal mode.
- The voice level adjustment ranges from -5 to +5 (for Pioneer, Panasonic or w/o HD Radio for FUJITSU TEN).
- The "Receive Voice Level" adjustment ranges from -5 to 0 (w/ HD Radio for FUJITSU TEN).
- The "Send Voice Level" adjustment ranges from -5 to +2 (w/ HD Radio for FUJITSU TEN).
- The initial level is "0".
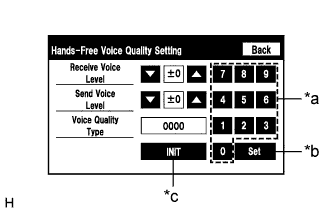
Hands-Free Voice Quality (Voice Quality Type adjustment)
Text in Illustration *a Numeric keypad *b Setting button *c Reset button If necessary, refer to the table below to adjust the voice quality type with the numeric keypad.
When adjusting the settings, use the number pad on the screen to input the voice quality type according to the table.
Setting Parameter Target Phenomenon Voice Quality Type (FUJITSU TEN) Voice Quality Type (Panasonic) Voice Quality Type (Pioneer) Positive Effect of Changing Voice Quality Negative Effect of Changing Voice Quality Echo The other party hears a lot of echo when speaking to you. 1000
20000001 0001
0002
0003
0004
0005The amount of echo the other party hears of their own voice is reduced. When both parties speak at the same time, your voice suddenly drops in volume, cuts out etc. Half Duplex When both parties speak at the same time, your voice suddenly drops in volume, cuts out etc. 0100
02000002 0010
0020
0030
0040
0050When both parties speak at the same time, the phenomenon by which the other party's voice suddenly drops in volume, cuts out etc. reduces. The amount of echo the other party hears of their own voice increases. Noise The other party hears a lot of vehicle noise etc. when listening to your voice. 0010
0020- 0100
0200
0300
0400
0500The amount of vehicle noise etc. the other party hears when listening to your voice reduces. The quality of your voice, that the other party hears, reduces. Voice Quality The quality of your voice, that the other party hears, is low. 0001
00020003 1000
2000
3000
4000
5000The quality of your voice, that the other party hears, increases. The amount of noise etc. the other party hears when listening to your voice increases. - HINT:
- Refer to the "Unit Version Information" screen to confirm radio and display receiver assembly manufacturer information.
- The type of adjustments that can be made using voice quality type adjustment only adjust the sound quality of your voice that the other party hears. It cannot adjust the sound quality of the other party's voice that you hear.
- The default value is "0000".
- Settings will be applied when the normal screen is returned to.
- When multiple setting values are available, the higher the setting value, the bigger the effect. However, as the positive effects increase, so do the negative effects.
- If voice quality type values that are not in the table are input, the setting will not be applied and a positive effect may not be gained.
- If the quality of phone calls decreases due to the changed settings, return the settings to "0000" by pressing the "INIT" switch.
|
 |
 |
 |
| CHECK UNIT VERSION INFORMATION |
- HINT:
- Illustrations may differ from the actual vehicle screen depending on the device settings and options. Therefore, some detailed areas may not be shown exactly the same as on the actual vehicle screen.
Enter diagnostic mode (Link).
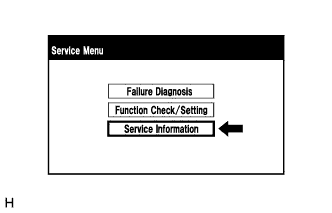
Select "Service Information" from the "Service Menu" screen.
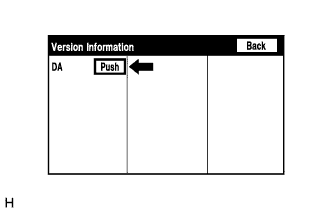
Select "Version Information" from the "Service Information" screen.
Press the "Push" switch.
Unit Version Information
Screen Description Display Content *a: Device name Target device *b: Manufacturer name Manufacturer of the ECU (target device) *c: Component name Component name of the ECU (target device) *d: Version Version of the ECU (target device) - HINT:
- Depending on the manufacturer, some component names and versions will be displayed differently.
 |
 |
 |
 |