INSTALL AIR CONDITIONING CONTROL ASSEMBLY (w/o Radio Receiver)
INSTALL AIR CONDITIONING CONTROL ASSEMBLY (w/ Radio Receiver)
INSTALL RADIO TUNER OPENING COVER WITH HEATER CONTROL PANEL ASSEMBLY (w/o Radio Receiver)
INSTALL RADIO RECEIVER WITH HEATER CONTROL PANEL ASSEMBLY (w/ Radio Receiver)
INSTALL LOWER INSTRUMENT CLUSTER FINISH PANEL CENTER SUB-ASSEMBLY
INSTALL UPPER CONSOLE REAR PANEL SUB-ASSEMBLY (for Automatic Transaxle)
INSTALL UPPER CONSOLE REAR PANEL SUB-ASSEMBLY (for Manual Transaxle)
INSTALL FLOOR SHIFT POSITION INDICATOR HOUSING SUB-ASSEMBLY (for Automatic Transaxle)
INSTALL SHIFT LEVER KNOB SUB-ASSEMBLY (for Automatic Transaxle)
INSTALL SHIFT LEVER KNOB SUB-ASSEMBLY (for Manual Transaxle)
Air Conditioning Control Assembly -- Installation |
| 1. INSTALL AIR CONDITIONING CONTROL ASSEMBLY (w/o Radio Receiver) |
Install the air conditioning control assembly as shown in the illustration.
 |
| 2. INSTALL AIR CONDITIONING CONTROL ASSEMBLY (w/ Radio Receiver) |
Install the air conditioning control assembly as shown in the illustration.
 |
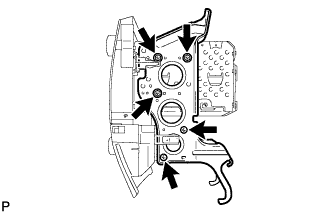
| 3. INSTALL RADIO NO. 2 BRACKET (w/o Radio Receiver) |
Install the radio No. 2 bracket with the 3 bolts.
 |
| 4. INSTALL RADIO NO. 2 BRACKET (w/ Radio Receiver) |
Install the radio No. 2 bracket with the 5 bolts.
 |
| 5. REMOVE RADIO NO. 1 BRACKET (w/o Radio Receiver) |
Install the radio No. 1 bracket with the 3 bolts.
 |
| 6. INSTALL RADIO NO. 1 BRACKET (w/ Radio Receiver) |
Install the radio No. 1 bracket with the 5 bolts.
 |
| 7. INSTALL RADIO TUNER OPENING COVER WITH HEATER CONTROL PANEL ASSEMBLY (w/o Radio Receiver) |
Connect the connector.
Engage the 6 clips.
 |
Install the radio tuner opening cover with heater control panel assembly with the 4 bolts <N>.
| 8. INSTALL RADIO RECEIVER WITH HEATER CONTROL PANEL ASSEMBLY (w/ Radio Receiver) |
Connect each connector.
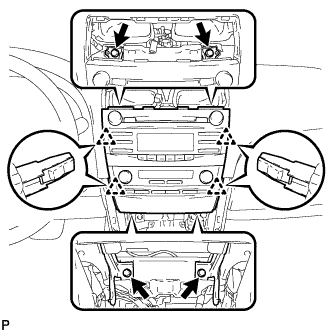 |
Engage the 4 clips.
Install the radio receiver with heater control panel assembly with the 4 bolts.
| 9. INSTALL INSTRUMENT PANEL NO. 2 REGISTER ASSEMBLY |
Connect the connector.
Engage the 7 clips and install the instrument panel No. 2 register assembly.
 |
| 10. INSTALL LOWER INSTRUMENT CLUSTER FINISH PANEL CENTER SUB-ASSEMBLY |
Connect each connector.
Engage the 2 claws and 2 clips.
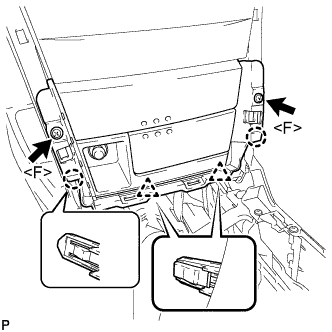 |
Install the lower instrument cluster finish panel center sub-assembly with the 2 screws <F>.
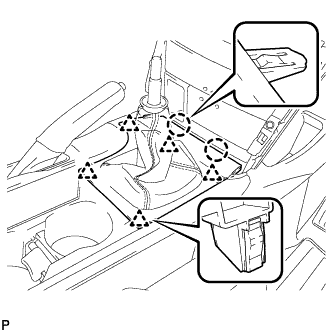
| 11. INSTALL UPPER CONSOLE REAR PANEL SUB-ASSEMBLY (for Automatic Transaxle) |
Connect the connector and engage the clamp.
 |
Engage the 3 claws and 5 clips to install the upper console rear panel sub-assembly.
| 12. INSTALL UPPER CONSOLE REAR PANEL SUB-ASSEMBLY (for Manual Transaxle) |
Engage the 3 claws and 5 clips to install the upper console rear panel sub-assembly.
 |
| 13. INSTALL FLOOR SHIFT POSITION INDICATOR HOUSING SUB-ASSEMBLY (for Automatic Transaxle) |
with Seat Heater System:
Connect each connector.
Engage the 6 claws and the 3 clips to install the floor shift position indicator housing sub-assembly.
 |
| 14. INSTALL UPPER CONSOLE PANEL (for Manual Transaxle) |
Engage the 2 claws and the 5 clips to install the upper console panel as shown in the illustration.
 |
| 15. INSTALL NO. 2 INSTRUMENT CLUSTER FINISH PANEL GARNISH |
Engage the 2 clips and install the No. 2 instrument cluster finish panel garnish.
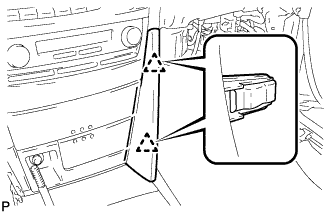 |
| 16. INSTALL NO. 1 INSTRUMENT CLUSTER FINISH PANEL GARNISH |
Engage the 2 clips and install the No. 1 instrument cluster finish panel garnish.
 |
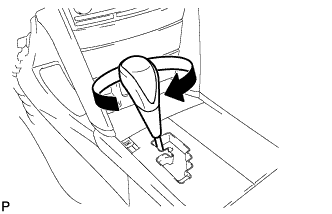
| 17. INSTALL SHIFT LEVER KNOB SUB-ASSEMBLY (for Automatic Transaxle) |
Install the shift lever knob sub-assembly.
 |
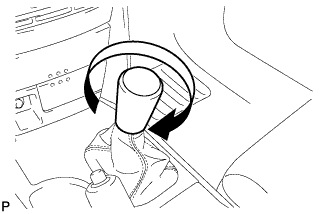
| 18. INSTALL SHIFT LEVER KNOB SUB-ASSEMBLY (for Manual Transaxle) |
Install the shift lever knob sub-assembly.
 |