Front Seat Inner Belt Assembly -- Installation |
- HINT:
- A bolt without a torque specification is shown in the standard bolt chart (RAV4_ACA30 RM00000118W06GX.html).
| 1. INSTALL FRONT SEAT INNER BELT ASSEMBLY (for Power Seat) |
 |
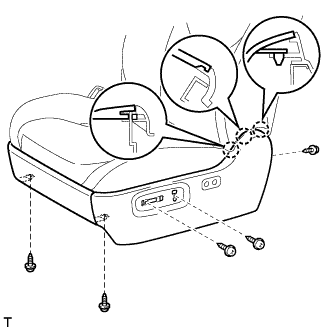
Install the front seat inner belt with the nut.
- Torque:
- 42 N*m{428 kgf*cm, 31 ft.*lbf}
- NOTICE:
- Do not overlap the anchor part of the seat belt and protruding part of the seat adjuster.
for Driver Seat:
Attach the 2 clamps and connect the 2 connectors.
for Passenger Seat:
Attach the 2 clamps and connect the 2 connectors.
| 2. INSTALL FRONT SEAT INNER BELT ASSEMBLY (for Manual Seat) |
|
Install the front seat inner belt with the nut.
- Torque:
- 42 N*m{428 kgf*cm, 31 ft.*lbf}
- NOTICE:
- Do not overlap the anchor part of the seat belt and protruding part of the seat adjuster.
for Driver Seat:
Attach the 2 clamps and connect the 2 connectors.
for Passenger Seat:
Attach the 3 clamps and connect the 2 connectors.
| 3. INSTALL FRONT SEAT CUSHION INNER SHIELD LH (for Power Seat) |
Install the front No. 1 seat cushion inner shield to the cushion shield.
Attach the claw to install the front No. 1 seat cushion inner shield.
Install the screw.
 |
Connect the connector to the front power seat lumbar switch.
Attach the 3 claws and install the cushion shield (with front No. 1 seat cushion inner shield) to the front seat frame assembly (w/ adjuster).
 |
Install the 5 screws.
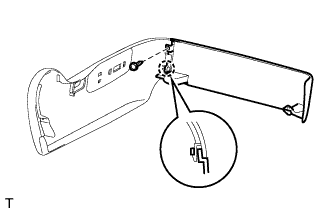
Connect the rubber band of the front seatback board to the front seat frame assembly (w/ adjuster).
 |
| 4. INSTALL FRONT SEAT CUSHION INNER SHIELD LH (for Manual Seat) |
Attach the 3 claws to install the cushion shield.
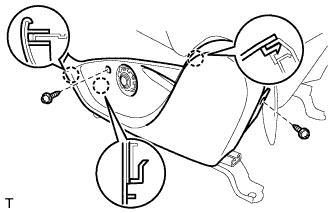 |
Install the 2 screws.
Connect the rubber band of the front seatback board or front seatback cover to the front seat frame (w/ adjuster).
|
| 5. INSTALL FRONT SEAT ASSEMBLY (for Power Seat) |
Place the seat in the cabin.
- NOTICE:
- Be careful not to damage the vehicle body.
Connect the connectors under the seat.
Connect the cable to the negative (-) battery terminal.
Operate the power seat switch knob and move the seat to the rearmost position.
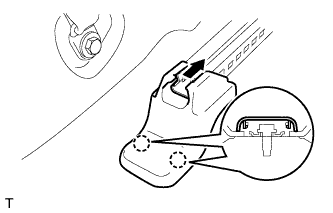
 |
Install the 2 bolts to the front side of the seat.
- Torque:
- 37 N*m{377 kgf*cm, 27 ft.*lbf}
- HINT:
- Tighten the 2 bolts in the order indicated in the illustration.
Operate the power seat switch knob and move the seat to the foremost position.
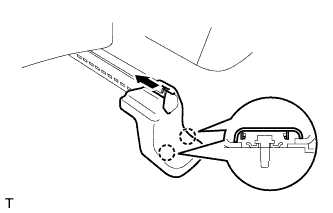
 |
Install the 2 bolts to the rear side of the seat.
- Torque:
- 37 N*m{377 kgf*cm, 27 ft.*lbf}
- HINT:
- Tighten the 2 bolts in the order indicated in the illustration.
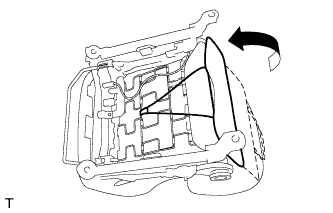
Install the front seat track bracket outer cover in the direction indicated by the arrow in the illustration and attach the 2 claws.
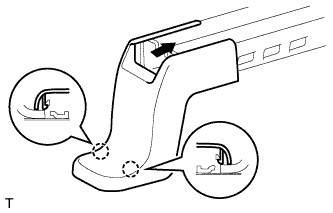 |
Install the front seat track bracket inner cover in the direction indicated by the arrow in the illustration and attach the 2 claws.
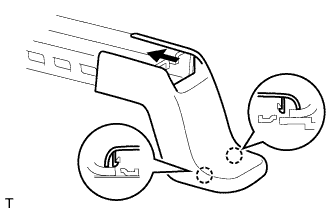 |
| 6. INSTALL FRONT SEAT ASSEMBLY (for Manual Seat) |
Place the seat in the cabin.
- NOTICE:
- Be careful not to damage the vehicle body.
Connect the connector under the seat.
Lift up the seat track adjusting handle and move the seat to the rearmost position.
Install the 2 bolts to the front side of the seat.
- Torque:
- 37 N*m{377 kgf*cm, 27 ft.*lbf}
- HINT:
- Tighten the bolts in the order indicated in the illustration.
 |
Lift up the seat track adjusting handle and move the seat to the foremost position.
Install the 2 bolts to the rear side of the seat.
- Torque:
- 37 N*m{377 kgf*cm, 27 ft.*lbf}
- HINT:
- Tighten the bolts in the order indicated in the illustration.
 |
| 7. INSTALL SEAT TRACK BRACKET COVER OUTER FRONT LH |
Install the outer cover in the direction indicated by the arrow in the illustration and attach the 2 claws.
 |
| 8. INSTALL SEAT TRACK BRACKET COVER INNER FRONT LH |
Install the inner cover in the direction indicated by the arrow in the illustration and attach the 2 claws.
 |
| 9. INSTALL SEAT TRACK BRACKET COVER INNER FRONT RH |
Use the same procedures described for the LH side.
| 10. INSTALL SEAT TRACK BRACKET COVER OUTER FRONT RH |
Use the same procedures described for the LH side.
| 11. CONNECT CABLE TO NEGATIVE BATTERY TERMINAL |