Engine Unit -- Replacement |
| 1. REPLACE TIMING CHAIN COVER OIL SEAL |
- HINT:
- There are 2 methods to replace the oil seal.
If the timing chain cover is removed from the cylinder block:
Using a screwdriver and hammer, tap out the oil seal.
Apply multi-purpose grease to the lip of a new oil seal.
- NOTICE:
- Keep the lip free of foreign objects.
Using SST and a hammer, tap in the new oil seal until its surface is flush with the timing chain cover edge.
- SST
- 09223-22010
- NOTICE:
- Do not tap the oil seal at an angle.


If the timing chain cover oil seal is installed to the cylinder block:
Remove fan and generator V belt (RAV4_ACA30 RM000001R3F00FX.html).
Remove the crankshaft pulley (RAV4_ACA30 RM000001R3L00CX_01_0018.html).
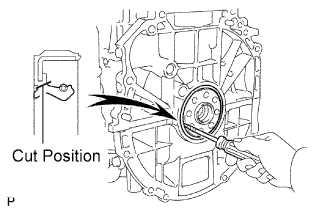
Using a knife, cut off the lip of the oil seal.
Using a screwdriver with its tip wrapped with tape, pry out the oil seal.
- NOTICE:
- After removing, check the crankshaft for damage. If damaged, smooth the surface with 400-grit sandpaper.
Apply multi-purpose grease to the lip of a new oil seal.
- NOTICE:
- Keep the lip free of foreign objects.
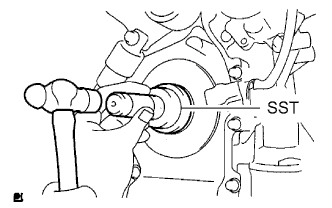
Using SST and a hammer, tap in the new oil seal until its surface is flush with the timing chain cover edge.
- SST
- 09223-22010
- NOTICE:
- Do not tap the oil seal at an angle.
Install the crankshaft pulley (RAV4_ACA30 RM000001AA900GX_01_0011.html).
Install the fan and generator V belt (RAV4_ACA30 RM000001R3D00HX.html).

| 2. REPLACE ENGINE REAR OIL SEAL |
Using a knife, cut off the lip of the oil seal.
 |
Using a screwdriver with its tip wrapped with tape, pry out the oil seal.
- NOTICE:
- After removing, check the crankshaft for damage. If damaged, smooth the surface with 400-grit sandpaper.
Apply multi-purpose grease to the lip of a new oil seal.
- NOTICE:
- Keep the lip free of foreign objects.
Using SST and a hammer, tap in the new oil seal until its surface is flush with the rear oil seal retainer edge.
- SST
- 09223-15030
09950-70010(09951-07100)
- NOTICE:
- Wipe any extra grease off the crankshaft.
- Do not tap the oil seal at an angle.
 |
| 3. REPLACE STUD BOLT (for Cylinder Block) |
- NOTICE:
- If the stud bolt is deformed or the threads ate damaged, replace it.
Remove the 8 stud bolts.
Install the 8 stud bolts into the cylinder block.
- Torque:
Item Specified Condition A 22 N*m (219 kgf*cm, 16 ft.*lbf) B 5.0 N*m (51 kgf*cm, 44 in.*lbf) C 9.5 N*m (97 kgf*cm, 84 in.*lbf) D 5.0 N*m (51 kgf*cm, 44 in.*lbf)

| 4. REPLACE TIGHT PLUG (for Cylinder Block) |
- NOTICE:
- If water leaks from the tight plug or the plug corrodes, replace it.
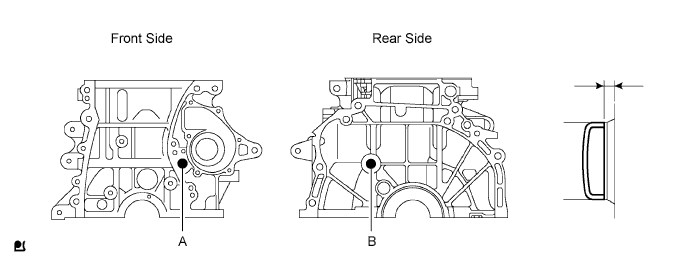
Remove the 2 tight plugs from the engine front and rear side.
Apply adhesive around the new tight plugs.
- Adhesive:
- Toyota Genuine Adhesive 1324, Three Bond 1324 or Equivalent
 |
Using SST, install the 2 tight plugs.
- SST
- 09950-60010(09951-00200)
09950-70010(09951-07100)
- Standard depth:
Item Specified Condition A 1.7 to 2.7 mm (0.067 to 0.106 in.) B 2.2 to 3.2 mm (0.087 to 0.126 in.)
| 5. REPLACE RING PIN (for Cylinder Block) |
- NOTICE:
- It is not necessary to remove with ring pin unless it is being replaced.
Remove the 12 ring pins.
Using a plastic hammer, install 12 new ring pins.
- Standard protrusion height:
Item Specified Condition A 6.0 mm (0.236 in.) B 5.0 mm (0.197 in.)

| 6. REPLACE STRAIGHT PIN (for Cylinder Block) |
- NOTICE:
- It is not necessary to remove with straight pin unless it is being replaced.
Remove the 8 straight pins.
Using a plastic hammer, install 8 new straight pins.
- Standard protrusion height:
Item Specified Condition A 8.0 mm (0.315 in.) B 7.5 mm (0.295 in.) C 12.0 mm (0.472 in.) D 5.0 mm (0.197 in.)
