Outside Moulding -- Removal |
- HINT:
- Use the same procedures for the RH side and LH side.
- The procedures listed below are for the LH side.
- When removing the moulding, heat the vehicle body and moulding using a heat light.
- Standard heating temperature:
Item Specified Condition Vehicle body 40 to 60°C (104 to 140°F) Clip 20 to 30°C (68 to 86°F)
- NOTICE:
- Do not heat the vehicle body and moulding excessively.
| 1. REMOVE SIDE STEP ASSEMBLY LH (w/ Side Step) |
Remove the 5 bolts, nut and side step.
| 2. REMOVE RADIATOR GRILLE |
Remove the 2 screws.
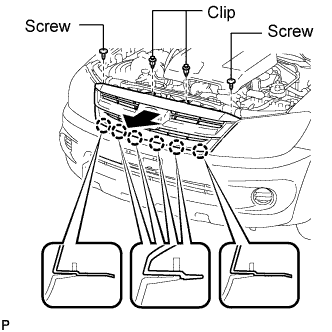 |
Using a clip remover, remove the 2 clips.
Pull the radiator grille in the direction indicated by the arrow in the illustration to detach the 6 claws and remove the radiator grille.
| 3. REMOVE FRONT FENDER LINER LH |
Remove the screw.
 |
Using a clip remover, remove the 3 clips.
Partially remove the fender liner.
- HINT:
- It is not necessary to fully remove the fender liner. Partially remove it so that the bumper cover can be removed in the next step.
| 4. REMOVE FRONT BUMPER COVER |
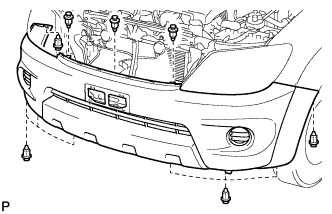 |
Using a clip remover, remove the 11 clips.
Put protective tape under the front fender.
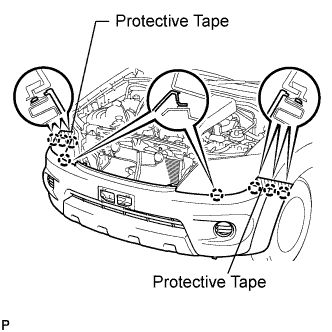 |
Detach the 8 claws and remove the cover.
Disconnect the 2 fog light connectors.
| 5. REMOVE QUARTER PANEL REAR MUDGUARD LH |
 |
Remove the 6 screws and mudguard.
| 6. REMOVE QUARTER PANEL REAR MUDGUARD RH |
- HINT:
- Use the same procedures described for the LH side.
| 7. REMOVE REAR BUMPER COVER |
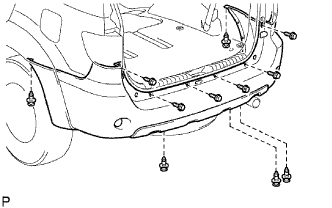 |
Using a clip remover, remove the 5 clips.
Remove the 6 screws.
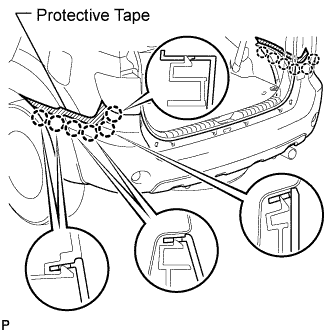
Put protective tape under the quarter panel.
 |
Detach the 12 claws and remove the bumper cover.
| 8. REMOVE FRONT FENDER MUDGUARD LH (w/ Front Fender Mudguard) |
 |
Remove the 3 screws and mudguard.
| 9. REMOVE FRONT WHEEL OPENING EXTENSION SUB-ASSEMBLY LH |
w/o Front fender mudguard:
Remove the 7 screws.
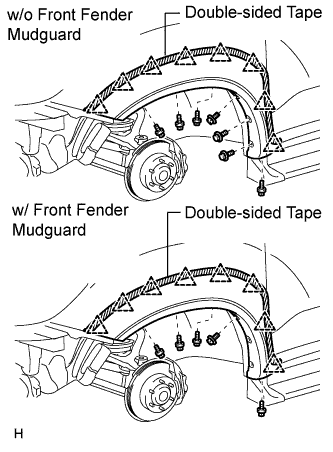 |
w/ Front fender mudguard:
Remove the 5 screws.
Using a heat light, heat the extension and vehicle body.
Using a knife, cut the double-sided tape that holds the extension to the vehicle body.
- NOTICE:
- If reusing the extension, take care not to damage the extension.
- Be careful not to damage the vehicle body.
Detach the 8 clips and remove the extension.
| 10. REMOVE REAR DOOR OUTSIDE MOULDING LH |
Using a drill bit of less than φ 4 mm (0.16 in.), drill out the 3 rivet flanges.
- HINT:
- Wind tape around the drill bit approximately 5 mm (0.20 in.) from the tip of the drill, as shown in the illustration.
- NOTICE:
- Do not drill the rivet at an angle as this will cause damage to the drill and drill hole. Line up the drill and rivet, and carefully drill out the rivet head.
- Be careful as the cut rivet will be very hot.
 |
Continue drilling and push out the remaining rivet fragments using the drill.
Using a vacuum cleaner, remove the rivet fragments and shavings from the drilled areas.
Using a heat light, heat the moulding and vehicle body.
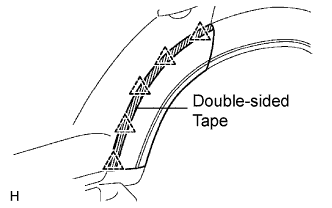 |
Using a knife, cut the double-sided tape that holds the moulding to the vehicle body.
- NOTICE:
- If reusing the moulding, take care not to damage the moulding.
- Be careful not to damage the vehicle body.
Detach the 5 clips and moulding.
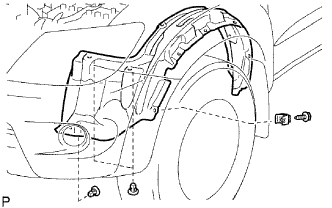
| 11. REMOVE REAR NO. 2 WHEEL OPENING BRACKET LH |
Remove the grommet.
 |
Detach the 2 clips and remove the bracket.
| 12. REMOVE REAR NO. 1 WHEEL OPENING EXTENSION LH |
Remove the 2 screws.
 |
Using a heat light, heat the extension and vehicle body.
Using a knife, cut the double-sided tape that holds the extension to the vehicle body.
- NOTICE:
- If reusing the extension, take care not to damage the extension.
- Be careful not to damage the vehicle body.
Detach the 6 clips and remove the extension.