Front Door -- Installation |
- HINT:
- Use the same procedures for the RH side and LH side.
- The procedures listed below are for the LH side.
- A bolt without a torque specification is shown in the standard bolt chart (Toyota Fortuner RM00000118W017X.html).
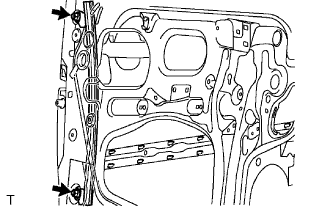
| 1. INSTALL FRONT DOOR WEATHERSTRIP LH |
 |
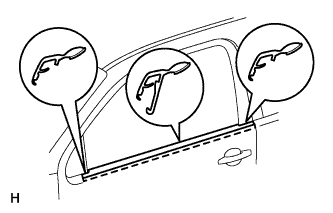
Install the clip indicated by the arrow in the illustration.
Attach the 33 clips and install the weatherstrip.
| 2. INSTALL FRONT DOOR CHECK ASSEMBLY LH |
 |
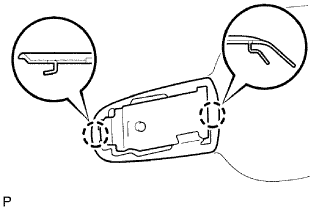
Install the door check to the door panel with the 2 bolts.
- Torque:
- 5.5 N*m{56 kgf*cm, 49 in.*lbf} for bolt A
- HINT:
- Install the door check so that the rivet head is facing upward.
Apply adhesive to the bolt.
- Adhesive:
- Toyota Genuine Adhesive 1324, Three Bond 1324 or equivalent
Install the door check to the body panel with the bolt.
- Torque:
- 30 N*m{306 kgf*cm, 22 ft.*lbf} for bolt C
| 3. INSTALL FRONT DOOR OUTSIDE HANDLE REAR PAD |
 |
Attach the 2 claws to install the pad.
| 4. INSTALL FRONT DOOR OUTSIDE HANDLE FRONT PAD |
 |
Attach the 2 claws to install the pad.
| 5. INSTALL FRONT DOOR OUTSIDE HANDLE FRAME SUB-ASSEMBLY LH |
 |
Install the front door lock open rod.
Using a T30 "TORX" socket, install the frame with the screw.
- Torque:
- 4.0 N*m{41 kgf*cm, 35 in.*lbf}
| 6. INSTALL FRONT DOOR OUTSIDE HANDLE ASSEMBLY LH |
 |
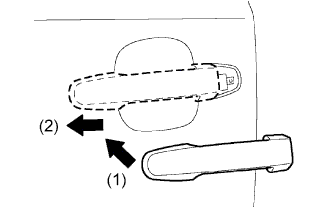
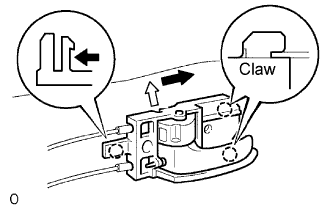
Pull and hold the bellcrank lever of the frame as shown in the illustration.
Install the handle by pushing it in the direction of the arrows in the illustration.
- NOTICE:
- If the bellcrank lever is not pulled and held when installing the handle, the bellcrank lever will interfere with the handle and become damaged.
 |
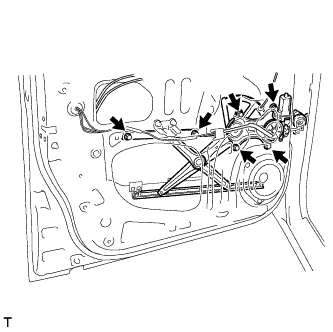
| 7. INSTALL FRONT DOOR LOCK ASSEMBLY LH |
 |
Install a new door lock wire harness packing.
- NOTICE:
- When reinstalling the door lock, always use new packing.
- Do not allow grease or dirt to contaminate the gap between the door panel and packing.
- Old or damaged packing cannot effectively protect against water, which can damage the door lock.
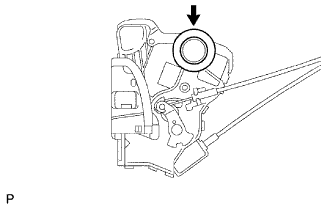
Install the control rod into the door lock, and then set it to the door panel.
- NOTICE:
- Make sure that the rod is securely engaged with the lock.
 |
Apply adhesive to the threads of the 3 screws.
- Adhesive:
- Toyota Genuine Adhesive 1324, Three Bond 1324 or equivalent
Using a T30 "TORX" socket, install the door lock with the 3 screws.
- Torque:
- 5.0 N*m{51 kgf*cm, 44 in.*lbf}
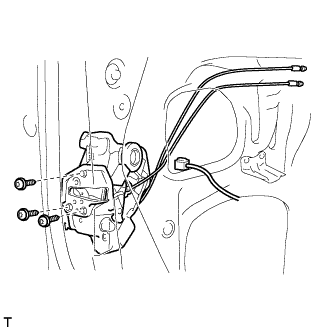 |
Connect the door lock connector.
| 8. INSTALL FRONT DOOR OUTSIDE HANDLE COVER |
 |
Using a T30 "TORX" socket, install the cover (with the door key cylinder installed) with the screw.
- Torque:
- 4.0 N*m{41 kgf*cm, 35 in.*lbf}
Install the hole plug.
| 9. INSTALL FRONT DOOR LOWER REAR FRAME SUB-ASSEMBLY LH |
 |
Install the frame with the 2 bolts.
- Torque:
- 8.0 N*m{82 kgf*cm, 71 in.*lbf}
| 10. INSTALL POWER WINDOW REGULATOR MOTOR ASSEMBLY LH |
 |
Using a T25 "TORX" driver, install the motor with the 3 screws.
- Torque:
- 5.4 N*m{55 kgf*cm, 49 in.*lbf}
| 11. INSTALL FRONT DOOR REGULATOR SUB-ASSEMBLY LH |
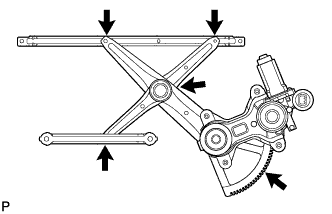 |
Apply MP grease to the sliding and rotating areas of the window regulator.
- NOTICE:
- Do not apply grease to the spring of the window regulator.
Install the regulator with the 6 bolts.
- Torque:
- 8.0 N*m{82 kgf*cm, 71 in.*lbf}
- NOTICE:
- Be careful not to drop the window regulator as it may become damaged.
 |
Connect the window regulator connector.
| 12. INSTALL FRONT DOOR GLASS SUB-ASSEMBLY LH |
 |
Insert the door glass into the door panel along the glass run as indicated by the arrows in the illustration.
- NOTICE:
- Be careful not to damage the glass.
Install the door glass to the window regulator with the 2 bolts.
- Torque:
- 8.0 N*m{82 kgf*cm, 71 in.*lbf}
 |
| 13. INSTALL FRONT DOOR GLASS WEATHERSTRIP ASSEMBLY OUTER LH |
Attach the claws to install the weatherstrip.
- HINT:
- Confirm that the moulding is firmly installed.
 |
| 14. INSTALL OUTER REAR VIEW MIRROR SUB-ASSEMBLY LH |
 |
Install the mirror with the 3 nuts.
- Torque:
- 8.0 N*m{82 kgf*cm, 71 ft.*lbf}
Connect the connector labeled A.
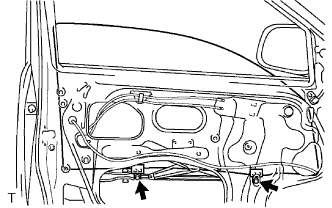
| 15. INSTALL FRONT DOOR SERVICE HOLE COVER LH |
 |
Apply new butyl tape to the door as shown in the illustration.
Install a new service hole cover.
- HINT:
- When installing the service hole cover, pull out the links and connectors through the service hole cover.
- There should be no wrinkles or folds after attaching the service hole cover.
- After attaching the service hole cover, check the sealing quality.
Install the 2 grommets.
Install the bracket with the 2 screws.
| 16. INSTALL FRONT DOOR INSIDE HANDLE SUB-ASSEMBLY LH |
 |
Move the inside handle in the direction indicated by the arrow in the illustration to install the inside handle.
Connect the 2 cables to the inside handle.
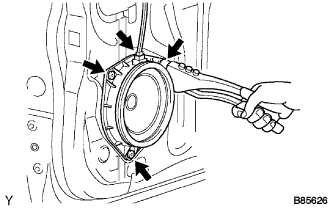
| 17. INSTALL FRONT NO. 1 SPEAKER ASSEMBLY |
Using an air riveter or hand riveter, install the speaker with 3 new rivets.
- NOTICE:
Do not pry the rivet with the riveter, as this will cause damage to the riveter and mandrel.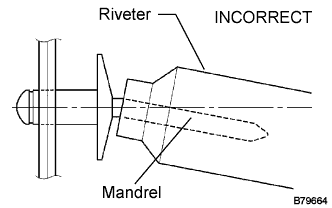
Confirm that the rivets are seated properly against the speaker.
Do not tilt the riveter when installing the rivet to the speaker.
Do not leave any space between the rivet head and speaker.
Do not leave any space between the speaker and door. Firmly hold together the 2 items while installing the rivet.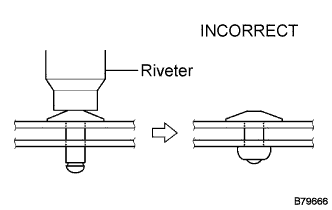
 |
Connect the connector.
| 18. INSTALL FRONT DOOR TRIM BOARD SUB-ASSEMBLY LH |
 |
Attach the 7 claws to install the weatherstrip inner.
Install the trim board.
Attach the 8 clips to install the trim board.
Install the screw and clip.
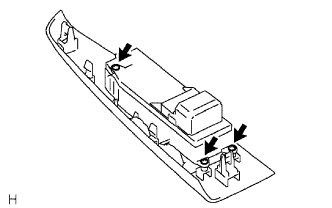
| 19. INSTALL FRONT ARMREST BASE PANEL UPPER LH |
 |
for Passenger side:
Attach the 2 claws and install the window regulator switch to the base panel.
for Driver side:
Install the window regulator master switch to the base panel.
Install the 3 screws.
 |
Connect the switch connector.
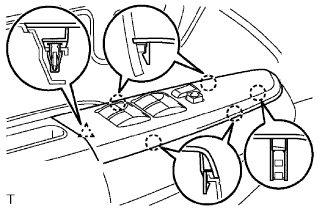 |
Attach the clip and 5 claws to install the panel together with the window regulator master switch.
| 20. INSTALL DOOR PULL HANDLE |
 |
Install the pull handle with the screw.
| 21. INSTALL FRONT DOOR LOWER FRAME BRACKET GARNISH LH |
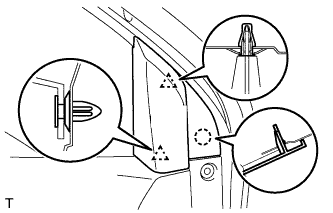 |
Attach the 2 clips to install the garnish.
| 22. CONNECT CABLE TO NEGATIVE BATTERY TERMINAL |
| 23. INSPECT SRS WARNING LIGHT |
Check the SRS warning light (Toyota Fortuner RM000000YVX004X.html).