Rear No. 2 Seat Assembly Reassembly
INSTALL NO. 2 SEAT LEG PLATE
INSTALL REAR NO. 2 SEAT CUSHION COVER
INSTALL REAR SEAT CUSHION UNDER CLOTH
INSTALL NO. 1 SEAT CUSHION CARPET
INSTALL NO. 2 SEAT LEG SUB-ASSEMBLY RH
INSTALL REAR NO. 2 SEAT BELT SUB-ASSEMBLY INNER RH
INSTALL REAR SEAT LEG COVER
INSTALL NO. 2 SEAT CUSHION COVER RH
INSTALL REAR NO. 2 SEAT COVER RH
INSTALL REAR SEAT HINGE COVER
INSTALL NO. 3 SEAT OUTER REAR LEG SUB-ASSEMBLY RH
INSTALL NO. 3 SEAT OUTER FRONT LEG SUB-ASSEMBLY RH
INSTALL REAR NO. 2 SEATBACK COVER
INSTALL REAR NO. 2 SEATBACK ASSEMBLY
INSTALL REAR NO. 2 SEAT RECLINING COVER RH
INSTALL NO. 1 RECLINING ADJUSTER RELEASE HANDLE RH
INSTALL REAR SEAT CUSHION LOWER HINGE COVER RH
INSTALL REAR NO. 2 SEAT HEADREST ASSEMBLY RH
Rear No. 2 Seat Assembly -- Reassembly |
- HINT:
- Use the same procedures for the RH side and LH side.
- The procedures listed below are for the RH side.
- A bolt without a torque specification is shown in the standard bolt chart (Toyota Fortuner RM00000118W017X.html).
- CAUTION:
- Wear protective gloves. Sharp areas on the seatback frames and seat cushion frame may injure your hands,
| 1. INSTALL NO. 2 SEAT LEG PLATE |
Install the plate with the 2 bolts.
- Torque:
- 42 N*m{428 kgf*cm, 31 ft.*lbf}
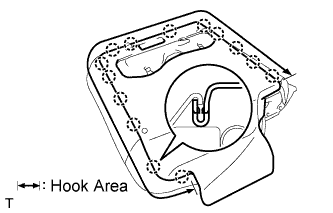
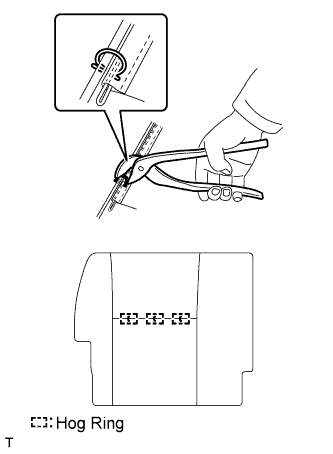
| 2. INSTALL REAR NO. 2 SEAT CUSHION COVER |
Using hog ring pliers, install the seat cushion cover to the seat cushion pad with 4 new hog rings.
- NOTICE:
- Be careful not to damage the cover.
- When installing the hog rings, avoid wrinkling the cover.
Install the seat cushion cover (with pad) to the seat cushion frame with the hook.
| 3. INSTALL REAR SEAT CUSHION UNDER CLOTH |
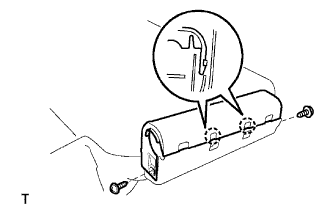
| 4. INSTALL NO. 1 SEAT CUSHION CARPET |
Set the carpet onto the seat cushion.
Using a tacker, install the carpet to the seat cushion with the 4 tack pins and 2 clips, as shown in the illustration.
- NOTICE:
- Do not substitute other metal parts for tack pins.
| 5. INSTALL NO. 2 SEAT LEG SUB-ASSEMBLY RH |
Install the leg with the 2 bolts and No. 3 seat cushion spring.
- Torque:
- 21 N*m{214 kgf*cm, 15 ft.*lbf}
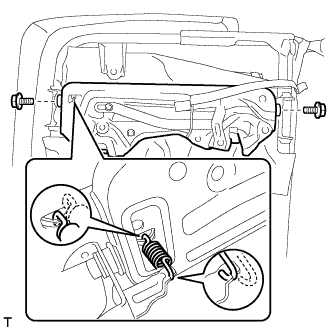
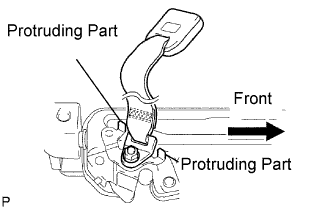
| 6. INSTALL REAR NO. 2 SEAT BELT SUB-ASSEMBLY INNER RH |
Install the seat belt with the nut as shown in the illustration.
- Torque:
- 42 N*m{428 kgf*cm, 31 ft.*lbf}
- NOTICE:
- Do not overlap the anchor part of the seat belt and the protruding parts of the floor panel.
| 7. INSTALL REAR SEAT LEG COVER |
Attach the 2 claws to install the leg cover.
Install the 3 screws.
| 8. INSTALL NO. 2 SEAT CUSHION COVER RH |
Pass the fold seat stopper band through the hole in the No. 2 seat cushion cover. Then install the fold seat stopper band to the seat cushion frame with the screw.
Install the No. 2 seat cushion cover with the 5 screws.
Install the rear No. 2 seat cushion cover to the No. 2 seat cushion cover.
Attach the 14 claws and hooks.
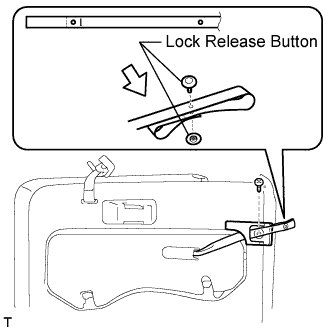
| 9. INSTALL REAR NO. 2 SEAT COVER RH |
Pass the fold seat stopper band through the hole in the rear No. 2 seat cover RH.
Install the rear No. 2 seat cover RH with the screw.
Fold the fold seat stopper band and install the 2 lock release buttons as shown in the illustration.
| 10. INSTALL REAR SEAT HINGE COVER |
Attach the 2 claws to install the hinge cover.
Install the 2 screws.
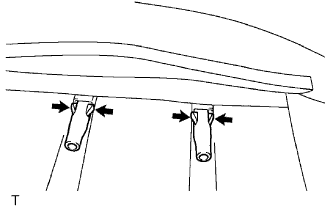
| 11. INSTALL NO. 3 SEAT OUTER REAR LEG SUB-ASSEMBLY RH |
Install the leg with the 2 plates and bolt.
- Torque:
- 21 N*m{214 kgf*cm, 15 ft.*lbf}
| 12. INSTALL NO. 3 SEAT OUTER FRONT LEG SUB-ASSEMBLY RH |
Install the leg with the 2 plates and bolt.
- Torque:
- 21 N*m{214 kgf*cm, 15 ft.*lbf}
| 13. INSTALL REAR NO. 2 SEATBACK COVER |
Using hog ring pliers, install the seatback cover to the seatback pad with 3 new hog rings.
- NOTICE:
- Be careful not to damage the cover.
- When installing the hog rings, avoid wrinkling the cover.
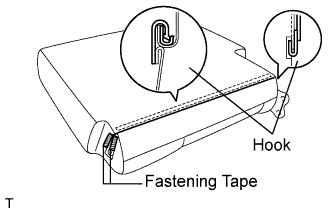
Install the seatback cover (with pad) to the seatback frame.
Install the 2 headrest supports.
Attach the hooks and close the fastening tape.
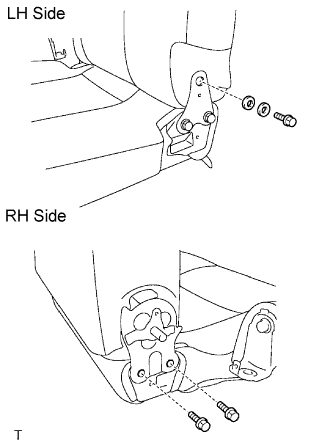
| 14. INSTALL REAR NO. 2 SEATBACK ASSEMBLY |
LH side:
Install the seatback with the plate, spacer and bolt.
- Torque:
- 21 N*m{214 kgf*cm, 15 ft.*lbf}
RH side:
Install the seatback with the 2 bolts.
- Torque:
- 42 N*m{428 kgf*cm, 31 ft.*lbf}
| 15. INSTALL REAR NO. 2 SEAT RECLINING COVER RH |
Install the reclining cover with the 2 screws.
| 16. INSTALL NO. 1 RECLINING ADJUSTER RELEASE HANDLE RH |
Install the release handle with the screw.
| 17. INSTALL REAR SEAT CUSHION LOWER HINGE COVER RH |
Install the hinge cover with the 2 screws.
| 18. INSTALL REAR NO. 2 SEAT HEADREST ASSEMBLY RH |