Front Wiper Motor And Link -- Installation |
| 1. INSTALL WINDSHIELD WIPER MOTOR ASSEMBLY |
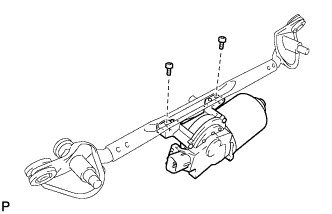 |
Using a T30 ''TORX'' socket, install the wiper motor with the 2 bolts.
- Torque:
- 7.5 N*m{76 kgf*cm, 66 in.*lbf}
Apply MP grease to the sliding parts of the wiper motor and the 2 rods of the wiper link.
Connect the 2 rods of the wiper link to the wiper motor.
| 2. INSTALL WINDSHIELD WIPER MOTOR AND LINK ASSEMBLY |
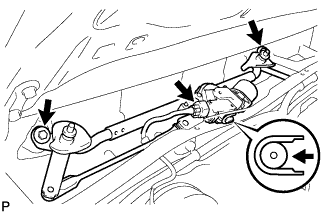 |
Move the wiper motor and link in the direction shown by the arrow in the illustration to attach the wiper cushion to the body, and install the wiper motor and link.
Install the 2 bolts.
- Torque:
- 5.5 N*m{56 kgf*cm, 49 in.*lbf}
Connect the connector.
| 3. INSTALL COWL TOP VENTILATOR LOUVER LH |
 |
Attach the 5 claws and install the louver.
| 4. INSTALL COWL TOP VENTILATOR LOUVER RH |
 |
Attach the 4 claws and install the louver.
| 5. INSTALL HOOD TO COWL TOP SEAL |
 |
Attach the 9 clips and install the seal.
| 6. INSTALL FRONT WIPER ARM AND BLADE ASSEMBLY RH |
Stop the wiper motor at the automatic stop position.
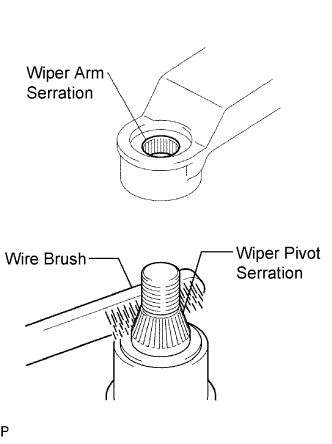 |
Clean the wiper arm serration with a round file or equivalent.
Clean the wiper pivot serration with a wire brush.
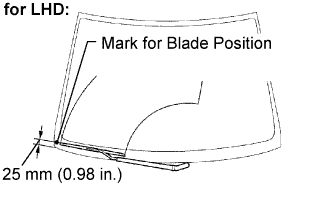
for LHD:
Install the arm and blade with the nut. Make sure that the arm and blade comes to the position shown in the illustration.
 |
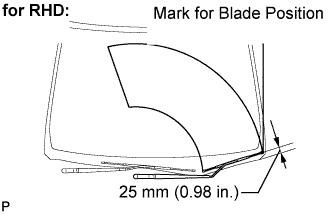
for RHD:
Install the arm and blade with the nut. Make sure that the arm and blade comes to the position shown in the illustration.- Torque:
- 19.6 N*m{200 kgf*cm, 14 ft.*lbf}
- HINT:
- Hold down the arm hinge with your hand while tightening the nut.
 |
| 7. INSTALL FRONT WIPER ARM AND BLADE ASSEMBLY LH |
Stop the wiper motor at the automatic stop position.
|
Clean the wiper arm serration with a round file or equivalent.
Clean the wiper pivot serration with a wire brush.
Install the arm and blade with the nut. Make sure that the arm and blade comes to the position shown in the illustration.
- Torque:
- 19.6 N*m{200 kgf*cm, 14 ft.*lbf}
- HINT:
- Hold down the arm hinge with your hand while tightening the nut.
  |
Operate the front wipers while spraying water or washer fluid on the windshield. Ensure that there is no interference between the blades and pillar.
| 8. INSTALL FRONT WIPER ARM HEAD CAP |
Install the 2 caps.
| 9. CONNECT CABLE TO NEGATIVE BATTERY TERMINAL |