Oil Filter -- Replacement |
- CAUTION:
- Prolonged and repeated contact with mineral oil will result in the loss of the skin's natural oils, leading to dryness, irritation and dermatitis. In addition, used engine oil contains potentially harmful contaminants which may cause skin cancer.
- Wear protective clothing and gloves. Avoid contact with used oil. If contact occurs, wash the area thoroughly with soap and waterless hand cleaner. Never use gasoline, thinners, or solvents to wash the skin.
- In order to protect the environment, dispose of used oil and used oil filters at designated disposal sites only.
| 1. DRAIN ENGINE OIL |
Remove the oil filler cap.
Remove the oil drain plug, and drain the oil into a container.
Clean the drain plug, and install it and a new gasket.
- Torque:
- 35 N*m{357 kgf*cm, 26 ft.*lbf}
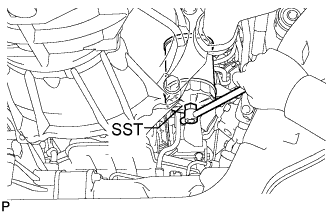
| 2. REMOVE OIL FILTER SUB-ASSEMBLY |
Using SST, remove the oil filter.
- SST
- 09228-44011
 |
| 3. INSTALL OIL FILTER SUB-ASSEMBLY |
Check and clean the oil filter installation surface.
Apply clean engine oil to the gasket of a new oil filter.
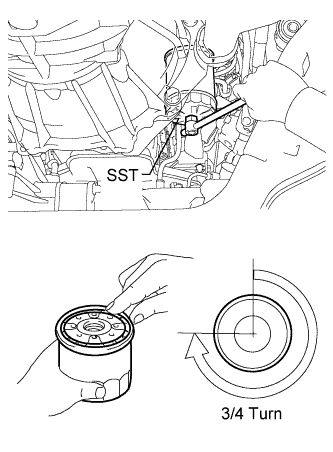 |
Install the oil filter, and tighten it by hand until the gasket contacts the installation surface.
Using SST, tighten the oil filter by an additional 3/4 turn to seat the filter.
- SST
- 09228-44011
| 4. ADD ENGINE OIL |
Add fresh engine oil.
- Standard capacity:
Item Specified Condition Drain and refill with oil filter change 7.2 liters (7.6 US qts, 6.3 Imp. qts) Drain and refill without oil filter change 6.7 liters (7.1 US qts, 5.9 Imp. qts) Dry fill 8.4 liters (8.9 US qts, 7.4 Imp. qts)
Install the oil filler cap.
| 5. INSPECT FOR OIL LEAK |
Start the engine, and check that there are no oil leaks after performing maintenance.