Exhaust Pipe -- Installation |
| 1. INSTALL FRONT EXHAUST PIPE ASSEMBLY |
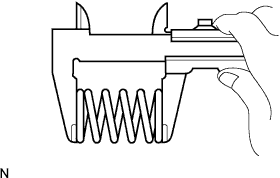
Using a vernier caliper, measure the free length of the compression spring.
- Minimum length:
- 40 mm (1.57 in.)
 |
Install the front pipe to the pipe support.
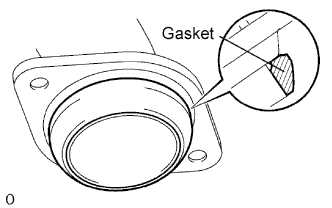
Install a new gasket to the exhaust manifold.
- HINT:
- Using a plastic-faced hammer, uniformly strike the gasket so that the gasket and exhaust manifold are properly fit.
- NOTICE:
- Be careful with the installation direction of the gasket.
- Do not reuse the gasket.
- To ensure a proper seal, do not use the front pipe to force the gasket onto the exhaust manifold.
 |
Install the front pipe with the 2 compression springs and 2 bolts. Alternately tighten the bolts in several passes.
- Torque:
- 43 N*m{438 kgf*cm, 32 ft.*lbf}
| 2. INSTALL HEATED OXYGEN SENSOR (for Unleaded Gasoline Specification Vehicle) |
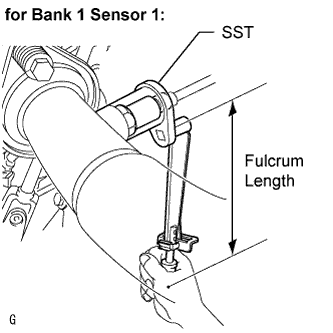
Using SST, install the sensor.
- SST
- 09224-00010
- Torque:
- 40 N*m{408 kgf*cm, 30 ft.*lbf}for use with SST
- 44 N*m{449 kgf*cm, 32 ft.*lbf}for use without SST
- HINT:
- Use a torque wrench with a fulcrum length of 30 cm (11.81 in.).
- Make sure SST and wrench are connected in a straight line.
 |
Attach the 3 wire clamps to the vehicle body.
 |
Connect the sensor connector.
| 3. INSTALL CENTER EXHAUST PIPE ASSEMBLY |
Install the center pipe to the 3 pipe supports.
Install a new gasket and the center pipe to the front pipe with the 2 bolts and 2 nuts. Alternately tighten the bolts in several passes.
- Torque:
- 48 N*m{489 kgf*cm, 35 ft.*lbf}
- NOTICE:
- Do not reuse the gasket.
| 4. INSTALL TAILPIPE ASSEMBLY |
Install the tailpipe to the pipe support.
Install a new gasket and the tailpipe to the center pipe with the 2 bolts and 2 nuts. Alternately tighten the bolts in several passes.
- Torque:
- 48 N*m{489 kgf*cm, 35 ft.*lbf}
- NOTICE:
- Do not reuse the gasket.
| 5. CONNECT CABLE TO NEGATIVE BATTERY TERMINAL |
| 6. CHECK FOR EXHAUST GAS LEAKS |