Fuel Tank -- Installation |
| 1. INSTALL FUEL SUCTION WITH PUMP AND GAUGE TUBE ASSEMBLY |
Apply a light coat of gasoline or grease to a new gasket, and install it to the fuel tank.
Install the fuel gauge tube to the fuel tank.
- NOTICE:
- Be careful not to bend the arm of the fuel sender gauge.
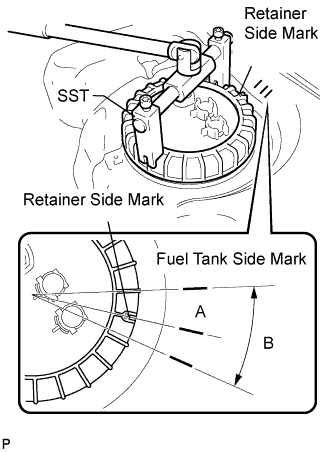
| 2. INSTALL FUEL PUMP GAUGE RETAINER |
Put the retainer on the fuel tank. While holding the pump tube, tighten the retainer one complete turn by band.
Using SST, tighten the retainer until the mark on the retainer aligns with mark A on the fuel tank, as shown in the illustration.
- SST
- 09808-14020(09808-01410,09808-01420,09808-01430)
- HINT:
- If the alignment is difficult, make sure the mark on the retainer is within range B on the fuel tank.
- Fit the tips of SST onto the ribs of the retainer.
 |
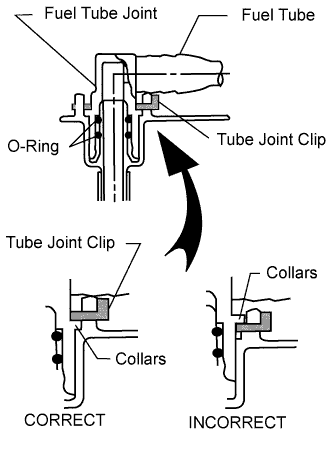
Install the 2 fuel pump tubes with the 2 tube joint clips.
- NOTICE:
- Check that there are no scratches or foreign objects on the connecting parts.
- Check that the fuel tube joint is inserted securely.
- Check that the tube joint clips are on the collars of the fuel tube joints.
- After installing the tube joint clips, check that the fuel tube joints have not been pulled off.
 |
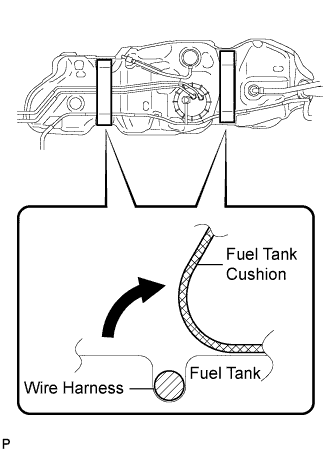
| 3. INSTALL NO. 1 FUEL TANK CUSHION |
Install 3 new fuel tank cushions.
 |
| 4. INSTALL FUEL TANK HEAT INSULATOR |
Install the heat insulator with 5 new clips.
 |
| 5. INSTALL FUEL TANK ASSEMBLY |
Set the fuel tank on a mission jack.
Raise the mission jack.
Fold back the 2 cushions.
 |
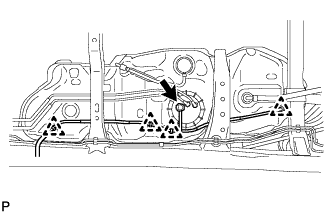
Attach the 4 harness clips and connect the fuel pump connector to the fuel tank.
- NOTICE:
- Be careful not to cut the wirings.
 |
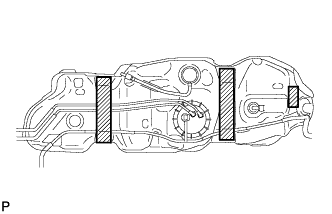
Install the 3 fuel tank bands with the 3 pins and 3 clips.
Connect the 3 fuel tank bands with the 3 bolts.
- Torque:
- 61 N*m{622 kgf*cm, 45 ft.*lbf}
 |
| 6. INSTALL FUEL TANK FILLER PIPE |
Install the filler pipe with the bolt and nut.
- Torque:
- 19 N*m{194 kgf*cm, 14 ft.*lbf}
| 7. CONNECT FUEL TANK TO FILLER PIPE HOSE |
Connect the filler pipe hose to the fuel tank filler pipe.
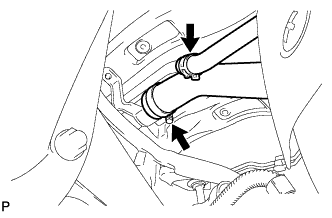 |
| 8. CONNECT FUEL TANK BREATHER HOSE |
Connect the fuel tank breather hose to the fuel tank filler pipe.
| 9. CONNECT FUEL TANK MAIN TUBE AND FUEL TANK RETURN TUBE |
Connect the 2 hoses to the 2 tubes.
Move the clamps to the connection points.
- NOTICE:
- Check that there is no damage or foreign matter on the connected part of the pipe.
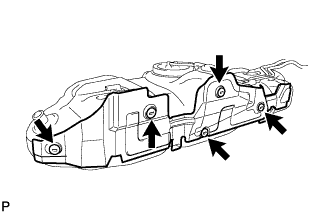
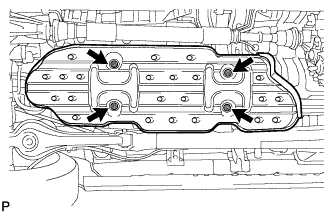
| 10. INSTALL NO. 1 FUEL TANK PROTECTOR |
Install the fuel tank protector with the 4 nuts.
- Torque:
- 20 N*m{204 kgf*cm, 15 ft.*lbf}
 |
| 11. TIGHTEN FUEL TANK CAP |
| 12. BLEED AIR FROM FUEL SYSTEM |
 |
Using the hand pump, bleed air from the fuel system until pumping becomes difficult.
| 13. CONNECT CABLE TO NEGATIVE BATTERY TERMINAL |
| 14. CHECK FOR FUEL LEAKS |
- CAUTION:
- During Active Test mode, engine speed becomes high and combustion noise becomes loud, so pay attention.
- During Active Test mode, fuel becomes high-pressured. Be extremely careful not to expose your eyes, hands, or body to escaped fuel.
Check that there are no leaks from any part of the fuel system when the engine is stopped. If there is fuel leakage, repair or replace parts as necessary.
Start the engine and check that there are no leaks from any part of the fuel system. If there is fuel leakage, repair or replace parts as necessary.
Disconnect the return hose from the common rail.
Start the engine and check for fuel leaks from the return pipe.
If there is fuel leakage, replace the common rail.
Connect the intelligent tester to the DLC3.
Start the engine and push the intelligent tester main switch on.
Select the Fuel Leak test from the Active Test mode on the intelligent tester.
If the intelligent tester is not available, fully depress the accelerator pedal quickly. Increase the engine speed to the maximum and maintain that speed for 2 seconds. Repeat this operation several times.
Check that there are no leaks from any part of the fuel system.
- NOTICE:
- A return pipe leakage of less than 10 cc (0.6 cu in.) per minute is acceptable.
Reconnect the return hose to the common rail.