Fuel Tank -- Removal |
- NOTICE:
- These procedures should be performed with the fuel tank less than 1/4 full.
| 1. DISCONNECT CABLE FROM NEGATIVE BATTERY TERMINAL |
- NOTICE:
- When disconnecting the cable, some systems need to be initialized after the cable is reconnected (Toyota Fortuner RM000004W63000X.html).
| 2. REMOVE FUEL TANK CAP ASSEMBLY |
| 3. REMOVE FUEL TANK PROTECTOR |
Remove the 4 nuts and fuel tank protector.
 |
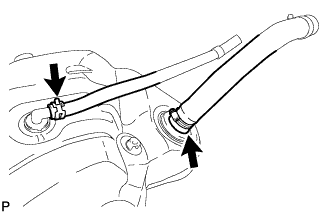
| 4. DISCONNECT FUEL TANK MAIN TUBE SUB-ASSEMBLY AND FUEL TANK RETURN TUBE |
Disconnect the fuel tank main tube and fuel tank return tube.
 |
| 5. DISCONNECT FUEL TANK BREATHER HOSE |
Disconnect the fuel tank breather hose from the fuel tank filler pipe.
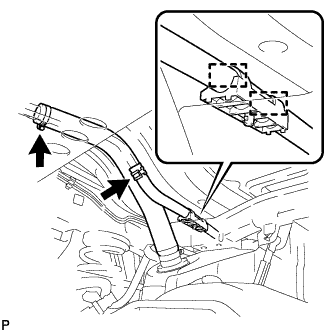 |
Detach the fuel tank breather hose from the 2 clamps.
| 6. DISCONNECT FUEL TANK TO FILLER PIPE HOSE |
Disconnect the fuel tank to filler pipe hose from the fuel tank filler pipe.
| 7. REMOVE FUEL TANK FILLER PIPE |
Remove the bolt, nut and filler pipe.
| 8. REMOVE FUEL TANK ASSEMBLY |
Place a transmission jack under the fuel tank.
Remove the 3 bolts, 3 clips, 3 pins and 3 fuel tank bands.
 |
Slightly lower the transmission jack.
- NOTICE:
- Be careful not to cut the wiring.
Fold back approximately half of each cushion so that the wire harness can be removed in the step below.
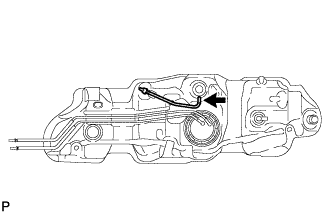
 |
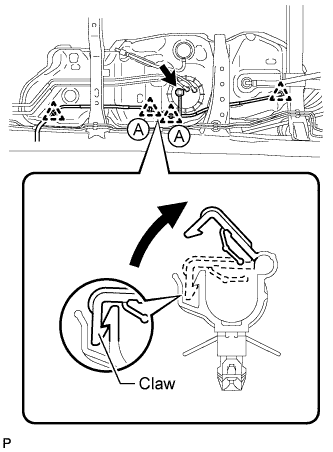
Detach the wire harness from the 4 clamps shown in the illustration.
- HINT:
- Detach the claw of the clamps labeled A in the illustration to detach the wire harness.
 |
Disconnect the sender gauge connector.
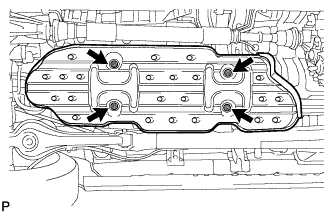
| 9. REMOVE NO. 1 FUEL TANK PROTECTOR SUB-ASSEMBLY |
Using needle-nose pliers, remove the 5 clips and 2 nuts shown in the illustration, and then remove the No. 1 fuel tank protector.
 |
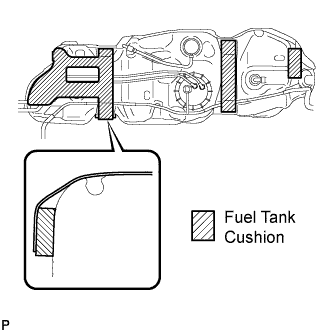
| 10. REMOVE FUEL TANK CUSHION |
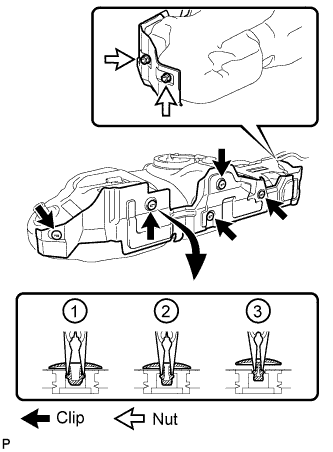
Remove the 4 fuel tank cushions from the fuel tank.
 |
| 11. REMOVE NO. 1 FUEL EVAPORATION TUBE SUB-ASSEMBLY |
Remove the No. 1 fuel evaporation tube.
 |
| 12. REMOVE FUEL PUMP GAUGE RETAINER |
Remove the 2 tube joint clips and pull out the 2 fuel tank tubes.
- NOTICE:
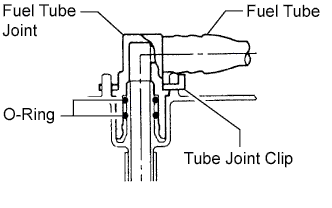
- Remove any dirt and foreign matter on the fuel tube joint before performing this work.
- Do not allow any scratches or foreign matter on the parts when disconnecting them, as the fuel tube joint contains the O-rings that seal the plug.
- Perform this work by hand. Do not use any tools.
- Do not forcibly bend, twist or turn the nylon tube.
- Protect the disconnected part by covering it with a plastic bag and tape after disconnecting the fuel tubes.
 |
Remove the fuel tank return tube and fuel tank main tube from the fuel tank.
Set SST on the fuel pump gauge retainer.
- SST
- 09808-14030
- HINT:
- Engage the claws of SST securely with the fuel pump gauge retainer holes to secure SST.
- Install SST while pressing the claws of SST against the fuel pump gauge retainer (towards the center of SST).
 |
Using SST, loosen the fuel pump gauge retainer.
- SST
- 09808-14030
- HINT:
- Fit the tips of SST onto the ribs of the fuel pump gauge retainer.
- NOTICE:
- When the fuel pump gauge retainer is loosened, be careful as the fuel tank vent tube will spring upward from the force of the spring.
- Clean the fuel tank vent tube before this operation.
 |
Remove the fuel pump gauge retainer.
| 13. REMOVE FUEL TANK VENT TUBE SUB-ASSEMBLY |
Remove the fuel tank vent tube from the fuel tank.
- NOTICE:
- Be careful not to bend the arm of the fuel sender gauge.
Remove the gasket from the fuel tank.
| 14. REMOVE FUEL TANK BREATHER HOSE |
Remove the fuel tank breather hose from the fuel tank.
 |
| 15. REMOVE FUEL TANK TO FILLER PIPE HOSE |
Remove the fuel tank to filler pipe hose from the fuel tank.