Land Cruiser Prado GRJ150 TRJ150 TRJ155 KDJ150 TRJ155 LJ150 - СИСТЕМА СМАЗКИ ДВИГАТЕЛЯ 5L-E
INSTALL FRONT CRANKSHAFT OIL SEAL
INSTALL TIMING BELT CASE SUB-ASSEMBLY
INSTALL OIL STRAINER SUB-ASSEMBLY
INSTALL OIL PAN SUB-ASSEMBLY
INSTALL CRANKSHAFT TIMING PULLEY
INSTALL NO. 2 TIMING BELT IDLER SUB-ASSEMBLY
INSTALL NO. 1 TIMING BELT IDLER SUB-ASSEMBLY
INSTALL WATER PUMP ASSEMBLY
INSTALL NO. 2 TIMING BELT COVER
INSTALL CAMSHAFT TIMING PULLEY
INSTALL NO. 1 GENERATOR BRACKET
INSTALL NO. 1 FRONT ENGINE MOUNTING BRACKET RH
INSTALL NO. 1 FRONT ENGINE MOUNTING BRACKET LH
INSTALL PUMP BRACKET
INSTALL WATER BY-PASS HOSE UNION
INSTALL WATER OUTLET HOUSING
INSTALL INJECTION PUMP ASSEMBLY
INSTALL TIMING BELT
INSTALL NO. 1 COMPRESSOR MOUNTING BRACKET
INSTALL ENGINE ASSEMBLY
МАСЛЯНЫЙ НАСОС - УСТАНОВКА
| 1. INSTALL FRONT CRANKSHAFT OIL SEAL |

Using SST and a hammer, tap in a new oil seal until its surface is flush with the timing belt case edge.
- SST
- 09214-60010
Apply MP grease to the lip of the oil seal.
| 2. INSTALL TIMING BELT CASE SUB-ASSEMBLY |
Place a new gasket on the cylinder block.
Install the timing belt case with the 5 bolts.
- Момент затяжки:
- 23 N*m{ 230 kgf*cm, 17 ft.*lbf}
| 3. INSTALL OIL STRAINER SUB-ASSEMBLY |
Install a new gasket and the oil strainer with the 2 bolts and 2 nuts.
- Момент затяжки:
- for nut:
- 21 N*m{ 210 kgf*cm, 17 ft.*lbf}
- for bolt:
- 18 N*m{ 184 kgf*cm, 13 ft.*lbf}
| 4. INSTALL OIL PAN SUB-ASSEMBLY |
Remove any old packing (FIPG) material and do not drop any oil on the contact surfaces of the oil pan and cylinder block.
- ПРИМЕЧАНИЕ:
- Do not use a solvent which will affect the painted surfaces.

Apply seal packing to the oil pan as shown in the illustration.
- Seal packing:
- Toyota Genuine Seal Packing Black, Three Bond 1207B or equivalent
- Application Specification:
Item Seal Packing Diameter Seal Packing Application Length Dashed line 7.0 mm (0.276 in.) 128 mm (5.04 in.) Continuous line 5.0 mm (0.197 in.) -
| *1 | Seal Packing |
| *a | Timing Belt Case Contact Portion |
| *b | Rear Oil Seal Retainer Contact Portion |
- УКАЗАНИЕ:
Install the oil pan with the 16 bolts and 2 nuts. Uniformly tighten the bolts and nuts in several steps.
- Момент затяжки:
- 18 N*m{ 184 kgf*cm, 13 ft.*lbf}
| 5. INSTALL CRANKSHAFT TIMING PULLEY |

Align the key groove of the timing pulley with the pulley set key.
Using SST and a hammer, tap in the timing pulley with the flange side facing inward.
- SST
- 09223-46011
| *a | Inside |
| 6. INSTALL NO. 2 TIMING BELT IDLER SUB-ASSEMBLY |
Install the spacer and No. 2 timing belt idler with the bolt.
- Момент затяжки:
- 33 N*m{ 337 kgf*cm, 24 ft.*lbf}
Check that the No. 2 timing belt idler moves smoothly.
| 7. INSTALL NO. 1 TIMING BELT IDLER SUB-ASSEMBLY |

Install the No. 1 belt idler with the 3 bolts.
- Момент затяжки:
- for bolt A:
- 44 N*m{ 449 kgf*cm, 32 ft.*lbf}
- for bolt B, C:
- 19 N*m{ 195 kgf*cm, 14 ft.*lbf}
- УКАЗАНИЕ:

- Standard Bolt:
Item Length A 76.5 mm (3.01 in.) B 42.9 mm (1.69 in.) C 41.3 mm (1.63 in.)
| 8. INSTALL WATER PUMP ASSEMBLY |
Install a new gasket, the water pump and tension spring bracket with the 6 bolts.
- Момент затяжки:
- 23 N*m{ 236 kgf*cm, 17 ft.*lbf}
| 9. INSTALL NO. 2 TIMING BELT COVER |
Install the timing belt cover with the 4 bolts.
- Момент затяжки:
- 18 N*m{ 184 kgf*cm, 13 ft.*lbf}
| 10. INSTALL CAMSHAFT TIMING PULLEY |
Install the woodruff key to the key groove of the camshaft.
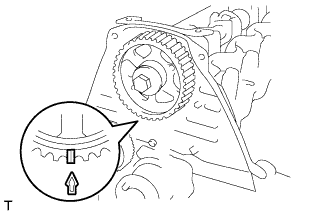
Align the timing mark on the camshaft timing pulley with the timing mark on the No. 2 timing belt cover and temporarily install the pulley with the bolt.

Using SST, tighten the bolt.
- SST
- 09960-10010(09962-01000,09963-01000)
- Момент затяжки:
- 98 N*m{ 999 kgf*cm, 72 ft.*lbf}
| 11. INSTALL NO. 1 GENERATOR BRACKET |
Install the generator bracket with the 3 bolts.
- Момент затяжки:
- 49 N*m{ 500 kgf*cm, 36 ft.*lbf}
| 12. INSTALL NO. 1 FRONT ENGINE MOUNTING BRACKET RH |
Install the engine mounting bracket with the 4 bolts.
- Момент затяжки:
- 49 N*m{ 500 kgf*cm, 36 ft.*lbf}
| 13. INSTALL NO. 1 FRONT ENGINE MOUNTING BRACKET LH |
Install the engine mounting bracket with the 4 bolts.
- Момент затяжки:
- 49 N*m{ 500 kgf*cm, 36 ft.*lbf}
| 14. INSTALL PUMP BRACKET |
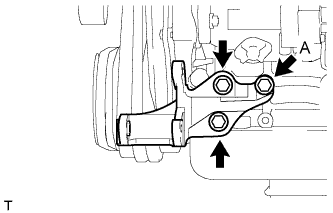
Install the pump bracket with the 3 bolts.
- Момент затяжки:
- for bolt A:
- 57 N*m{ 581 kgf*cm, 42 ft.*lbf}
- except bolt A:
- 78 N*m{ 795 kgf*cm, 58 ft.*lbf}
| 15. INSTALL WATER BY-PASS HOSE UNION |
Clean the threads of the water by-pass hose union and apply adhesive to them.
- Adhesive:
- Toyota Genuine Adhesive 1324, Three Bond 1324 or equivalent
Install the water by-pass hose union.
- Момент затяжки:
- 39 N*m{ 398 kgf*cm, 29 ft.*lbf}
| 16. INSTALL WATER OUTLET HOUSING |
Install a new gasket to the cylinder head.
Install the outlet hosing with the 3 bolts
- Момент затяжки:
- 19 N*m{ 194 kgf*cm, 14 ft.*lbf}
| 17. INSTALL INJECTION PUMP ASSEMBLY |
Install the injection pump (See page ).
| 18. INSTALL TIMING BELT |
Install the timing belt (See page ).
| 19. INSTALL NO. 1 COMPRESSOR MOUNTING BRACKET |

Install the No. 1 compressor mounting bracket with the 4 bolts.
- Момент затяжки:
- 81 N*m{ 829 kgf*cm, 60 ft.*lbf}
| 20. INSTALL ENGINE ASSEMBLY |
Install the engine (See page ).