Front Door Glass Weatherstrip -- Installation |
- HINT:
- Use the same procedure for the RH and LH sides.
- The procedure listed below is for the LH side.
- A bolt without a torque specification is shown in the standard bolt chart (Toyota Fortuner RM00000118W017X.html).
| 1. INSTALL FRONT DOOR OUTER GLASS WEATHERSTRIP ASSEMBLY LH |
Attach the 5 claws to install the front door outer glass weatherstrip.
| 2. INSTALL FRONT DOOR GLASS SUB-ASSEMBLY LH |
Temporarily install the power window regulator master switch assembly with front door armrest base panel.
Connect the cable to the negative (-) battery terminal.
Operate the front door window regulator so that the front door glass can be installed.
Disconnect the cable from the negative (-) battery terminal.
- NOTICE:
- When disconnecting the cable, some systems need to be initialized after the cable is reconnected (Toyota Fortuner RM000004W63000X.html).
Remove the power window regulator master switch assembly with front door armrest base panel.
Insert the front door glass into the front door panel along the front door glass run as indicated by the arrows in the order shown in the illustration.
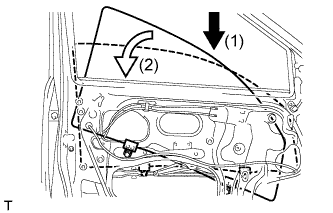 |
Install the front door glass with the 2 bolts.
- Torque:
- 8.0 N*m{82 kgf*cm, 71 in.*lbf}
| 3. INSTALL FRONT DOOR SERVICE HOLE COVER LH |
Apply new butyl tape to the front door panel.
Pass the front door inside locking cable, front door lock remote control cable and wire harness through a new front door service hole cover, and then install the front door service hole cover using the reference points on the front door panel.
Text in Illustration *a Reference Point
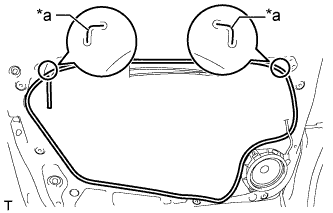 |
| 4. INSTALL FRONT DOOR NO. 1 TRIM BRACKET |
Install the front door No. 1 trim bracket with the 2 screws.
| 5. INSTALL FRONT DOOR INSIDE HANDLE SUB-ASSEMBLY LH |
Connect the front door inside locking cable and front door lock remote control cable to the front door inside handle.
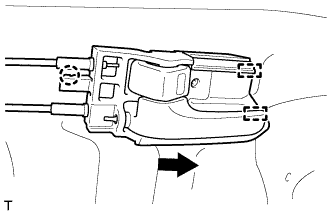 |
Attach the 2 guides as indicated by the arrow in the illustration, and then attach the claw to install the front door inside handle.
| 6. INSTALL OUTER REAR VIEW MIRROR ASSEMBLY LH |
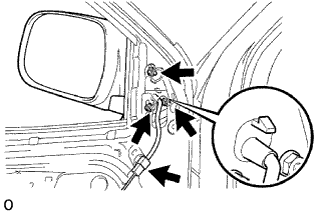 |
Install the outer rear view mirror assembly LH with the 3 nuts.
- Torque:
- 8.0 N*m{82 kgf*cm, 71 ft.*lbf}
Connect the connector.
| 7. INSTALL FRONT DOOR TRIM BOARD SUB-ASSEMBLY LH |
Attach the 8 clips to install the front door trim board.
Install the screw and clip.
| 8. INSTALL DOOR PULL HANDLE |
Install the door pull handle with the screw.
| 9. INSTALL FRONT DOOR LOWER FRAME BRACKET GARNISH LH |
Attach the 2 clips to install the front door lower frame bracket garnish.
| 10. INSTALL POWER WINDOW REGULATOR MASTER SWITCH ASSEMBLY WITH FRONT DOOR ARMREST BASE PANEL |
Connect the connector.
Attach the 4 claws and 2 clips to install the power window regulator switch assembly with front door armrest base panel.
| 11. CONNECT CABLE TO NEGATIVE BATTERY TERMINAL |
- NOTICE:
- When disconnecting the cable, some systems need to be initialized after the cable is reconnected (Toyota Fortuner RM000004W63000X.html).