Back Door -- Reassembly |
- HINT:
- A bolt without a torque specification is shown in the standard bolt chart (Toyota Fortuner RM00000118W017X.html).
| 1. INSTALL BACK DOOR STAY ASSEMBLY LH |
 |
Install the stay with the 4 bolts.
- Torque:
- 7.5 N*m{77 kgf*cm, 67 in.*lbf}
| 2. INSTALL BACK DOOR STAY ASSEMBLY RH |
- HINT:
- Use the same procedures described for the LH side.
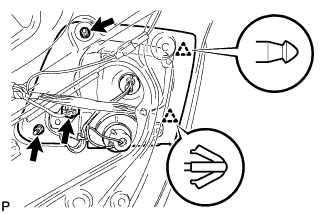
| 3. INSTALL BACK DOOR LOCK ASSEMBLY |
Install the lock with the 3 bolts.
- Torque:
- 15 N*m{153 kgf*cm, 11 ft.*lbf}
w/ Power door lock:
Connect the lock connector.
| 4. INSTALL BACK DOOR STOPPER LOWER |
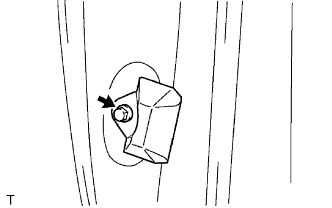 |
Install the stopper with the bolt.
- Torque:
- 7.0 N*m{77 kgf*cm, 62 in.*lbf}
| 5. INSTALL BACK DOOR STOPPER CUSHION |
Install the cushion with the 2 bolts.
- Torque:
- 5.5 N*m{56 kgf*cm, 49 in.*lbf}
| 6. INSTALL BACK DOOR LOCK CYLINDER ASSEMBLY |
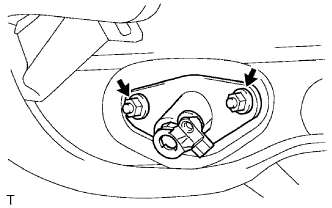 |
Install the cylinder with the 2 nuts.
- Torque:
- 5.0 N*m{51 kgf*cm, 44 in.*lbf}
Install the rod.
| 7. INSTALL BACK DOOR OUTSIDE HANDLE |
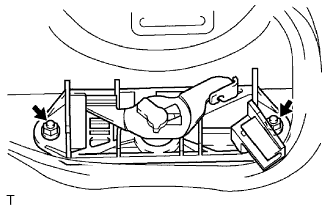 |
Install the handle with the 2 nuts.
- Torque:
- 7.0 N*m{77 kgf*cm, 62 in.*lbf}
Connect the cable.
| 8. INSTALL BACK DOOR OUTSIDE GARNISH |
Attach the 2 clips to install the garnish.
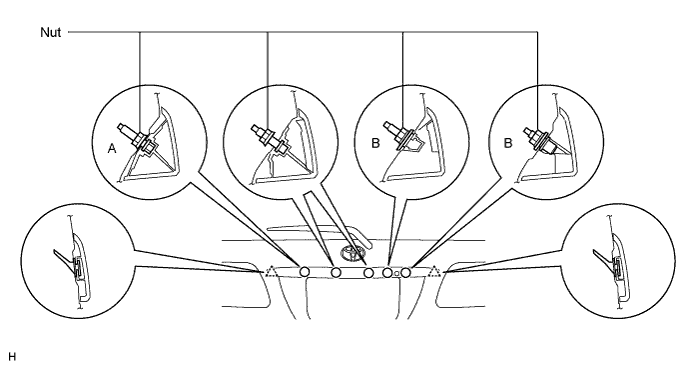
Install the 5 nuts.
- Torque:
- 7.0 N*m{77 kgf*cm, 62 in.*lbf} for nut A
- 5.0 N*m{51 kgf*cm, 44 in.*lbf} for nut B
| 9. INSTALL CENTER STOP LIGHT ASSEMBLY |
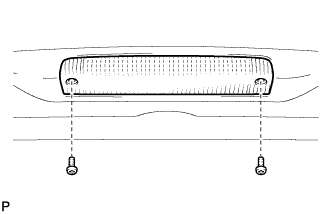 |
Install the center stop light with the 2 screws.
Connect the connector.
| 10. INSTALL LICENSE PLATE LIGHT ASSEMBLY |
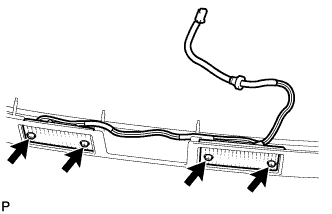 |
Install the license plate light with the 4 screws.
| 11. INSTALL REAR COMBINATION LIGHT ASSEMBLY LH |
 |
Attach the 2 clips to install the light.
Install the 2 nuts.
Connect the connector.
| 12. INSTALL REAR COMBINATION LIGHT ASSEMBLY RH |
- HINT:
- Use the same procedures described for the LH side.
| 13. INSTALL REAR WIPER MOTOR ASSEMBLY |
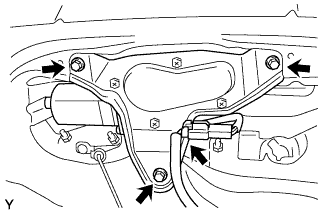 |
Install the wiper motor with the 3 bolts.
- Torque:
- 8.3 N*m{85 kgf*cm, 73 in.*lbf}
Connect the connector.
| 14. INSTALL BACK DOOR TRIM BOARD ASSEMBLY |
Install the trim board and attach the 16 clips.
| 15. INSTALL BACK DOOR GLASS CHANNEL LH |
 |
Clean the contact surface of the door panel with white gasoline.
Apply double-sided tape to the channel.
Using a heat light, heat the channel.
- Standard heating temperature:
Item Specified Condition Channel 20 to 30 °C (68 to 86°F)
- NOTICE:
- Do not heat the channel excessively.
Using a heat light, heat the door panel.
- Standard heating temperature:
Item Specified Condition Door panel 40 to 60°C (104 to 140°F)
- NOTICE:
- Do not heat the door panel and garnish excessively.
Remove the peeling paper from the channel face.
- HINT:
- After removing the peeling paper, keep the adhesive free from foreign matter.
Install the channel.
- NOTICE:
- Use steady pressure with your thumbs on the channel, not excessive force.
| 16. INSTALL BACK DOOR GLASS CHANNEL RH |
- HINT:
- Use the same procedures described for the LH side.
| 17. CONNECT CABLE TO NEGATIVE BATTERY TERMINAL |