Back Door -- Disassembly |
| 1. REMOVE BACK DOOR GLASS CHANNEL LH |
 |
Using a clip remover, remove the 2 clips.
Using a heat light, heat the channel.
- Standard heating temperature:
Item Specified Condition Channel 20 to 30°C (68 to 86°F)
- NOTICE:
- Do not heat the moulding excessively.
Using a screwdriver, detach the tape and channel.
- HINT:
- Tape the screwdriver tip before use.
- NOTICE:
- If planning to reuse the moulding, take care not to damage it.
| 2. REMOVE BACK DOOR GLASS CHANNEL RH |
- HINT:
- Use the same procedures described for the LH side.
| 3. REMOVE BACK DOOR TRIM BOARD ASSEMBLY |
Using a screwdriver, detach the 16 clips and remove the trim board.
- HINT:
- Tape the screwdriver tip before use.
| 4. REMOVE REAR WIPER MOTOR ASSEMBLY |
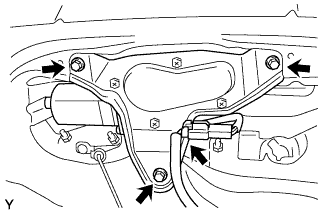 |
Disconnect the connector.
Remove the 3 bolts and wiper motor.
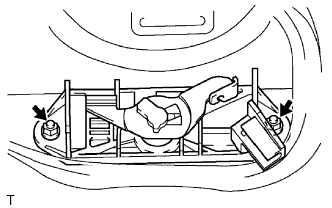
| 5. REMOVE REAR COMBINATION LIGHT ASSEMBLY LH |
 |
Disconnect the connector.
Remove the 2 nuts.
Detach the 3 clips and remove the light.
| 6. REMOVE REAR COMBINATION LIGHT ASSEMBLY RH |
- HINT:
- Use the same procedures described for the LH side.
| 7. REMOVE LICENSE PLATE LIGHT ASSEMBLY |
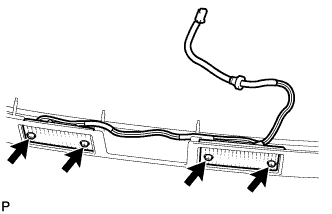 |
Remove the 4 screws and license plate light.
| 8. REMOVE CENTER STOP LIGHT ASSEMBLY |
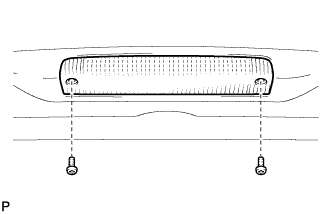 |
Disconnect the connector.
Remove the 2 screws and center stop light.
| 9. REMOVE BACK DOOR OUTSIDE GARNISH |
Remove the 5 nuts.
Detach the 2 clips and remove the garnish.

| 10. REMOVE BACK DOOR OUTSIDE HANDLE |
 |
Disconnect the cable.
Remove the 2 nuts and handle.
| 11. REMOVE BACK DOOR LOCK CYLINDER ASSEMBLY |
 |
Remove the rod.
Remove the 2 nuts and cylinder.
| 12. REMOVE BACK DOOR STOPPER CUSHION |
Remove the 2 bolts and cushion.
| 13. REMOVE BACK DOOR STOPPER LOWER |
 |
Remove the bolt and stopper.
| 14. REMOVE BACK DOOR LOCK ASSEMBLY |
w/ Power door lock:
Disconnect the lock connector.
Remove the 3 bolts and lock.
- HINT:
- Remove the lock through the service hole.
- NOTICE:
- Be careful when removing the bolts as the lock may fall and become damaged.
| 15. REMOVE BACK DOOR STAY ASSEMBLY LH |
 |
Remove the 4 bolts and stay.
- HINT:
- Remove the door stay while supporting the back door with one hand.
| 16. REMOVE BACK DOOR STAY ASSEMBLY RH |
- HINT:
- Use the same procedures described for the LH side.