Rear Seat Outer Belt Assembly -- Installation |
- HINT:
- Use the same procedures for the LH side and RH side.
- The procedures listed below are for the RH side.
- A bolt without a torque specification is shown in the standard bolt chart (Toyota Fortuner RM00000118W017X.html).
| 1. INSTALL REAR NO. 2 SEAT BELT ASSEMBLY OUTER RH |
 |
Align the claws with the seat belt positioning holes and install the retractor of the seat belt with the bolt as shown in the illustration.
- Torque:
- 42 N*m{428 kgf*cm, 31 ft.*lbf}
Connect the shoulder anchor with the bolt.
- Torque:
- 42 N*m{428 kgf*cm, 31 ft.*lbf}
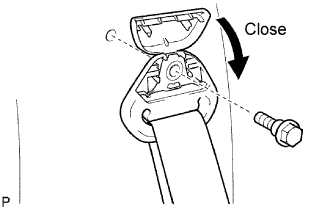 |
Close the cover cap.
| 2. INSTALL REAR NO. 1 SEAT BELT ASSEMBLY OUTER RH |
 |
Align the claws with the seat belt positioning holes and install the retractor of the seat belt with the bolt as shown in the illustration.
- Torque:
- 42 N*m{428 kgf*cm, 31 ft.*lbf}
Connect the shoulder anchor with the bolt.
- Torque:
- 42 N*m{428 kgf*cm, 31 ft.*lbf}
|
Close the cover cap.
| 3. INSTALL QUARTER INSIDE TRIM BOARD RH |
Install the 2 belt hangers to the trim board.
Connect the cooler control switch connector.
Attach the 10 clips and 6 claws to install the trim board.
 |
Install the clip labeled A.
Install the quarter trim hook with the screw.
Connect the rear No. 1 seat belt outer anchor.
Connect the anchor with the bolt.
- Torque:
- 42 N*m{428 kgf*cm, 31 ft.*lbf}
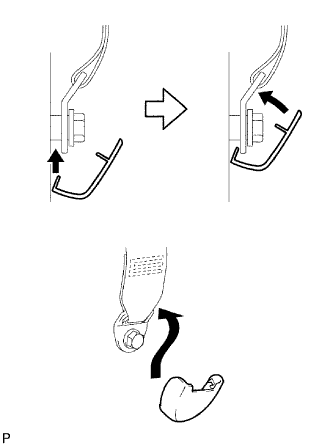
Attach the 2 claws to install the lap belt outer anchor cover.
Connect the rear No. 2 seat belt outer anchor.
Connect the anchor with the bolt.
- Torque:
- 42 N*m{428 kgf*cm, 31 ft.*lbf}
Attach the 2 claws to install the lap belt outer anchor cover.
| 4. CONNECT REAR NO. 2 SEAT BELT ASSEMBLY OUTER RH |
 |
Connect the seat belt's floor anchor with the bolt.
- Torque:
- 42 N*m{428 kgf*cm, 31 ft.*lbf}
Install the belt outer anchor cover.
 |
| 5. CONNECT REAR NO. 1 SEAT BELT ASSEMBLY OUTER RH |
 |
Connect the seat belt's floor anchor with the bolt.
- Torque:
- 42 N*m{428 kgf*cm, 31 ft.*lbf}
Install the belt outer anchor cover.
 |
| 6. INSTALL QUARTER TRIM HOOK |
| 7. INSTALL REAR DOOR OPENING TRIM WEATHERSTRIP RH |
| 8. INSTALL REAR DOOR SCUFF PLATE RH |
- HINT:
- Use the same procedures described for the LH side.
| 9. INSTALL BACK DOOR SCUFF PLATE |
Attach the 6 clips and 4 claws to install the scuff plate.
 |
| 10. INSTALL REAR NO. 2 SEAT ASSEMBLY RH |
Fully tilt the seatback forward.
Place the seat onto the lock striker.
- NOTICE:
- Be careful not to damage the vehicle body.
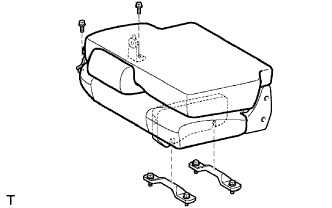 |
Tighten the bolt on the rear side of the seat.
- Torque:
- 37 N*m{377 kgf*cm, 27 ft.*lbf}
Tighten the bolt on the front side of the seat.
- Torque:
- 37 N*m{377 kgf*cm, 27 ft.*lbf}
Fully lock the seat to the lock striker.
- HINT:
- Confirm that the seat is firmly locked to the lock striker.
| 11. CONNECT CABLE TO NEGATIVE BATTERY TERMINAL |