Outside Moulding -- Installation |
- HINT:
- Use the same procedures for the RH side and LH side.
- The procedures listed below are for the LH side.
- When installing the moulding, heat the vehicle body and moulding using a heat light.
- Standard heating temperature:
Item Specified Condition Vehicle body 40 to 60°C (104 to 140°F) Moulding 20 to 30°C (68 to 86°F)
- NOTICE:
- Do not heat the vehicle body and moulding excessively.
| 1. INSTALL REAR NO. 1 WHEEL OPENING EXTENSION LH |
Clean the vehicle body surface.
Using a heat light, heat the vehicle body surface.
Remove the double-sided tape from the vehicle body.
Wipe off any tape adhesive residue with white gasoline.
If reusing extension:
Clean the extension.Using a heat light, heat the extension.
Remove the double-sided tape from the extension.
Wipe off any tape adhesive residue with white gasoline.
Apply new double-sided tape to the extension, as shown in the illustration.
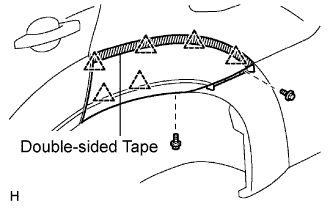
Install the extension.
Using a heat light, heat the vehicle body and extension.
Remove the peeling paper from the face of the extension.
- HINT:
- After removing the peeling paper, keep the exposed adhesive free from dirt and other contaminants.
Attach the 6 clips to install the extension and firmly press on the extension.
- NOTICE:
- Do not apply excessive force onto the extension. Apply steady pressure with your thumbs.
Install the 2 screws.
| 2. INSTALL REAR NO. 2 WHEEL OPENING BRACKET LH |
Attach the 2 clips to install the bracket.
 |
Install the grommet.
| 3. INSTALL REAR DOOR OUTSIDE MOULDING LH |
Clean the vehicle body surface.
Using a heat light, heat the vehicle body surface.
Remove the double-sided tape from the vehicle body.
Wipe off any tape adhesive residue with white gasoline.
If reusing moulding:
Clean the moulding.Using a heat light, heat the moulding.
Remove the double-sided tape from the moulding.
Wipe off any tape adhesive residue with white gasoline.
Apply new double-sided tape to the moulding, as shown in the illustration.
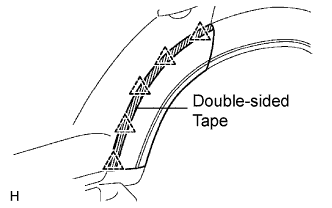
Install the moulding.
Using a heat light, heat the vehicle body and extension.
Remove the peeling paper from the face of the extension.
- HINT:
- After removing the peeling paper, keep the exposed adhesive free from dirt and other contaminants.
Attach the 5 clips to install the moulding and firmly press on the moulding.
- NOTICE:
- Do not apply excessive force onto the extension. Apply steady pressure with your thumbs.
Using an air riveter or hand riveter with a nose piece, strike the 3 rivets into the door panel to install the rear door outside moulding to the door panel.
- NOTICE:
- If the rivet is not positioned perpendicularly, it will bend the mandrel.
Do not pry the rivet with the riveter, as this will cause damage to the riveter and mandrel.
Confirm that the rivets are seated properly against the moulding.
Do not tilt the riveter when installing the rivet to the moulding.
Do not leave any space between the rivet head and moulding.
Do not leave any space between the moulding and door panel. Firmly hold together the 2 items while installing the rivet.
 |
| 4. INSTALL FRONT WHEEL OPENING EXTENSION SUB-ASSEMBLY LH |
Clean the body surface.
Using a heat light, heat the body surface.
Remove the double-sided tape from the body.
Wipe off any tape adhesive residue with white gasoline.
If reusing extension:
Clean the extension.Using a heat light, heat the extension.
Remove the double-sided tape from the extension.
Wipe off any tape adhesive residue with white gasoline.
Apply new double-sided tape to the extension, as shown in the illustration.
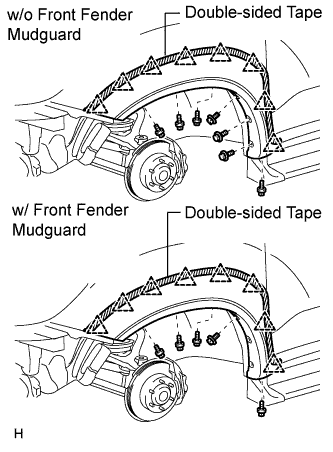
Install the extension.
Using a heat light, heat the vehicle body and extension.
Remove the peeling paper from the face of the extension.
- HINT:
- After removing the peeling paper, keep the exposed adhesive free from dirt and other contaminants.
Attach the 8 clips to install the extension and firmly press on the extension.
- NOTICE:
- Do not apply excessive force onto the extension. Apply steady pressure with your thumbs.
w/o Front mudguard:
Install the 7 screws.w/ Front mudguard:
Install the 5 screws.
| 5. INSTALL FRONT FENDER MUDGUARD LH (w/ Front Fender Mudguard) |
 |
Install the mudguard with the 3 screws.
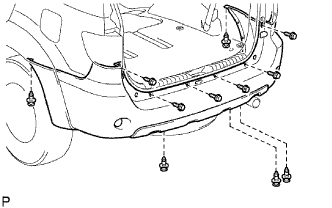
| 6. INSTALL REAR BUMPER COVER |
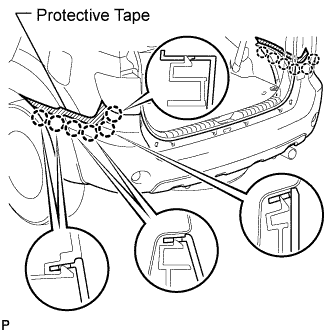
Put protective tape under the quarter panel.
 |
Attach the 12 claws to install the bumper cover.
Install the 6 screws and 5 clips.
 |
| 7. INSTALL QUARTER PANEL REAR MUDGUARD LH |
 |
Install the mudguard with the 6 screws.
| 8. INSTALL QUARTER PANEL REAR MUDGUARD RH |
- HINT:
- Use the same procedures described for the LH side.
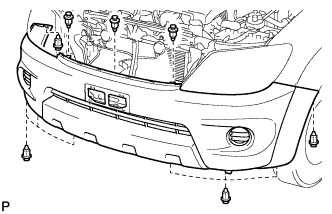
| 9. INSTALL FRONT BUMPER COVER |
Put protective tape under the front fender.
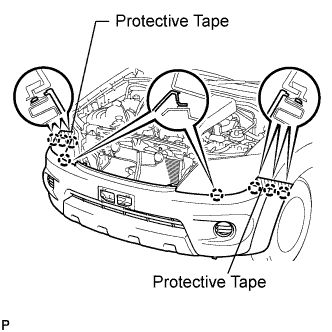 |
Connect the 2 fog light connectors.
Attach the 8 claws to install the cover.
Install the 11 clips.
 |
| 10. INSTALL FRONT FENDER LINER LH |
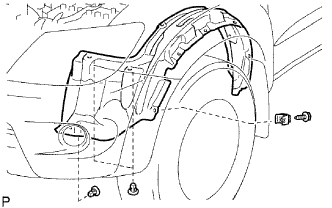 |
Install the fender liner with the 3 clips and screw.
| 11. INSTALL RADIATOR GRILLE |
Attach the 6 claws to install the radiator grille.
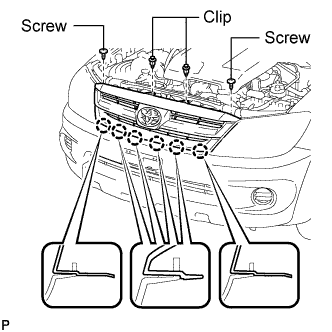 |
Install the 2 clips and 2 screws.
| 12. INSTALL SIDE STEP ASSEMBLY LH (w/ Side Step) |
Install the side step with the 5 bolts and nut.
- Torque:
- 18 N*m{184 kgf*cm, 13 ft.*lbf}