Roof Drip Side Finish Moulding -- Installation |
- HINT:
- Use the same procedures for the RH side and LH side.
- The procedures listed below are for the LH side.
- When replacing a clip, heat the clip and body using a heat light.
- Standard heating temperature:
Item Specified Condition Vehicle body 40 to 60°C (104 to 140°F) Clip 20 to 30°C (68 to 86°F)
- NOTICE:
- Do not heat the clip and vehicle body excessively.
| 1. REPLACE ROOF DRIP SIDE FINISH MOULDING CLIP |
- HINT:
- Use the procedures below to replace damaged or accidentally removed clips. If this step is not necessary, go to the next step.
- NOTICE:
- After press-fitting the clips, wait 30 minutes or more before installing the moulding.
- HINT:
- Minimum hardening time: 30 minutes
- Time needed for complete hardening: 24 hours.
Remove the double-sided tape that remains on the surfaces of the moulding and vehicle body, and then clean the surface with white gasoline.
Using a heat light, heat the clip installation surface of the vehicle body and installation part of the clips.
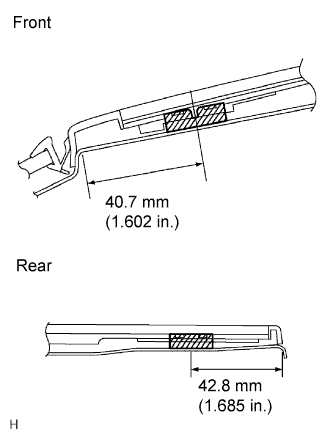
Install new clips to the positions shown in the illustration. Press-fit the clips by hand.
 |
| 2. INSTALL ROOF DRIP SIDE FINISH MOULDING LH |
 |
Put protective tape around the edges of the moulding.
Adjust the position of the moulding so that the front and rear ends attach to the vehicle's 2 clips, and install the moulding.
Remove the protective tape.