Roof Rack -- Installation |
- HINT:
- Use the same procedures for the RH side and LH side.
- The procedures listed below are for the LH side.
| 1. REPLACE ROOF CARRIER SEAL |
 |
Remove the seals.
Install new seals as shown in the illustration.
| 2. INSTALL ROOF RACK FRONT LEG LH |
Install the front leg cushion.
Using a T30 "torx" socket, install the front leg with the 2 "torx" bolts.
- Torque:
- 6.2 N*m{63 kgf*cm, 55 in.*lbf}
| 3. INSTALL ROOF RACK CENTER SUPPORT LH |
Install the center support cushion.
Using a 6 mm hexagon wrench, install the center support with the hexagon bolt.
- Torque:
- 7.1 N*m{72 kgf*cm, 63 in.*lbf}
| 4. INSTALL ROOF RACK REAR LEG LH |
Install the rear leg cushion.
Using a T30 "torx" socket, install the rear leg with the 2 "torx" bolts.
- Torque:
- 6.2 N*m{63 kgf*cm, 55 in.*lbf}
| 5. INSTALL ROOF RACK ASSEMBLY LH |
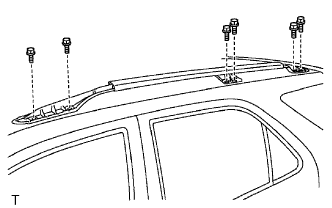 |
Install the roof rack with the 6 bolts.
- Torque:
- 9.0 N*m{92 kgf*cm, 80 in.*lbf}
| 6. INSTALL ROOF RACK FRONT LEG COVER LH |
Install the cover in the direction indicated by the arrow in the illustration.
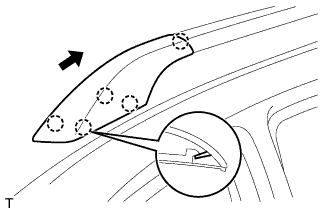 |
Attach the 5 claws.
| 7. INSTALL ROOF RACK CENTER LEG COVER LH |
 |
Attach the 2 claws to install the cover.
| 8. INSTALL ROOF RACK REAR LEG COVER LH |
Install the cover in the direction indicated by the arrow in the illustration.
 |
Attach the 5 claws.