Outer Rear View Mirror Removal
DISCONNECT CABLE FROM NEGATIVE BATTERY TERMINAL
REMOVE FRONT DOOR LOWER FRAME BRACKET GARNISH LH
REMOVE FRONT DOOR TRIM BOARD SUB-ASSEMBLY LH
REMOVE OUTER REAR VIEW MIRROR ASSEMBLY LH
REMOVE OUTER MIRROR COVER LH
Outer Rear View Mirror -- Removal |
- HINT:
- Use the same procedures for the LH side and RH side.
- The procedures listed below are for the LH side.
| 1. DISCONNECT CABLE FROM NEGATIVE BATTERY TERMINAL |
- CAUTION:
- Wait at least 90 seconds after disconnecting the cable from the negative (-) battery terminal to prevent airbag and seat belt pretensioner activation.
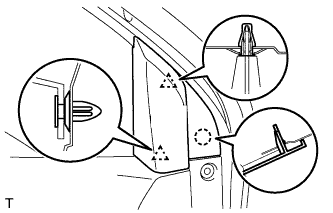
| 2. REMOVE FRONT DOOR LOWER FRAME BRACKET GARNISH LH |
Using a screwdriver, detach the 2 clips and remove the garnish.
- HINT:
- Tape the screwdriver tip before use.
| 3. REMOVE FRONT DOOR TRIM BOARD SUB-ASSEMBLY LH |
Remove the screw and clip labeled A.
Using a screwdriver, detach the 8 remaining clips and remove the trim board.
- HINT:
- Tape the screwdriver tip before use.
- If the screwdriver cannot reach the clips, pull on the lower trim to remove it.
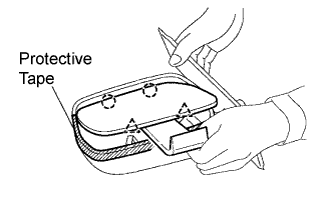
- NOTICE:
- The clip labeled B cannot be reused. When installing the trim board, replace clip B.
- In order to prevent the door panel from being damaged, use protective tape to cover the areas indicated by the arrows in the illustration.
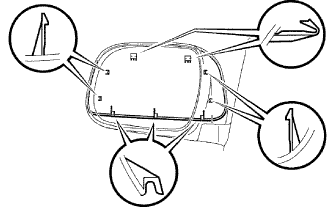
Using a screwdriver, detach the 7 claws and remove the weatherstrip inner.
- HINT:
- Tape the screwdriver tip before use.
| 4. REMOVE OUTER REAR VIEW MIRROR ASSEMBLY LH |
Disconnect the mirror connector labeled A.
Remove the 3 nuts.
Push down the claw and remove the outer rear view mirror.
| 5. REMOVE OUTER MIRROR COVER LH |
Using a moulding remover, detach the 2 claws and 2 clips.
- HINT:
- Apply protective tape to the mirror body.
Remove the mirror.
Using a screwdriver, detach the 9 claws and remove the mirror cover.
- HINT:
- Tape the screwdriver tip before use.