Windshield Glass -- Removal |
| 1. DISCONNECT CABLE FROM NEGATIVE BATTERY TERMINAL |
- CAUTION:
- Wait at least 90 seconds after disconnecting the cable from the negative (-) battery terminal to prevent airbag and seat belt pretensioner activation.
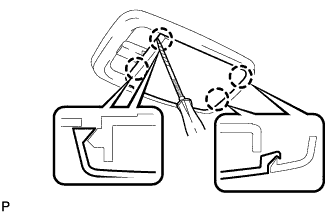
| 2. REMOVE INNER REAR VIEW MIRROR ASSEMBLY |
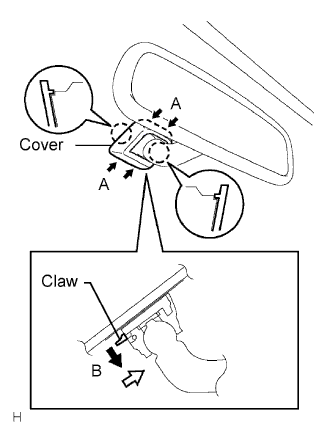 |
Push the cover in the direction indicated by the arrows labeled A and remove it.
While holding down the claw in the direction of the black arrow labeled B, slide the mirror in the direction of the white arrow and remove it.
| 3. REMOVE FRONT DOOR OPENING TRIM LH |
Partially remove the front door opening trim weatherstrip LH so that the front pillar garnish LH can be removed (Toyota Fortuner RM000001JVR00MX_01_0005.html).
| 4. REMOVE FRONT DOOR OPENING TRIM RH |
- HINT:
- Use the same procedures described for the LH side.
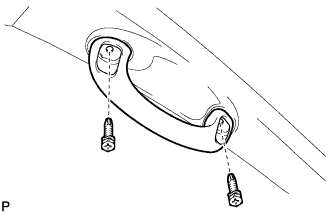
| 5. REMOVE FRONT ASSIST GRIP SUB-ASSEMBLY |
 |
- HINT:
- Use the same procedure for both front assist grips.
Remove the 2 screws and front assist grip.
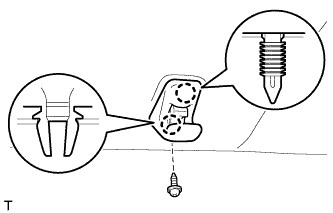
| 6. REMOVE FRONT PILLAR GARNISH LH |
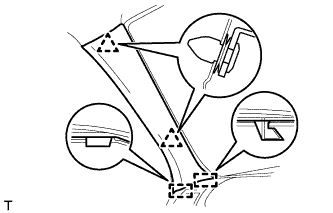 |
Detach the 2 clips and 2 guides and remove the front pillar garnish.
w/ Curtain Shield Airbag:
Protect the curtain shield airbag assembly.Thoroughly cover the airbag with a cloth or nylon sheet and fix the ends of the cover with adhesive tape, as shown in the illustration.
- NOTICE:
- Cover the curtain shield airbag with a protective cover as soon as the front pillar garnish is removed.
Text in Illustration *1 Protective Cover *2 Adhesive Tape
 |
| 7. REMOVE FRONT PILLAR GARNISH RH |
- HINT:
- Use the same procedure described for the LH side.
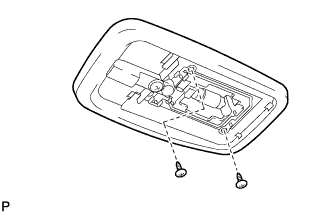
| 8. REMOVE MAP LIGHT ASSEMBLY |
Remove the 2 screws.
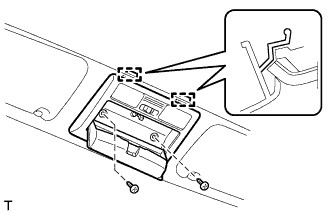 |
Detach the 2 guides and remove the map light assembly.
Disconnect the connector.
| 9. REMOVE NO. 1 ROOM LIGHT ASSEMBLY |
Using a screwdriver wrapped with protective tape, detach the 4 claws and remove the lens.
- HINT:
- Protective tape the screwdriver tip before use.
 |
Remove the 2 screws and room light.
 |
Disconnect the light connector.
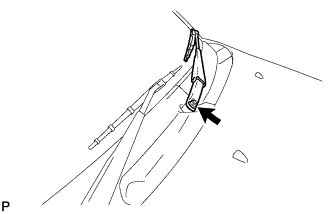
| 10. REMOVE VISOR ASSEMBLY LH |
 |
Detach the guide.
Remove the 2 screws and visor.
| 11. REMOVE VISOR ASSEMBLY RH |
- HINT:
- Use the same procedure described for the LH side.
| 12. REMOVE VISOR HOLDER LH |
 |
Remove the screw.
Detach the 2 claws and remove the visor holder.
| 13. REMOVE VISOR HOLDER RH |
- HINT:
- Use the same procedure described for the LH side.
| 14. REMOVE ASSIST GRIP |
 |
- HINT:
- Use the same procedure for all assist grips.
Using a screwdriver, detach the 4 claws and open the 2 covers.
- HINT:
- Tape the screwdriver tip before use.
Text in Illustration *1 Protective Tape
Remove the 2 screws and assist grip.
 |
| 15. REMOVE ROOF HEADLINING ASSEMBLY |
Partially remove the roof headlining (Toyota Fortuner RM000001JVR00MX_01_0042.html).
- HINT:
- It is not necessary to completely remove the roof headlining. Slightly lower the front section of the roof headlining so that the windshield glass can be removed.
| 16. REMOVE FRONT WIPER ARM HEAD CAP |
Remove the 2 caps.
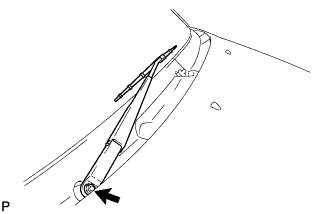
| 17. REMOVE FRONT WIPER ARM AND BLADE ASSEMBLY LH |
 |
Remove the nut and arm and blade.
| 18. REMOVE FRONT WIPER ARM AND BLADE ASSEMBLY RH |
 |
Remove the nut and arm and blade.
| 19. REMOVE HOOD TO COWL TOP SEAL |
 |
Detach the 9 clips and remove the seal.
| 20. REMOVE COWL TOP VENTILATOR LOUVER LH |
 |
Detach the 4 claws and remove the louver.
| 21. REMOVE COWL TOP VENTILATOR LOUVER RH |
 |
Detach the 5 claws and remove the louver.
| 22. REMOVE OUTER UPPER WINDSHIELD MOULDING |
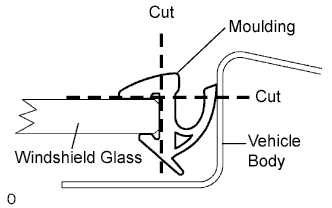 |
Using a knife, cut off the moulding as shown in the illustration.
- NOTICE:
- Be careful not to damage the vehicle body.
Remove the remaining moulding.
- HINT:
- Make a partial cut in the moulding. Then pull and remove it by hand.
| 23. REMOVE WINDSHIELD GLASS |
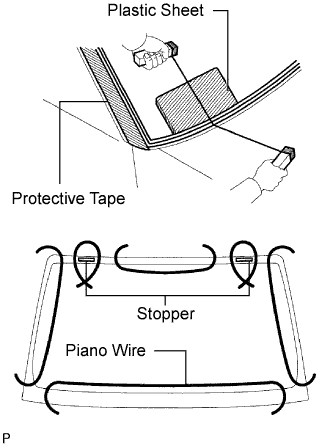 |
Apply protective tape to the outer surface of the vehicle body to prevent scratches.
From the interior, insert a piano wire between the vehicle body and glass as shown in the illustration.
Tie objects that can serve as handles (for example, wooden blocks) to both wire ends.
- NOTICE:
- When separating the glass from the vehicle, be careful not to damage the vehicle's paint or interior/exterior ornaments.
- To prevent the instrument panel from being scratched when removing the glass, place a plastic sheet between the piano wire and instrument panel.
Place matchmarks over the glass and vehicle body on the locations indicated in the illustration.
- HINT:
- Matchmarks do not need to be placed if not reusing the glass.
 |
Cut through the adhesive by pulling the piano wire around the glass.
- NOTICE:
- Leave as much adhesive on the vehicle body as possible when cutting through the adhesive.
Remove the stoppers.
Using suction cups, remove the glass.
| 24. CLEAN WINDSHIELD GLASS |
 |
Using a scraper, remove the damaged stoppers, dams and adhesive sticking to the glass.
Clean the outer edges of the glass with non-residue solvent.
- NOTICE:
- Do not touch the glass surface after cleaning it.
- Even if using new glass, clean it with non-residue solvent.
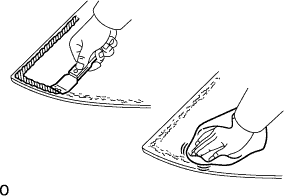
| 25. CLEAN VEHICLE BODY |
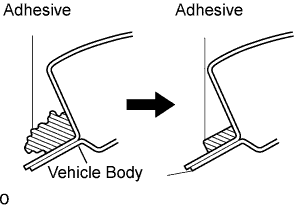 |
Clean and shape the contact surface of the vehicle body.
On the contact surface of the vehicle body, use a knife to cut away excess adhesive as shown in the illustration.
- HINT:
- Leave as much adhesive on the vehicle body as possible.
- NOTICE:
- Be careful not to damage the vehicle body.
Clean the contact surface of the vehicle body with cleaner.
- HINT:
- Even if all the adhesive has been removed, clean the vehicle body.