Floor Shift Assembly Removal
DISCONNECT CABLE FROM NEGATIVE BATTERY TERMINAL
REMOVE PARKING BRAKE HOLE COVER SUB-ASSEMBLY
REMOVE UPPER CONSOLE PANEL SUB-ASSEMBLY
REMOVE CONSOLE BOX ASSEMBLY
REMOVE FLOOR SHIFT ASSEMBLY
Floor Shift Assembly -- Removal |
| 1. DISCONNECT CABLE FROM NEGATIVE BATTERY TERMINAL |
- CAUTION:
- Wait at least 90 seconds after disconnecting the cable from the negative (-) battery terminal to prevent airbag activation and seat belt pretensioner activation.
| 2. REMOVE PARKING BRAKE HOLE COVER SUB-ASSEMBLY |
Detach the 4 claws and remove the hole cover.
| 3. REMOVE UPPER CONSOLE PANEL SUB-ASSEMBLY |
- NOTICE:
- Be careful not to damage the instrument panel lower and console box with the claws of the upper console panel.
Detach the 12 claws and remove the console panel.
| 4. REMOVE CONSOLE BOX ASSEMBLY |
Remove the 4 screws <F> and 2 bolts <E>.
Using a clip remover, remove the 2 clips and console box.
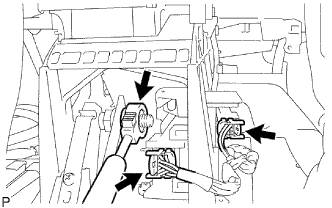
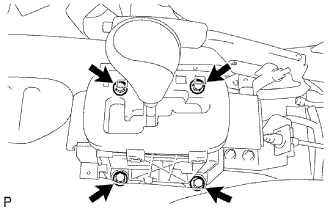
| 5. REMOVE FLOOR SHIFT ASSEMBLY |
Disconnect the 2 connectors and clamp.
Move the shift lever to L.
Disconnect the transmission control cable.
Remove the 4 bolts.
Remove the floor shift.