Brake Actuator (For Rhd With Vsc) -- Installation |
| 1. INSTALL BRAKE ACTUATOR ASSEMBLY |
Install the actuator with bracket with the 3 nuts.
- Torque:
- 19 N*m{195 kgf*cm, 14 ft.*lbf}
- NOTICE:
- Tighten the 3 nuts uniformly in alphabetical order.
- Be careful not to damage the brake tubes.
- Do not drop the actuator. If dropped, replace it.
 |
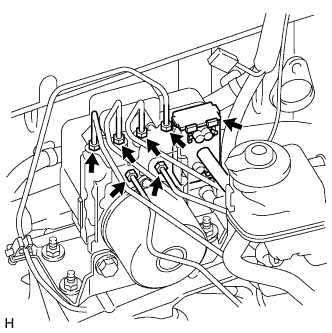
Set each brake line to the correct position on the brake actuator as shown in the illustration.
- HINT:
- *1: to front wheel cylinder RH
- *2: to front wheel cylinder LH
- *3: to rear wheel cylinder RH
- *4: to rear wheel cylinder LH
- *5: from master cylinder
 |
Using a union nut wrench, connect the 6 brake lines.
- Torque:
- 15 N*m{155 kgf*cm, 11 ft.*lbf}
- NOTICE:
- Use the formula to calculate special torque values for situations where a union nut wrench is combined with a torque wrench (Toyota Fortuner RM000000UYX010X.html).
 |
Connect the actuator connector and push the lock lever downward.
| 2. FILL RESERVOIR WITH BRAKE FLUID |
- Fluid:
- SAE J1703 or FMVSS No. 116 DOT3
| 3. BLEED AIR FROM BRAKE MASTER CYLINDER |
- HINT:
- If the master cylinder has been disassembled or if the reservoir becomes empty, bleed air from the master cylinder.
Using a union nut wrench, disconnect the 2 brake lines from the master cylinder.
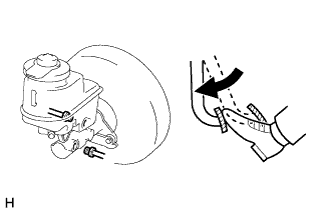 |
Slowly depress and hold the brake pedal.
Cover the outer holes with your fingers, and release the pedal.
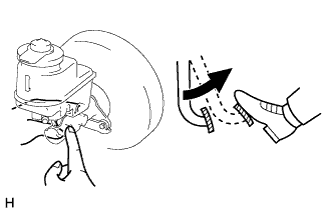 |
Repeat the 2 previous steps 3 or 4 times.
Using a union nut wrench, connect the 2 brake lines to the master cylinder.
- Torque:
- 15 N*m{155 kgf*cm, 11 ft.*lbf}
- NOTICE:
- Use the formula to calculate special torque values for situations where a union nut wrench is combined with a torque wrench (Toyota Fortuner RM000000UYX010X.html).
| 4. BLEED AIR FROM BRAKE LINE |
Remove the bleeder plug cap.
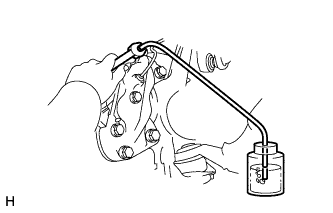
Connect a vinyl tube to the bleeder plugs.
Depress the pedal several times, and then loosen the bleeder plug with the pedal depressed.
When fluid stops coming out, immediately tighten the bleeder plug. Then release the pedal.
Repeat the 2 previous steps until all the air in the brake fluid is gone.
Tighten the bleeder plug.
- Torque:
- for front brake:
- 11 N*m{110 kgf*cm, 8 ft.*lbf}
- for rear brake:
- 10 N*m{102 kgf*cm, 7 ft.*lbf}
Install the cap.
Bleed air from the brake line for each wheel by repeating the above procedures.
 |
| 5. BLEED AIR FROM CLUTCH LINE (for Manual Transmission) |
 |
Remove the bleeder plug cap.
Connect the vinyl tube to the bleeder plug.
Depress the clutch pedal several times, and then loosen the bleeder plug with the pedal depressed.
At the point when fluid stops coming out, tighten the bleeder plug, and then release the clutch pedal.
Repeat the previous 2 steps until all the air in the fluid is completely bled out.
Tighten the bleeder plug.
- Torque:
- 11 N*m{112 kgf*cm, 8 ft.*lbf}
Install the bleeder plug cap.
Check that all the air has been bled out of the clutch line.
| 6. CHECK BRAKE FLUID LEVEL IN RESERVOIR |
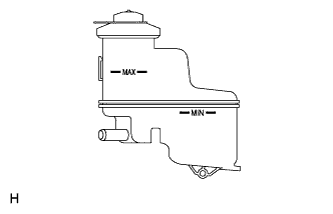
Check the fluid level.
If the brake fluid level is lower than the MIN line, check for leaks and inspect the disc brake pads. If necessary, refill the reservoir with brake fluid to the MAX line after repair or replacement.- Fluid:
- SAE J1703 or FMVSS No. 116 DOT3
 |
| 7. CHECK FOR BRAKE FLUID LEAKAGE |
| 8. CONNECT CABLE TO NEGATIVE BATTERY TERMINAL |
- NOTICE:
- When disconnecting the cable, some systems need to be initialized after the cable is reconnected (Toyota Fortuner RM000004W63000X.html).
| 9. CHECK BRAKE ACTUATOR WITH INTELLIGENT TESTER |
Check the brake actuator with the intelligent tester (Toyota Fortuner RM0000011JI00DX.html).