Front Seat Assembly (For Separate Seat Type) Installation
INSTALL FRONT SEAT ASSEMBLY
INSPECT AND ADJUST SEAT SLIDE ADJUSTER LOCKS
INSTALL FRONT SEAT HEADREST ASSEMBLY
INSTALL SEAT TRACK BRACKET OUTER COVER RH
INSTALL SEAT TRACK BRACKET INNER COVER RH
CONNECT CABLE TO NEGATIVE BATTERY TERMINAL
Front Seat Assembly (For Separate Seat Type) -- Installation |
- HINT:
- Use the same procedures for the RH side and LH side.
- The procedures listed below are for the RH side.
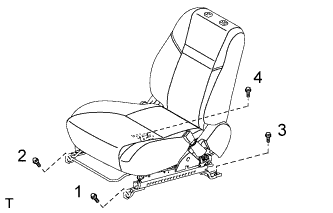
| 1. INSTALL FRONT SEAT ASSEMBLY |
Place the seat in the cabin.
- NOTICE:
- Be careful not to damage the vehicle body.
w/ Seat belt warning, w/ occupant detection sensor:
Connect the connector under the seat.
Install the seat with the 4 bolts.
- Torque:
- 37 N*m{377 kgf*cm, 27 ft.*lbf}
- HINT:
- Tighten the bolts in the order indicated in the illustration.
| 2. INSPECT AND ADJUST SEAT SLIDE ADJUSTER LOCKS |
During sliding operation of the front seat, check that the left and right adjusters move together smoothly and lock simultaneously.
If the seat adjusters do not lock simultaneously, loosen the seat fixation bolts to adjust the adjuster's position.
| 3. INSTALL FRONT SEAT HEADREST ASSEMBLY |
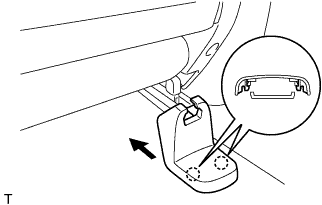
| 4. INSTALL SEAT TRACK BRACKET OUTER COVER RH |
Install the outer cover in the direction indicated by the arrow in the illustration and attach the 2 claws.
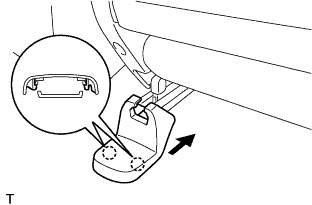
| 5. INSTALL SEAT TRACK BRACKET INNER COVER RH |
Install the inner cover in the direction indicated by the arrow in the illustration and attach the 2 claws.
| 6. CONNECT CABLE TO NEGATIVE BATTERY TERMINAL |