Fuel Tank -- Removal |
- NOTICE:
- These procedures should be performed with the fuel tank less than 1/4 full.
| 1. DISCHARGE FUEL SYSTEM PRESSURE |
- CAUTION:
- Do not disconnect any part of the fuel system until you have discharged the fuel system pressure.
- Even after discharging the fuel pressure, place a cloth or equivalent over fittings as you separate them to reduce the risk of fuel spray on yourself or in the engine compartment.
Disconnect the cable from the negative (-) battery terminal.
- CAUTION:
- Wait at least 90 seconds after disconnecting the cable from the negative (-) battery terminal to prevent airbag activation.
Remove the front driver side scuff plate.
Using a screwdriver, detach the 7 claws.
- HINT:
- Tape the screwdriver tip before use.
Using a clip remover, detach the 3 clips and remove the scuff plate.
Fold back the floor carpet and disconnect the joining connector, as shown in the illustration.
- HINT:
- This connector has the lines of the fuel pump and rear speed sensor.
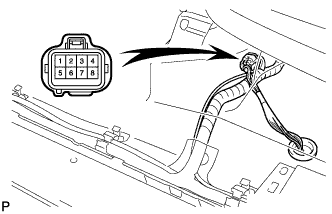 |
Connect the cable to the negative (-) battery terminal.
Start the engine. After the engine has stopped on its own, turn the ignition switch OFF.
- HINT:
- DTC C0210/33 and DTC C0215/34 (rear speed sensor circuit) and DTC P0171/25 (system too lean) may be set.
Crank the engine again, and then check that the engine does not start.
Loosen the fuel tank cap, and then discharge the pressure in the fuel tank completely.
Connect the fuel pump connector.
Install the front driver side scuff plate.
Clear the DTCs (Toyota Fortuner RM000000ZPW007X.html).
| 2. DISCONNECT CABLE FROM NEGATIVE BATTERY TERMINAL |
- CAUTION:
- Wait at least 90 seconds after disconnecting the cable from the negative (-) battery terminal to prevent airbag activation.
| 3. REMOVE FUEL TANK CAP ASSEMBLY |
| 4. REMOVE NO. 1 FUEL TANK PROTECTOR |
Remove the 4 nuts and fuel tank protector.
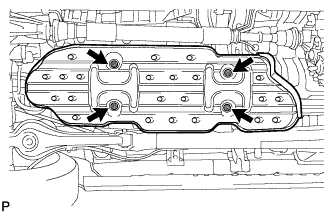 |
| 5. REMOVE NO. 3 FUEL TUBE CLAMP |
Remove the tube clamp from the fuel tube.
 |
| 6. DISCONNECT FUEL MAIN TUBE AND FUEL RETURN TUBE |
Pinch and pull the main tube connector to disconnect the connector from the pipe. Then pinch and pull the return tube connector to disconnect the connector from the pipe.
- NOTICE:
- Check for foreign matter in the pipe and around the connector. Clean if necessary. Foreign matter may damage the O-ring or cause leaks in the seal between the pipe and connector.
- Do not use any tools to separate the pipe and connector.
- Do not forcefully bend or twist the nylon tube.
- Check for foreign matter on the pipe seal surface. Clean if necessary.
- Put the pipe and connector ends in plastic bags to prevent damage and foreign matter contamination.
- If the pipe and connector are stuck together, pinch the connector between your fingers and turn it carefully to disconnect it.
 |
for Unleaded Gasoline Specification Vehicle:
Disconnect the vent line hose.
| 7. DISCONNECT FUEL TANK TO FILLER PIPE HOSE |
Disconnect the filler pipe hose from the fuel tank filler pipe.
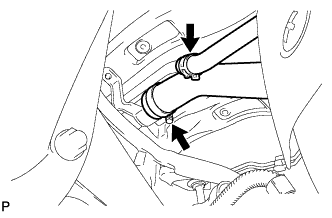 |
| 8. DISCONNECT FUEL TANK BREATHER HOSE |
Disconnect the breather hose from the fuel tank filler pipe.
| 9. REMOVE FUEL TANK FILLER PIPE |
Remove the bolt, nut and filler pipe.
| 10. REMOVE FUEL TANK ASSEMBLY |
Set a mission jack underneath the fuel tank.
Remove the 3 bolts, 3 clips, 3 pins and 3 fuel tank bands.
 |
Slightly lower the mission jack.
- NOTICE:
- Be careful not to cut the wirings.
Then fold back approximately half of each cushion rubber so that the wire harness can be removed in the step below.
 |
Disengage the 4 wire harness clamps shown in the illustration from the fuel tank.
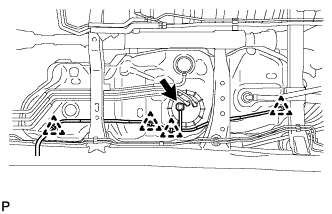 |
Disconnect the fuel pump connector.
- NOTICE:
- Before this procedure, check the connector for dirt, mud or other contamination.
- Do not use any tools in this procedure.
| 11. REMOVE NO. 1 FUEL TANK CUSHION |
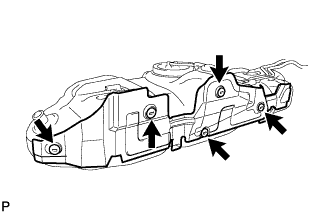
Using needle-nose pliers, remove the 5 clips shown in the illustration and then remove the heat insulator.
 |
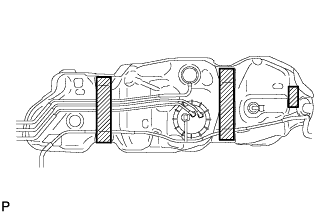
Remove the 3 fuel tank cushions from the fuel tank.
 |
| 12. REMOVE FUEL PUMP GAUGE RETAINER |
Remove the 2 tube joint clips and pull out the 2 fuel pump tubes.
- NOTICE:
Before beginning this procedure, check for foreign matter in the fuel suction tube. Clean if necessary.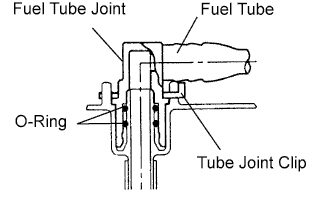
- Keep the O-ring free from foreign matter, as it becomes contaminated easily.
- Do not use any tools in this procedure.
- Do not forcefully bend or twist the tube.
- Put the tube in a plastic bag to prevent damage and contamination.
- Protect the fuel suction tube's joint with tape or equivalent to prevent contamination from foreign matter.
- If the fuel suction tube and tube are stuck together, pinch the tube and turn it carefully to disconnect it.
 |
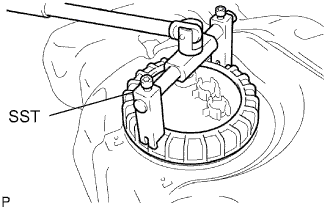
Using SST, loosen the retainer.
- SST
- 09808-14020(09808-01410,09808-01420,09808-01430)
- HINT:
- Fit the tips of SST onto the ribs of the retainer.
- NOTICE:
- When the retainer is loosened, be careful as the fuel pump will spring upward from the force of the spring.
- Clean the fuel suction tube before this operation.
 |
Remove the retainer.
| 13. REMOVE FUEL SUCTION WITH PUMP AND GAUGE TUBE ASSEMBLY |
Remove the fuel gauge tube from the fuel tank.
- NOTICE:
- Be careful not to bend the arm of the fuel sender gauge.
Remove the gasket from the fuel tank.