Crankshaft Position Sensor -- Installation |
| 1. INSTALL CRANKSHAFT POSITION SENSOR |
Apply a light coat of engine oil to the O-ring of the sensor.
 |
Install the sensor with the bolt.
- Torque:
- 10 N*m{102 kgf*cm, 7 ft.*lbf}
Connect the sensor connector.
| 2. INSTALL COOLER COMPRESSOR ASSEMBLY |
Temporarily install the compressor with the bolt labeled A.
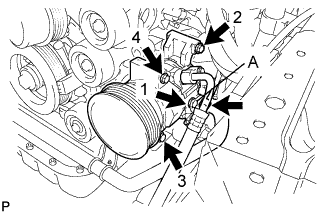 |
Install the compressor completely by tightening the 4 bolts in the order shown in the illustration.
- Torque:
- 25 N*m{255 kgf*cm, 18 ft.*lbf}
- NOTICE:
- In order to prevent misalignment, which causes belt rattle, tightening of the bolts must be performed in the order shown.
Connect the compressor connector.
Connect the suction hose with the 2 bolts.
- Torque:
- 5.4 N*m{55 kgf*cm, 48 in.*lbf}
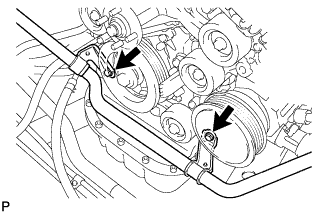 |
| 3. INSTALL GENERATOR ASSEMBLY |
 |
Install the generator and adjusting bar with the 2 bolts.
- Torque:
- 43 N*m{438 kgf*cm, 32 ft.*lbf}
Install the generator wire with the nut.
- Torque:
- 9.8 N*m{100 kgf*cm, 87 in.*lbf}
Install the terminal cap.
Connect the generator connector.
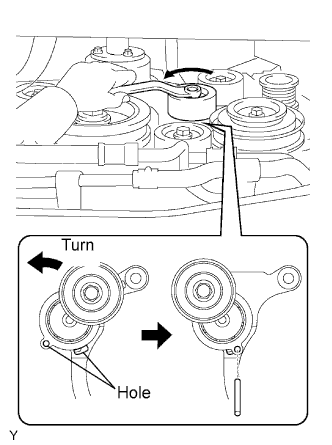
| 4. INSTALL DRIVE BELT |
While turning the belt tensioner counterclockwise, align its holes, and then insert a pin of φ6 mm (0.24 in.) into the holes to fix the belt tensioner.
 |
Install the V-ribbed belt.
- HINT:

- If it is hard to install the V-ribbed belt, perform the following procedure.
Put the V-ribbed belt on everything except the PS pump as shown in the illustration.
While releasing the belt tension by turning the belt tensioner counterclockwise, put the V-ribbed belt on the PS pump.
While turning the belt tensioner counterclockwise, remove the pin.
| 5. CONNECT CABLE TO NEGATIVE BATTERY TERMINAL |