Lower Instrument Panel Removal
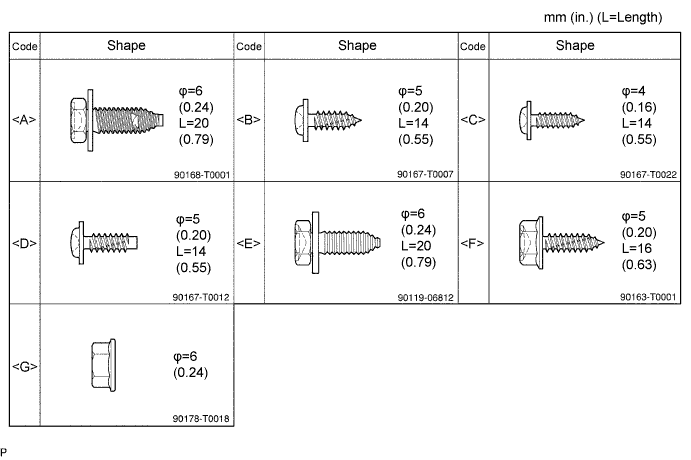
TABLE OF BOLT, SCREW AND NUT
DISCONNECT CABLE FROM NEGATIVE BATTERY TERMINAL
REMOVE UPPER INSTRUMENT PANEL SUB-ASSEMBLY
REMOVE WINDSHIELD WIPER SWITCH ASSEMBLY
REMOVE HEADLIGHT DIMMER SWITCH ASSEMBLY
REMOVE LOWER INSTRUMENT PANEL FINISH PANEL SUB-ASSEMBLY
REMOVE SHIFT LEVER KNOB SUB-ASSEMBLY
REMOVE PARKING BRAKE HOLE COVER SUB-ASSEMBLY
REMOVE UPPER CONSOLE PANEL SUB-ASSEMBLY
REMOVE CONSOLE BOX ASSEMBLY
REMOVE NO. 1 INSTRUMENT PANEL BOX
REMOVE SWITCH BASE
REMOVE FRONT DOOR SCUFF PLATE LH
REMOVE FRONT DOOR SCUFF PLATE RH
REMOVE COWL SIDE TRIM BOARD LH
REMOVE COWL SIDE TRIM BOARD RH
REMOVE LOWER INSTRUMENT PANEL SUB-ASSEMBLY
Lower Instrument Panel -- Removal |
| 1. TABLE OF BOLT, SCREW AND NUT |
- HINT:
- All bolts, screws and nuts relevant to installing and removing the instrument panel are shown along with an alphabetical code in the table below.
| 2. DISCONNECT CABLE FROM NEGATIVE BATTERY TERMINAL |
- CAUTION:
- Wait at least 90 seconds after disconnecting the cable from the negative (-) battery terminal to prevent airbag and seat belt pretensioner activation.
| 3. REMOVE UPPER INSTRUMENT PANEL SUB-ASSEMBLY |
Remove the upper instrument panel (Toyota Fortuner RM000003O10005X.html).
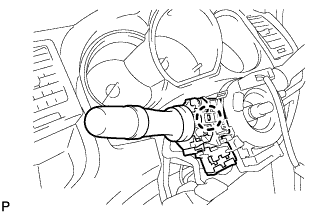
| 4. REMOVE WINDSHIELD WIPER SWITCH ASSEMBLY |
Disconnect the connectors.
Detach the claw and remove the wiper switch.
- NOTICE:
- Do not push the claw with excessive force as damage may occur.
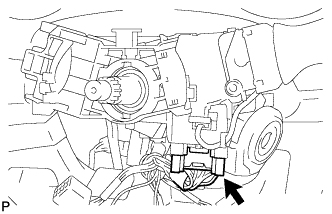
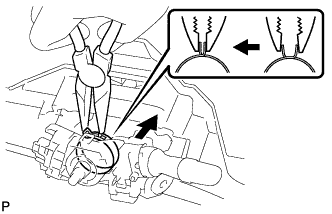
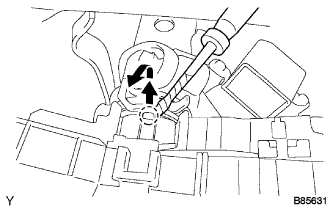
| 5. REMOVE HEADLIGHT DIMMER SWITCH ASSEMBLY |
Disconnect the connector.
Using needle-nose pliers, remove the band clamp as shown in the illustration.
Using a screwdriver, detach the claw and remove the switch.
- HINT:
- Tape the screwdriver tip before use.
| 6. REMOVE LOWER INSTRUMENT PANEL FINISH PANEL SUB-ASSEMBLY |
Detach the 2 claws and 3 clips, and remove the panel.
| 7. REMOVE SHIFT LEVER KNOB SUB-ASSEMBLY |
Twist the transmission shift lever knob in the direction indicated by the arrow and remove it.
for 4WD:
Twist the transfer shift lever knob in the direction indicated by the arrow and remove it.
| 8. REMOVE PARKING BRAKE HOLE COVER SUB-ASSEMBLY |
Detach the 4 claws and remove the hole cover.
| 9. REMOVE UPPER CONSOLE PANEL SUB-ASSEMBLY |
- NOTICE:
- Be careful not to damage the instrument panel lower and console box with the claws of the upper console panel.
Detach the 12 claws and remove the console panel.
| 10. REMOVE CONSOLE BOX ASSEMBLY |
Remove the 4 screws <F> and 2 bolts <E>.
Using a clip remover, remove the 2 clips and console box.
| 11. REMOVE NO. 1 INSTRUMENT PANEL BOX |
Using a clip remover, remove the 2 clips from the duct and instrument panel box.
Remove the 6 screws <B>.
Disconnect all connectors.
Detach all clamps and remove the panel box.
Detach the 8 claws.
Disconnect all connectors and remove the switch base.
| 13. REMOVE FRONT DOOR SCUFF PLATE LH |
Detach the 7 claws and 3 clips, and remove the front door scuff plate.
| 14. REMOVE FRONT DOOR SCUFF PLATE RH |
- HINT:
- Use the same procedures described for the LH side.
| 15. REMOVE COWL SIDE TRIM BOARD LH |
Remove the cap nut.
Detach the 2 clips and remove the cowl side trim board.
| 16. REMOVE COWL SIDE TRIM BOARD RH |
- HINT:
- Use the same procedures described for the LH side.
| 17. REMOVE LOWER INSTRUMENT PANEL SUB-ASSEMBLY |
- NOTICE:
- Make sure that the wire harness is not caught on anything.
Using a clip remover, remove the 4 clips from the duct and instrument panel.
Remove the 2 bolts <A> and nut <G>.
Remove the 3 screws <F>.
Disconnect all connectors and detach all clamps.
Remove the hood lock control cable lever and fuel lid control cable lever.
Remove the instrument panel.