Land Cruiser URJ200 URJ202 GRJ200 VDJ200 - SEAT BELT
FRONT SEAT OUTER BELT ASSEMBLY - REMOVAL
- HINT:
| 1. PRECAUTION |
- NOTICE:
- After turning the ignition switch off, waiting time may be required before disconnecting the cable from the battery terminal. Therefore, make sure to read the disconnecting the cable from the battery terminal notice before proceeding with work ().
| 2. DISCONNECT CABLE FROM NEGATIVE BATTERY TERMINAL |
- CAUTION:
- Wait at least 90 seconds after disconnecting the cable from the negative (-) battery terminal to disable the SRS system.
- NOTICE:
- When disconnecting the cable, some systems need to be initialized after the cable is reconnected ().
| 3. REMOVE FRONT DOOR SCUFF PLATE |

Detach the 7 claws and 4 clips, and remove the scuff plate.
| 4. REMOVE REAR STEP COVER |

- HINT:
- Use the same procedure to remove the step cover on the other side.
Detach the 2 claws and remove the step cover.
| 5. REMOVE REAR DOOR SCUFF PLATE |
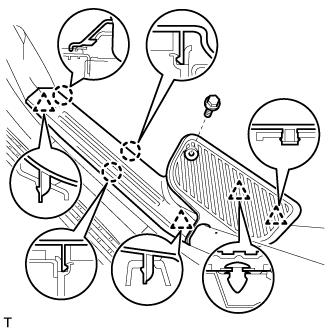
Remove the screw.
Detach the 3 claws and 4 clips, and remove the scuff plate.
| 6. REMOVE CENTER PILLAR GARNISH COVER |
- HINT:
When removing the center pillar garnish cover, move the front seat and seatback to the foremost upright position.
When removing the center pillar garnish cover, connect the cable to the negative (-) battery terminal and operate the power seat switch to move the front seat and seatback to the foremost upright position.
After moving the front seat, disconnect the cable from the negative (-) battery terminal.
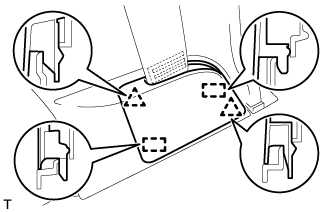
Detach the 2 clips and 2 guides, and remove the cover.
| 7. REMOVE CENTER LOWER PILLAR GARNISH |
- HINT:
When removing the center pillar garnish cover, move the front seat and seatback to the foremost upright position.
When removing the center pillar garnish cover, connect the cable to the negative (-) battery terminal and operate the power seat switch to move the front seat and seatback to the foremost upright position. After moving the front seat, disconnect the cable from the negative (-) battery terminal.
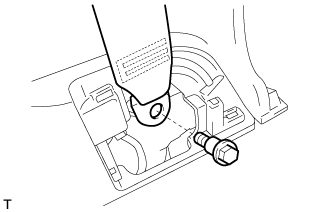
Remove the bolt and seat belt anchor.
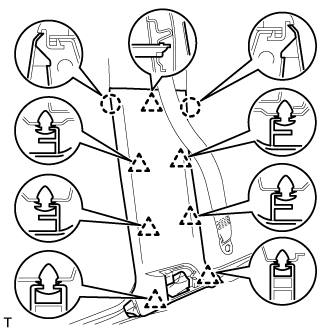
Detach the 2 claws and 7 clips, and remove the center lower pillar garnish.
| 8. REMOVE REAR ASSIST GRIP ASSEMBLY |

- HINT:
- Use the same procedure to remove the rear assist grip on the other side.
Detach the 4 claws and remove the 2 assist grip plugs.
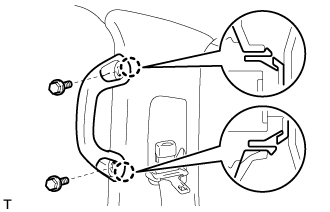
Remove the 2 bolts.
Detach the 2 claws and remove the rear assist grip.
| 9. REMOVE CENTER PILLAR GARNISH |
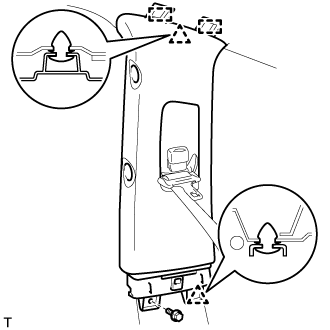
Remove the bolt.
Detach the 2 clips and 2 guides.
Pass the seat belt anchor through the center pillar garnish, and remove the center pillar garnish.
| 10. REMOVE FRONT SEAT OUTER BELT ASSEMBLY |
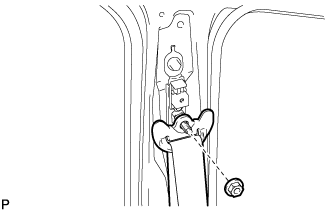
Remove the nut and shoulder anchor.

Disconnect the pretensioner connector labeled A as shown in the illustration.
Disconnect the tension reducer connector labeled B.
w/ Pre-Crash Safety System:
Disconnect the pre-crash safety connector labeled C.
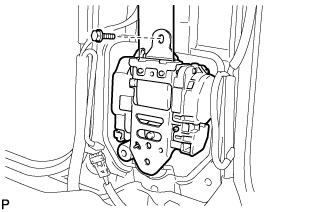
Remove the bolt and seat belt.
| 11. REMOVE FRONT SHOULDER BELT ANCHOR ADJUSTER ASSEMBLY |
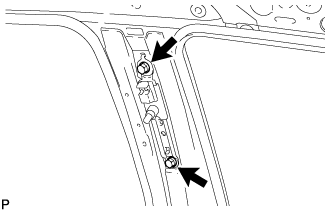
Remove the 2 bolts and adjuster.