Land Cruiser URJ200 URJ202 GRJ200 VDJ200 - DOOR / HATCH
REAR DOOR - DISASSEMBLY
- HINT:
| 1. PRECAUTION |
- NOTICE:
- After turning the ignition switch off, waiting time may be required before disconnecting the cable from the battery terminal. Therefore, make sure to read the disconnecting the cable from the battery terminal notice before proceeding with work ().
| 2. DISCONNECT CABLE FROM NEGATIVE BATTERY TERMINAL |
- NOTICE:
- When disconnecting the cable, some systems need to be initialized after the cable is reconnected ().
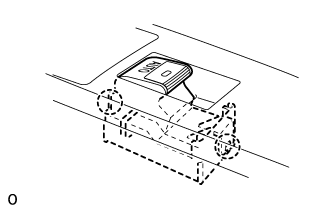
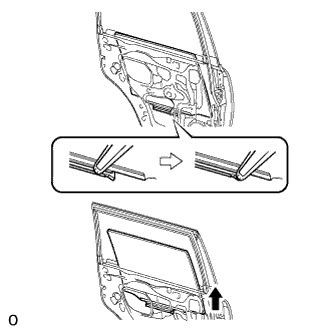
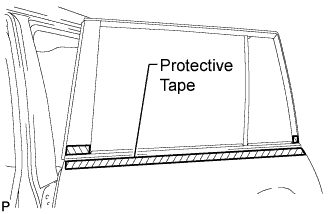
| 3. REMOVE REAR DOOR OUTSIDE MOULDING SUB-ASSEMBLY LH (w/ Outside Moulding) |
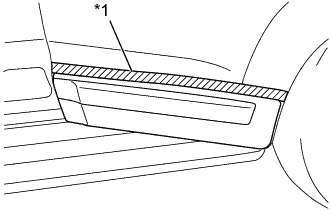
Put protective tape around the rear door outside moulding sub-assembly LH.
| *1 | Protective Tape |
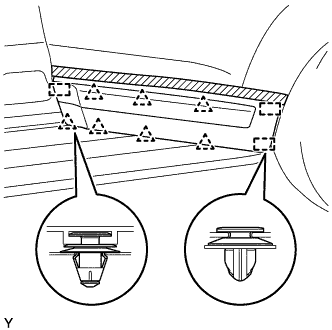
Using a moulding remover, detach the 3 clamps and 7 clips, and remove the rear door outside moulding sub-assembly LH.
Remove any clips remaining on the door panel.
- NOTICE:
- Be careful not to allow any clips or pieces of clips to fall inside the door panel.
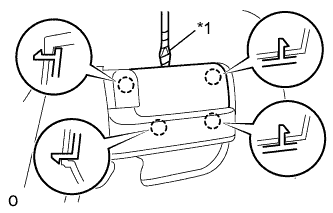
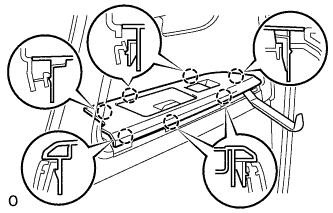
| 4. REMOVE COURTESY LIGHT ASSEMBLY (w/ Courtesy Light) |

Detach the claw.
Remove the courtesy light and then disconnect the connector.
| 5. REMOVE REAR DOOR INSIDE HANDLE BEZEL LH |
Using a screwdriver, detach the 4 claws and remove the rear door inside handle bezel LH.
- HINT:
- Tape the screwdriver tip before use.
| *1 | Protective Tape |
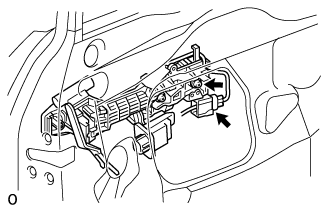
| 6. REMOVE REAR DOOR UPPER ARMREST BASE PANEL LH |
Using a moulding remover, detach the 7 claws.
Disconnect the connector and remove the armrest base panel.
| 7. REMOVE REAR POWER WINDOW REGULATOR SWITCH ASSEMBLY |
Detach the 2 claws and remove the regulator switch.
| 8. REMOVE ASSIST GRIP COVER LH |
Using a moulding remover, detach the 9 claws and remove the assist grip cover LH.
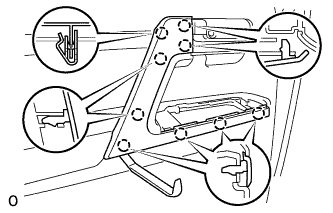
| 9. REMOVE REAR DOOR TRIM BOARD SUB-ASSEMBLY LH |
Remove the 3 screws.
Remove the 9 clips.
Remove the rear inner door glass weatherstrip LH together with the rear door trim board sub-assembly LH by pulling them upward in the order shown in the illustration.
- HINT:
- Make sure that the pin labeled A in the illustration is detached from the door panel.
Disconnect the connector and remove the rear door trim board sub-assembly LH.
Disconnect the 2 cables from the rear door inside handle sub-assembly LH.
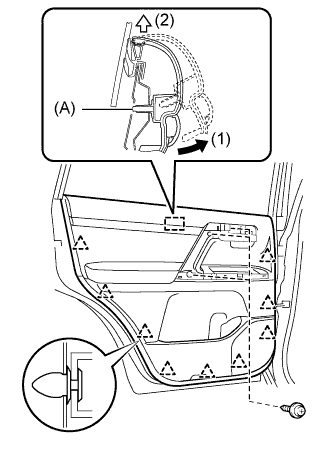
| 10. REMOVE REAR INNER DOOR GLASS WEATHERSTRIP LH |

Detach the 4 clips and remove the rear inner door glass weatherstrip LH from the rear door trim board sub-assembly LH.
- NOTICE:
| 11. REMOVE REAR DOOR INSIDE HANDLE SUB-ASSEMBLY LH |

Detach the 2 claws and remove the rear door inside handle sub-assembly LH.
| 12. REMOVE REAR DOOR INSIDE HANDLE BEZEL LH |
Remove the 6 screws and rear door inside handle bezel LH.
| 13. REMOVE REAR NO. 3 SPEAKER ASSEMBLY (for 14 Speakers) |

Disconnect the connector.
Detach the clamp.
Remove the 2 screws and speaker.
- NOTICE:
- Do not touch the cone part of the speaker.
| 14. REMOVE REAR SPEAKER SET (w/ Rear Speaker) |

Disconnect the speaker connector.
Remove the 3 screws.
Detach the claw and remove the speaker.
- NOTICE:
- Do not touch the cone part of the speaker.
| 15. REMOVE REAR DOOR SERVICE HOLE COVER LH |
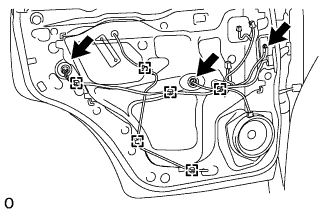
Using a clip remover, detach the 6 clamps.
Remove the bolt and disconnect the 2 connectors.
Remove the rear door service hole cover LH.
- HINT:
- Remove the remaining tape on the door.
| 16. REMOVE REAR DOOR PANEL PROTECTOR LH |

Detach the claw and remove the rear door panel protector LH.
| 17. REMOVE REAR DOOR GLASS RUN LH |
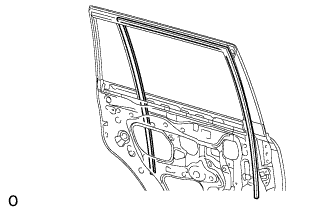
Remove the rear door glass run LH from the window frame.
| 18. REMOVE REAR DOOR REAR LOWER WINDOW FRAME SUB-ASSEMBLY LH |

Remove the 2 bolts.
Remove the screw and rear door rear lower window frame sub-assembly LH.
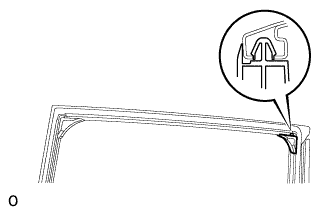
| 19. REMOVE REAR DOOR QUARTER WINDOW GLASS LH |
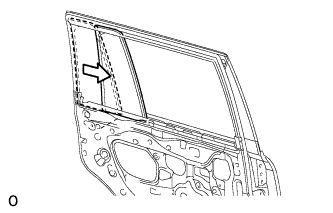
Remove the rear door quarter window glass LH and rear door quarter window weatherstrip LH as a unit as shown in the illustration.
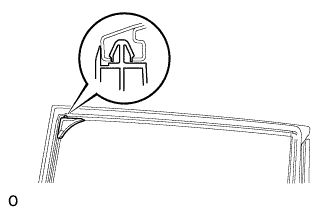
| 20. REMOVE REAR DOOR QUARTER WINDOW WEATHERSTRIP LH |
Remove the rear door quarter window weatherstrip LH.
| 21. REMOVE REAR DOOR GLASS SUB-ASSEMBLY LH |
Remove the rear door glass sub-assembly LH from the rear door window regulator sub-assembly LH as shown in the illustration.
- NOTICE:
- Do not damage the door glass.
| 22. REMOVE REAR DOOR GLASS CHANNEL SUB-ASSEMBLY LH (for Tempered Glass) |

Using a screwdriver, remove the rear door glass channel sub-assembly LH.
- NOTICE:
- Be careful not to damage the door glass.
- HINT:
- Tape the screwdriver tip before use.
| *1 | Protective Tape |
| 23. REMOVE REAR DOOR GLASS CHANNEL FILLER (for Tempered Glass) |
Remove the rear door glass channel filler.
| 24. REMOVE REAR DOOR FRAME GARNISH LH |
Detach the clip and remove the rear door frame garnish LH.
- HINT:
- This clip needs to be replaced with a new one because the clip will break when removing the rear door frame garnish LH.
| 25. REMOVE REAR NO. 2 DOOR FRAME GARNISH LH |
Detach the clip and remove the rear No. 2 door frame garnish LH.
- HINT:
- This clip needs to be replaced with a new one because the clip will break when removing the rear No. 2 door frame garnish LH.
| 26. REMOVE REAR DOOR WINDOW REGULATOR SUB-ASSEMBLY LH |
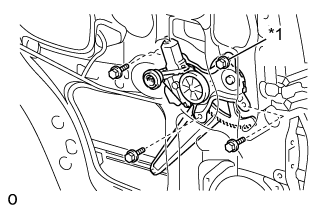
Loosen the temporary bolt.
- NOTICE:
- Do not remove the temporary bolt. If the temporary bolt is removed, the rear door window regulator sub-assembly LH may fall and cause damage.
| *1 | Temporary Bolt |
Remove the 3 bolts and rear door window regulator sub-assembly LH.
- NOTICE:
- Be careful when removing the bolts as the motor may fall and become damaged.
Remove the temporary bolt from the rear door window regulator sub-assembly LH.
| 27. REMOVE REAR POWER WINDOW REGULATOR MOTOR ASSEMBLY LH |
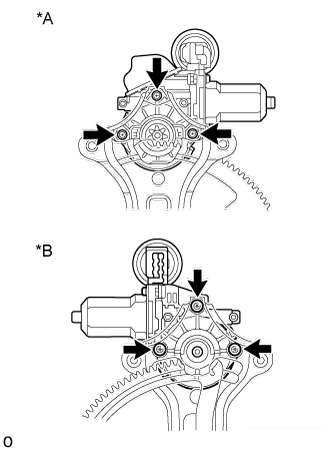
Using a T25 "TORX" driver, remove the 3 screws and motor.
- NOTICE:
- Be careful when removing the screws as the motor may fall and become damaged.
| *A | for Models with Jam Protection Function on 4 Windows |
| *B | for Models with Jam Protection Function on Driver Door Window Only |
| 28. REMOVE REAR DOOR BELT MOULDING ASSEMBLY LH |
Put protective tape around the belt moulding.

Detach the claw and remove the belt moulding.
| 29. REMOVE REAR DOOR FRONT WINDOW FRAME MOULDING LH |
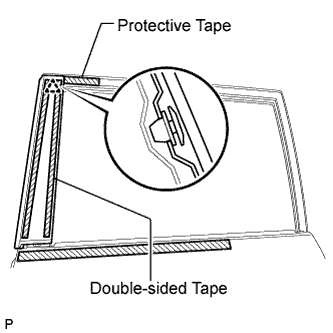
Put protective tape around the window frame moulding.
Detach the clip and remove the double-sided tape to remove the window frame moulding.
| 30. REMOVE REAR DOOR LOCK CHILD PROTECTION COVER LH |
| 31. REMOVE REAR DOOR LOCK ASSEMBLY LH |

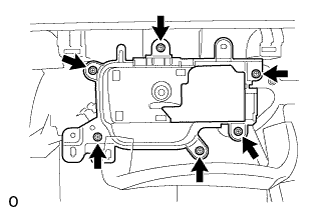
Using a T30 ''TORX'' socket, remove the 3 screws and door lock.
- NOTICE:
- Be careful when removing the screws as the door lock may fall and become damaged.
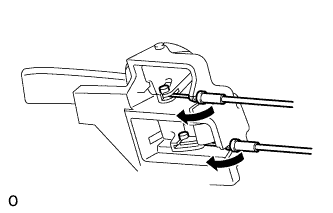
| 32. REMOVE REAR DOOR LOCK REMOTE CONTROL CABLE ASSEMBLY LH |
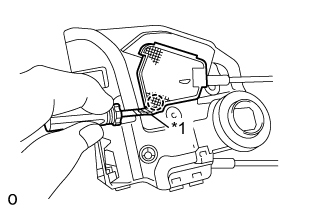
Using a screwdriver, detach the claw.
- HINT:
- Tape the screwdriver tip before use.
| *1 | Protective Tape |

Remove the rear door lock remote control cable assembly LH.
| 33. REMOVE REAR DOOR INSIDE LOCKING CABLE ASSEMBLY LH |
Using a screwdriver, detach the 3 claws.
- HINT:
- Tape the screwdriver tip before use.
| *1 | Protective Tape |

Remove the rear door inside locking cable assembly LH.
| *A | w/o Double Lock |
| *B | w/ Double Lock |
| 34. REMOVE REAR DOOR OUTSIDE HANDLE COVER LH |

Using a T30 ''TORX'' socket, loosen the screw.
Detach the claw and remove the rear door outside handle cover LH.
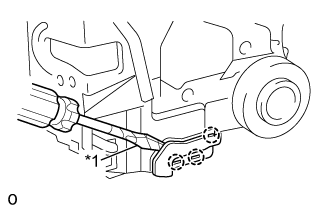
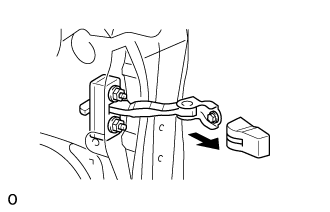
| 35. REMOVE REAR DOOR OUTSIDE HANDLE ASSEMBLY LH |
Using a T30 "TORX" wrench, loosen the screw.
w/ Entry and Start System:
Disconnect the connector.

Remove the rear door outside handle assembly LH by sliding and pulling it in the direction indicated by the arrow in the illustration.
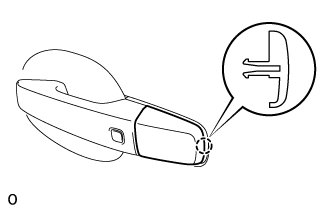
| 36. REMOVE REAR NO. 1 DOOR OUTSIDE HANDLE PAD LH |

Detach the 3 claws and remove the rear No. 1 door outside handle pad LH.
| 37. REMOVE REAR NO. 2 DOOR OUTSIDE HANDLE PAD LH |
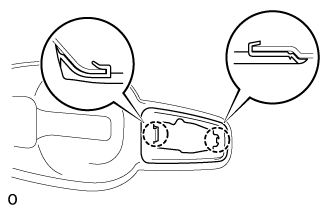
Detach the 2 claws and remove the rear No. 2 door outside handle pad LH.
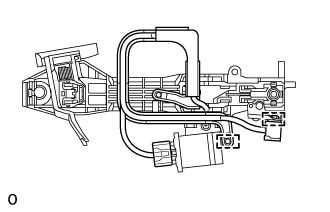
| 38. REMOVE REAR DOOR OUTSIDE HANDLE FRAME SUB-ASSEMBLY LH |
w/ Entry and Start System:
Detach the clamp.
Disconnect the connector.
Using a T30 ''TORX'' socket, loosen the screw.
Slide the rear door outside handle frame sub-assembly LH and No. 4 electrical key wire harness to remove them.
- HINT:
- Remove the rear door outside handle frame sub-assembly LH through the service hole.
Remove the lock open rod from the rear door outside handle frame sub-assembly LH.
| 39. REMOVE NO. 4 ELECTRICAL KEY WIRE HARNESS (w/ Entry and Start System) |
Disconnect the connector.
Detach the 2 clamps, and remove the No. 4 electrical key wire harness from the rear door outside handle frame sub-assembly LH.
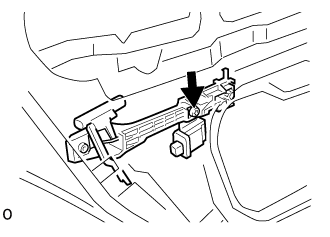
| 40. REMOVE DOOR ELECTRICAL KEY OSCILLATOR (w/ Entry and Start System) |

Remove the screw and door electrical key oscillator.
| 41. REMOVE REAR DOOR CHECK COVER LH (w/ Cover) |
Remove the rear door check cover LH.
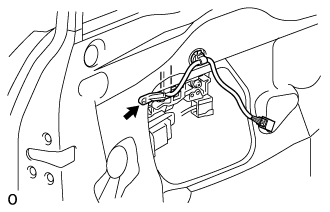
| 42. REMOVE REAR DOOR CHECK ASSEMBLY LH |

Remove the bolt, 2 nuts and rear door check assembly LH.
- NOTICE:
- Be careful when removing the bolt and nuts as the rear door check assembly LH may fall and become damaged.
- HINT:
- Remove the rear door check assembly LH through the service hole.
| 43. REMOVE REAR DOOR WEATHERSTRIP LH |
Detach the 21 clips and remove the rear door weatherstrip LH.

| *A | w/ Spot Cover | *B | w/o Spot Cover |
| *1 | Double-sided Tape | - | - |