Land Cruiser URJ200 URJ202 GRJ200 VDJ200 - EXTERIOR PANELS / TRIM
FRONT BUMPER (w/ Winch) - INSTALLATION
- HINT:
- A bolt without a torque specification is shown in the standard bolt chart ().
| 1. INSTALL FRONT UPPER CENTER BUMPER RETAINER |
Install the front upper center bumper retainer with the 3 bolts.
| 2. INSTALL HEADLIGHT ASSEMBLY LH |
for Halogen Headlight:
()
for HID Headlight:
()
| 3. INSTALL HEADLIGHT ASSEMBLY RH |
- HINT:
- Use the same procedure described for the LH side.
| 4. INSTALL FRONT BUMPER SIDE SUPPORT LH |
Attach the 3 clips to install the front bumper side support LH.
Install the 2 screws.
| 5. INSTALL FRONT BUMPER SIDE SUPPORT RH |
- HINT:
- Use the same procedure described for the LH side.
| 6. INSTALL FRONT BUMPER EXTENSION LH |
Install the front bumper extension LH with the 3 bolts.
| 7. INSTALL FRONT BUMPER EXTENSION RH |
- HINT:
- Use the same procedure described for the LH side.
| 8. INSTALL FRONT BUMPER COVER |
w/ Fog Light:
Connect the No. 4 engine room wire connector.
Connect the winch control wire connector and attach the 10 claws to install the front bumper cover.
Install the 3 clips, 4 screws and 4 bolts.
Using a T30 "TORX" socket, install the 6 screws.
| 9. INSTALL RADIATOR GRILLE ASSEMBLY |
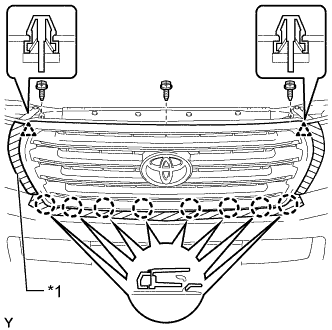
Put protective tape around the radiator grille assembly.
| *1 | Protective Tape |
Remove the 3 screws.
Detach the 2 clips and 8 claws, and remove the radiator grille assembly.
w/ Wide View Front Monitor System:
Disconnect the connector.
| 10. INSTALL FRONT BUMPER WINCH COVER SUB-ASSEMBLY |
Attach the 3 guides.
Attach the 2 claws and front bumper winch cover sub-assembly.
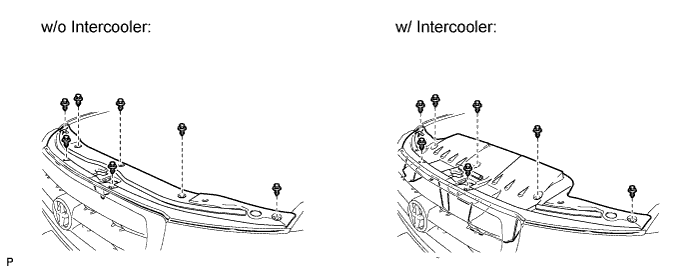
| 11. INSTALL UPPER RADIATOR SUPPORT SEAL |
Install the radiator support seal with the 7 clips.
| 12. INSTALL FRONT FENDER SPLASH SHIELD SUB-ASSEMBLY LH |
Push in the clip to install the front fender splash shield sub-assembly LH.
Install the 3 bolts and screw.
| 13. INSTALL FRONT FENDER SPLASH SHIELD SUB-ASSEMBLY RH |
Push in the clip to install the front fender splash shield sub-assembly RH.
Install the 3 bolts and 2 screws.
| 14. CONNECT CABLE TO NEGATIVE BATTERY TERMINAL (for HID Headlight) |
- NOTICE:
- When disconnecting the cable, some systems need to be initialized after the cable is reconnected ().
| 15. ADJUST HEADLIGHT AIMING |
for Halogen Headlight:
()
for HID Headlight:
()
| 16. ADJUST FOG LIGHT AIMING (w/ Fog Light) |
()