Land Cruiser URJ200 URJ202 GRJ200 VDJ200 - EXTERIOR PANELS / TRIM
BACK DOOR GARNISH (for Double Swing Out Type) - INSTALLATION
| 1. INSTALL BACK DOOR OUTSIDE GARNISH SUB-ASSEMBLY |
Attach the 10 clips to install the back door outside garnish.
Pass the wire harness the back door panel, and then attach the grommet.
Connect the connector and attach the clamp.
| 2. INSTALL BACK DOOR OUTSIDE HANDLE |
Install the back door outside handle with the 2 bolts.
- Torque:
- 5.0 N*m{ 51 kgf*cm, 44 in.*lbf}
Connect the cable to the back door outside handle and attach the guide.
| 3. INSTALL BACK DOOR SERVICE HOLE COVER LH |
Apply new butyl tape to the back door panel.
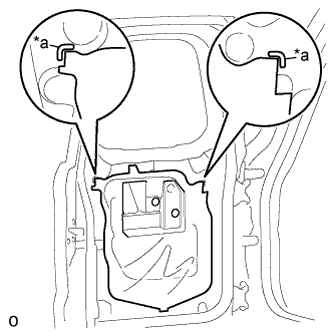
Pass the 2 links and wire harness through a new back door service hole cover, and then install the back door service hole cover using the reference points on the back door panel.
| *a | Reference Point |
Attach the 3 clamps and connect the 2 connectors.
| 4. INSTALL BACK DOOR INSIDE HANDLE ASSEMBLY LH |
Connect the 2 links to the back door inside handle.
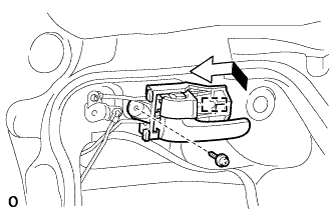
Attach the guide in the direction indicated by the arrow in the illustration to install the back door inside handle.
Install the screw.
| 5. INSTALL REAR ASSIST GRIP REINFORCEMENT LH |
Install the rear assist grip reinforcement with the 3 bolts.
| 6. INSTALL BACK DOOR TRIM PANEL ASSEMBLY LH |
Attach the 10 clips to install the back door trim panel.
| 7. INSTALL DOOR INSIDE HANDLE BEZEL LH |
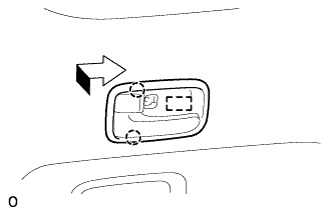
Attach the guide in the direction indicated by the arrow in the illustration, and then attach the 2 claws to install the door inside handle bezel.
Install the screw.
Attach the claw to close the cover.
| 8. INSTALL ASSIST GRIP LH |
Install the assist grip with the 2 bolts.
Attach the 2 claws to close the 2 covers.