Land Cruiser URJ200 URJ202 GRJ200 VDJ200 - 3UR-FE LUBRICATION
OIL AND OIL FILTER - REPLACEMENT
- CAUTION:
| 1. DRAIN ENGINE OIL |
Remove the oil filler cap.

Remove the 2 bolts and No. 2 engine under cover seal.
Remove the oil pan drain plug and gasket, and drain the engine oil into a container.
Install a new gasket and the oil pan drain plug.
- Torque:
- 40 N*m{ 408 kgf*cm, 30 ft.*lbf}
| 2. REMOVE FRONT FENDER SPLASH SHIELD SUB-ASSEMBLY LH |
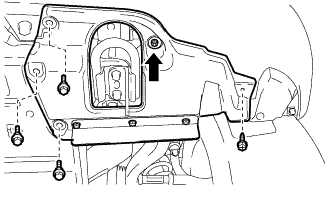
Remove the 3 bolts and screw.
Turn the clip indicated by the arrow in the illustration to remove the front fender splash shield sub-assembly LH.
| 3. REMOVE NO. 1 ENGINE UNDER COVER SUB-ASSEMBLY LH |
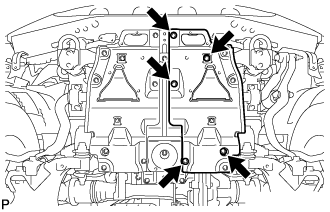
Remove the 5 bolts and No. 1 engine under cover sub-assembly LH.
| 4. REMOVE OIL FILTER ELEMENT |

Connect a hose with an inside diameter of 15 mm (0.591 in.) to the pipe.
| *1 | Pipe |
| *2 | Hose |
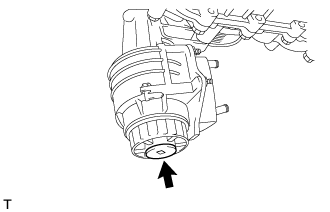
Remove the oil filter drain plug.
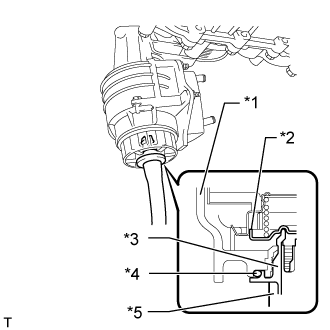
Install the pipe to the oil filter cap.
| *1 | Cap |
| *2 | Valve |
| *3 | Pipe |
| *4 | O-Ring |
| *5 | Hose |
- NOTICE:
- If the O-ring is removed with the drain plug, install the O-ring together with the pipe.
- HINT:
- Use a container to catch the draining oil.

Check that oil is drained from the oil filter. Then disconnect the pipe and remove the O-ring as shown in the illustration.

Using SST, remove the oil filter cap.
- SST
- 09228-06501
| *1 | Oil Filter Bracket Clip |
- NOTICE:
- Do not remove the oil filter bracket clip.
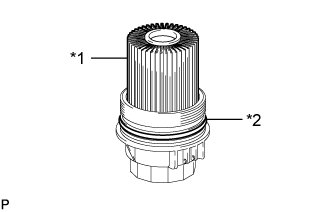
Remove the oil filter element and O-ring from the oil filter cap.
| *1 | Oil Filter Element |
| *2 | O-Ring |
- NOTICE:
- Be sure to remove the cap O-ring by hand, without using any tools, to prevent damage to the cap O-ring groove.
| 5. INSTALL OIL FILTER ELEMENT |
Clean the inside of the oil filter cap, its threads and its O-ring groove.
Apply a small amount of engine oil to a new O-ring and install it to the oil filter cap.
Set a new oil filter element to the oil filter cap.
Remove any dirt or foreign matter from the installation surface of the engine.
Apply a small amount of engine oil to the O-ring again and temporarily install the oil filter cap.
- NOTICE:
- Do not remove the oil filter bracket clip.
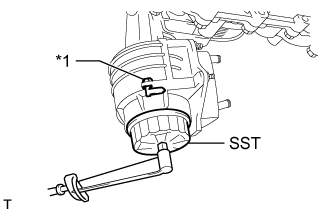
Using SST, tighten the oil filter cap.
- SST
- 09228-06501
- Torque:
- 25 N*m{ 255 kgf*cm, 18 ft.*lbf}
| *1 | Oil Filter Bracket Clip |
- NOTICE:

Apply a small amount of engine oil to a new drain plug O-ring, and install it to the oil filter cap.
| *1 | O-Ring |
- NOTICE:
- Before installing the O-ring, remove any dirt or foreign matter from the installation surface of the oil filter cap.
Install the oil filter drain plug.
- Torque:
- 13 N*m{ 127 kgf*cm, 9 ft.*lbf}
- NOTICE:
- Be careful that the O-ring does not get caught between any surrounding parts.
Install the No. 2 engine under cover seal with the 2 bolts.
- Torque:
- 10 N*m{ 102 kgf*cm, 7 ft.*lbf}
| 6. ADD ENGINE OIL |
Add fresh oil and install the oil filler cap.
- Standard Oil Grade:
Oil Grade Oil Viscosity (SAE) API grade SL "Energy-Conserving", SM "Energy-Conserving", SN "Resource-Conserving" or ILSAC multigrade engine oil 5W-30
10W-30API grade SL, SM or SN multigrade engine oil 15W-40
20W-50
- Standard Oil Capacity:
Item Specified Condition Drain and refill without oil filter change 7.1 liters (7.5 US qts, 6.2 Imp. qts) Drain and refill with oil filter change 7.5 liters (7.9 US qts, 6.6 Imp. qts) Dry fill 9.3 liters (9.8 US qts, 8.2 Imp. qts)
| 7. INSPECT FOR OIL LEAK |
Start the engine. Make sure that there are no oil leaks from the area that was worked on.
| 8. INSPECT ENGINE OIL LEVEL |
Warm up the engine. Then stop the engine and wait for 5 minutes.
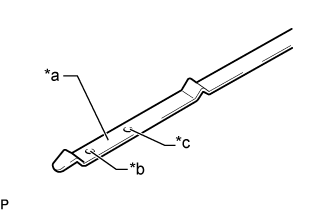
Check that the engine oil level is between the dipstick low level mark and full level mark.
| *a | Measuring Surface |
| *b | Low Level Mark |
| *c | Full Level Mark |
If the level is low, check for leakage and add oil up to the full level mark.
- NOTICE:
- Do not fill engine oil above the full level mark.
- HINT:
- A certain amount of engine oil will be consumed while driving. In the following situations, oil consumption may increase, and engine oil may need to be refilled in between oil maintenance intervals.
- When judging the amount of oil consumption, keep in mind that the oil may have become diluted, making it difficult to judge the true level accurately.
| 9. INSTALL NO. 1 ENGINE UNDER COVER SUB-ASSEMBLY LH |
Install the No. 1 engine under cover with the 5 bolts.
- Torque:
- 29 N*m{ 296 kgf*cm, 21 ft.*lbf}
| 10. INSTALL FRONT FENDER SPLASH SHIELD SUB-ASSEMBLY LH |
Push in the clip to install the front fender splash shield sub-assembly LH.
Install the 3 bolts and screw.