Land Cruiser URJ200 URJ202 GRJ200 VDJ200 - 1UR-FE ENGINE CONTROL
HEATED OXYGEN SENSOR - INSTALLATION
| 1. INSTALL HEATED OXYGEN SENSOR (for Bank 2 Sensor 2) |
Temporarily install the sensor to the front exhaust pipe by hand.

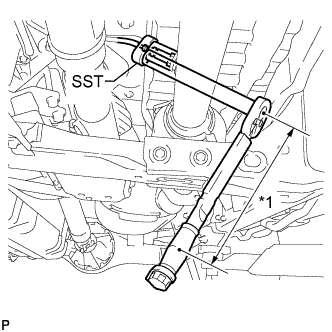
Using SST, tighten the heated oxygen sensor.
- SST
- 09224-00010
- Torque:
- without SST:
- 44 N*m{ 449 kgf*cm, 32 ft.*lbf}
- with SST:
- 40 N*m{ 408 kgf*cm, 30 ft.*lbf}
| *1 | Fulcrum Length |
- HINT:
Use a torque wrench with a fulcrum length of 300 mm (11.8 in.). When using a torque wrench with a fulcrum length that is not 300 mm (11.8 in.), calculate the torque specification for the torque wrench and SST based on the "without SST" torque specification ().
Make sure SST and the wrench are connected in a straight line.
Attach the clamp and connect the heated oxygen sensor connector.
| 2. INSTALL HEATED OXYGEN SENSOR (for Bank 1 Sensor 2) |
Temporarily install the sensor to the front No. 2 exhaust pipe by hand.
Using SST, tighten the heated oxygen sensor.
- SST
- 09224-00010
- Torque:
- without SST:
- 44 N*m{ 449 kgf*cm, 32 ft.*lbf}
- with SST:
- 40 N*m{ 408 kgf*cm, 30 ft.*lbf}
| *1 | Fulcrum Length |
- HINT:
Use a torque wrench with a fulcrum length of 300 mm (11.8 in.). When using a torque wrench with a fulcrum length that is not 300 mm (11.8 in.), calculate the torque specification for the torque wrench and SST based on the "without SST" torque specification ().
Make sure SST and the wrench are connected in a straight line.
Connect the heated oxygen sensor connector.
| 3. INSTALL PROPELLER SHAFT HEAT INSULATOR |
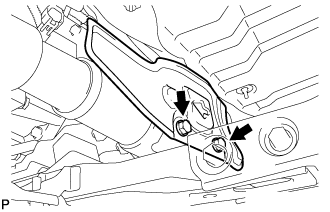
Install the insulator with the 2 bolts.
- Torque:
- 16 N*m{ 160 kgf*cm, 12 ft.*lbf}
| 4. INSPECT FOR EXHAUST GAS LEAK |
If gas is leaking, tighten the areas necessary to stop the leak. Replace damaged parts as necessary.