Camshaft oil control valve Components

Camshaft oil control valve ON-vehicle inspection
| 1. INSPECT CAMSHAFT TIMING OIL CONTROL VALVE ASSEMBLY |
-
Connect the intelligent tester to the DLC3.
-
Start the engine and turn the intelligent tester on.
-
Warm up the engine.
-
Enter the following menus: Powertrain / Engine and ECT / Active Test / Control the VVT Linear (Bank 1) or Control the VVT Linear (Bank 2) or Control the VVT System (Bank 1) or Control the VVT System (Bank 2) or Control the VVT Exhaust Linear (Bank 1) or Control the VVT Exhaust Linear (Bank 2).
-
Check the engine speed while operating the Oil Control Valve (OCV) using the intelligent tester.
OK:
If the result is not as specified, check the oil control valve, wiring and camshaft timing gear.Tester Operation Specified Condition OCV OFF Normal engine speed OCV ON Soon after OCV switched from OFF to ON, engine idles roughly or stalls HINT:
- Control the VVT Linear (Bank 1): Command to activate exhaust and intake side oil control valves of bank 1 (Control range: Between -128 to 127%).
- Control the VVT Linear (Bank 2): Command to activate exhaust and intake side oil control valves of bank 2 (Control range: Between -128 to 127%).
- Control VVT System (Bank 1): Command to activate oil control valve of bank 1 (Control range: ON/OFF).
- Control VVT System (Bank 2): Command to activate oil control valve of bank 2 (Control range: ON/OFF).
- Control the VVT Exhaust Linear (Bank 1): Command to activate exhaust side oil control valve of bank 1 (Control range: Between -128 to 127%).
- Control the VVT Exhaust Linear (Bank 2): Command to activate exhaust side oil control valve of bank 2 (Control range: Between -128 to 127%).
Camshaft oil control valve Removal
| 1. REMOVE V-BANK COVER SUB-ASSEMBLY |
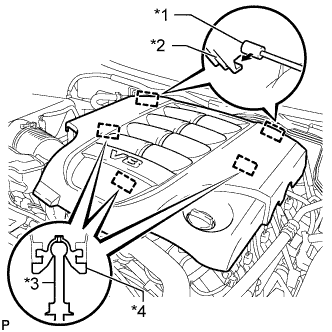
-
Raise the front of the V-bank cover to detach the 3 pins. Then remove the 2 V-bank cover hooks from the bracket, and remove the V-bank cover.
Text in Illustration *1 Bracket *2 Hook *3 Pin *4 Grommet
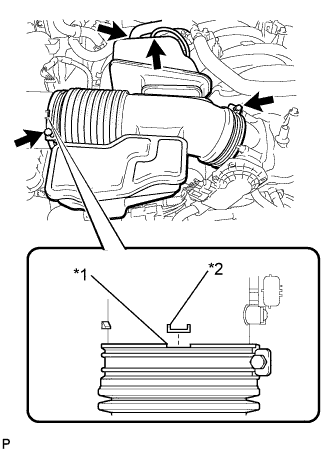
| 2. REMOVE AIR CLEANER HOSE ASSEMBLY |
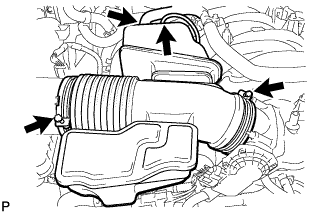
-
Disconnect the vacuum hose and No. 2 ventilation hose.
-
Loosen the 2 hose clamps.
-
Remove the air cleaner hose.
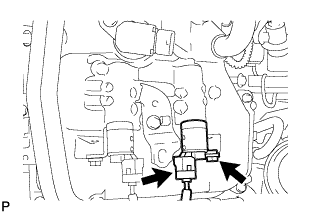
| 3. REMOVE CAMSHAFT TIMING OIL CONTROL VALVE ASSEMBLY (for Exhaust Side of Bank 1) |
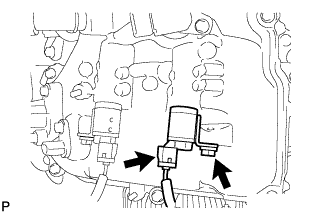
- Disconnect the oil control valve connector.
-
-
Remove the bolt and oil control valve.
-
Remove the O-ring from the oil control valve.
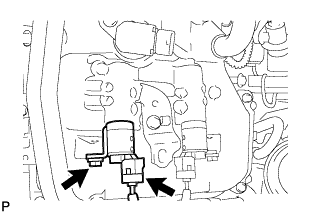
| 4. REMOVE CAMSHAFT TIMING OIL CONTROL VALVE ASSEMBLY (for Intake Side of Bank 1) |
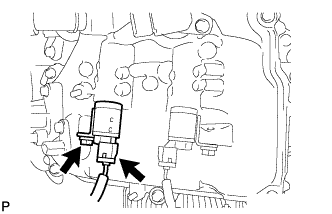
-
Disconnect the oil control valve connector.
-
Remove the bolt and oil control valve.
-
Remove the O-ring from the oil control valve.
| 5. REMOVE CAMSHAFT TIMING OIL CONTROL VALVE ASSEMBLY (for Intake Side of Bank 2) |
-
Disconnect the oil control valve connector.
-
Remove the bolt and oil control valve.
-
Remove the O-ring from the oil control valve.
| 6. REMOVE CAMSHAFT TIMING OIL CONTROL VALVE ASSEMBLY (for Exhaust Side of Bank 2) |
-
Disconnect the oil control valve connector.
-
Remove the bolt and oil control valve.
-
Remove the O-ring from the oil control valve.
Camshaft oil control valve Inspection
| 1. INSPECT CAMSHAFT TIMING OIL CONTROL VALVE ASSEMBLY |
-
Measure the resistance according to the value(s) in the table below.
Standard Resistance:
| Tester Connection | Condition | Specified Condition |
| 1 - 2 | 20°C (68°F) | 6.9 to 7.9 ? |
If the result is not as specified, replace the oil control valve assembly.
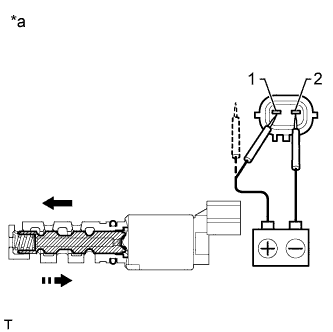
-
Connect the battery positive (+) lead to terminal 1 and the negative (-) lead to terminal 2, and check the movement of the valve.
OK:
Condition Specified Condition Battery positive (+) voltage is applied Valve moves in left arrow direction shown in the illustration Battery positive (+) voltage is cut off Valve moves in right arrow direction shown in the illustration
If the result is not as specified, replace the oil control valve assembly. If the valve cannot return properly because of foreign matter, a small pressure leak in the advanced direction may occur and a DTC may be output.Text in Illustration *a Component without harness connected (Oil Control Valve)
Camshaft oil control valve Installation
| 1. INSTALL CAMSHAFT TIMING OIL CONTROL VALVE ASSEMBLY (for Exhaust Side of Bank 1) |
-
Install a new O-ring to the oil control valve.
-
Apply a light coat of engine oil to the O-ring.
-
Install the oil control valve with the bolt.
Torque:
10 N*m{ 102 kgf*cm , 7 ft.*lbf }
NOTICE:
- Do not allow foreign matter to contact the oil seal face of the oil control valve (connecting surface with cylinder head cover).
- Be careful that the O-ring is not cracked or moved out of place when installing the oil control valve.
-
Connect the oil control valve connector.
| 2. INSTALL CAMSHAFT TIMING OIL CONTROL VALVE ASSEMBLY (for Intake Side of Bank 1) |
-
Install a new O-ring to the oil control valve.
-
Apply a light coat of engine oil to the O-ring.
-
Install the oil control valve with the bolt.
Torque:
10 N*m{ 102 kgf*cm , 7 ft.*lbf }
NOTICE:
- Do not allow foreign matter to contact the oil seal face of the oil control valve (connecting surface with cylinder head cover).
- Be careful that the O-ring is not cracked or moved out of place when installing the oil control valve.
-
Connect the oil control valve connector.
| 3. INSTALL CAMSHAFT TIMING OIL CONTROL VALVE ASSEMBLY (for Intake Side of Bank 2) |
-
Install a new O-ring to the oil control valve.
-
Apply a light coat of engine oil to the O-ring.
-
Install the oil control valve with the bolt.
Torque:
10 N*m{ 102 kgf*cm , 7 ft.*lbf }
NOTICE:
- Do not allow foreign matter to contact the oil seal face of the oil control valve (connecting surface with cylinder head cover).
- Be careful that the O-ring is not cracked or moved out of place when installing the oil control valve.
-
Connect the oil control valve connector.
| 4. INSTALL CAMSHAFT TIMING OIL CONTROL VALVE ASSEMBLY (for Exhaust Side of Bank 2) |
-
Install a new O-ring to the oil control valve.
-
Apply a light coat of engine oil to the O-ring.
-
Install the oil control valve with the bolt.
Torque:
10 N*m{ 102 kgf*cm , 7 ft.*lbf }
NOTICE:
- Do not allow foreign matter to contact the oil seal face of the oil control valve (connecting surface with cylinder head cover).
- Be careful that the O-ring is not cracked or moved out of place when installing the oil control valve.
-
Connect the oil control valve connector.
| 5. INSTALL AIR CLEANER HOSE ASSEMBLY |
-
Install the air cleaner hose so that the protrusion of the air cleaner cap aligns with the groove of the hose as shown in the illustration.
Text in Illustration *1 Groove *2 Protrusion
-
Tighten the 2 clamps.
Torque:
5.0 N*m{ 51 kgf*cm , 44 in.*lbf }
-
Connect the vacuum hose.
-
Connect the No. 2 ventilation hose.
| 6. INSTALL V-BANK COVER SUB-ASSEMBLY |

-
Attach the 2 V-bank cover hooks to the bracket. Then align the 3 V-bank cover grommets with the 3 pins, and press down on the V-bank cover to attach the pins.
Text in Illustration *1 Bracket *2 Hook *3 Pin *4 Grommet