Трос Механизма Переключения Передач В Сборе (Для Моделей С Кузовом Типа Седан) Снятие. Corolla ZZE150
DISCONNECT CABLE FROM NEGATIVE BATTERY TERMINAL
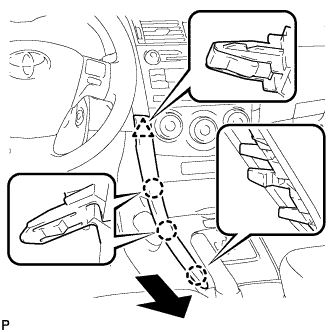
REMOVE LOWER INSTRUMENT PANEL FINISH PANEL LH
REMOVE LOWER INSTRUMENT PANEL FINISH PANEL RH
REMOVE SHIFT LEVER KNOB SUB-ASSEMBLY
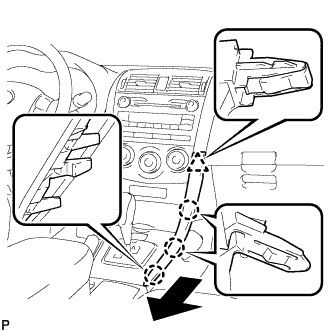
REMOVE CENTER INSTRUMENT CLUSTER FINISH PANEL ASSEMBLY
REMOVE INSTRUMENT PANEL BOX ASSEMBLY
REMOVE FRONT NO. 1 CONSOLE BOX INSERT
REMOVE FRONT NO. 2 CONSOLE BOX INSERT
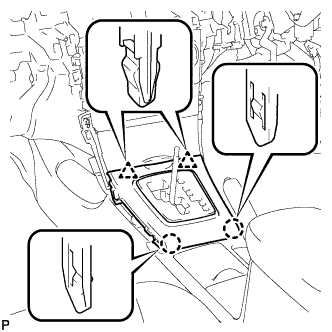
REMOVE UPPER CONSOLE PANEL SUB-ASSEMBLY
REMOVE CONSOLE BOX CARPET
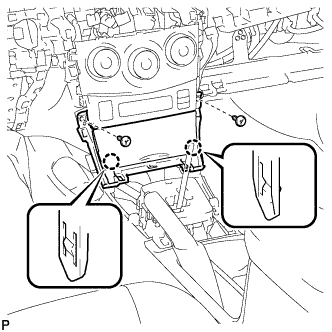
REMOVE REAR CONSOLE BOX ASSEMBLY
REMOVE NO.2 CYLINDER HEAD COVER
REMOVE AIR CLEANER CAP SUB-ASSEMBLY
REMOVE AIR CLEANER CASE
REMOVE OXYGEN SENSOR
REMOVE FRONT EXHAUST PIPE ASSEMBLY
REMOVE NO. 1 FRONT FLOOR HEAT INSULATOR
REMOVE TRANSMISSION CONTROL CABLE ASSEMBLY
Трос Механизма Переключения Передач В Сборе (Для Моделей С Кузовом Типа "Седан") -- Снятие |
| 1. DISCONNECT CABLE FROM NEGATIVE BATTERY TERMINAL |
| 2. REMOVE LOWER INSTRUMENT PANEL FINISH PANEL LH |
Освободите 3 захвата и фиксатор и снимите левую нижнюю отделочную накладку панели приборов.
| 3. REMOVE LOWER INSTRUMENT PANEL FINISH PANEL RH |
Освободите 3 захвата и фиксатор и снимите правую нижнюю отделочную накладку панели приборов.
| 4. REMOVE SHIFT LEVER KNOB SUB-ASSEMBLY |
Turn the shift lever knob counterclockwise and remove the shift lever knob sub-assembly.
| 5. REMOVE CENTER INSTRUMENT CLUSTER FINISH PANEL ASSEMBLY |
Освободите 2 захвата и 2 фиксатора, а затем снимите центральную отделочную накладку панели приборов в сборе.
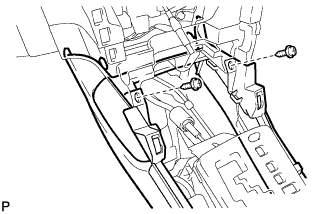
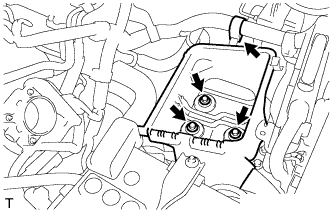
| 6. REMOVE INSTRUMENT PANEL BOX ASSEMBLY |
Выверните 2 винта <В>.
Освободите 2 захвата.
Отсоедините все разъемы и снимите ящик панели приборов в сборе.
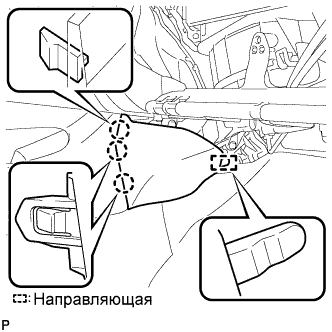
| 7. REMOVE FRONT NO. 1 CONSOLE BOX INSERT |
Освободите 3 захвата.
Отсоедините направляющую и снимите переднюю вставку вещевого ящика в облицовке туннеля пола № 1.
| 8. REMOVE FRONT NO. 2 CONSOLE BOX INSERT |
Освободите 3 захвата.
Отсоедините направляющую и снимите переднюю вставку вещевого ящика в облицовке туннеля пола № 2.
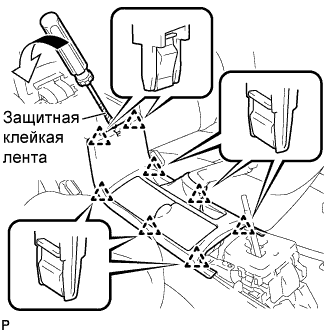
| 9. REMOVE UPPER CONSOLE PANEL SUB-ASSEMBLY |
С помощью отвертки расцепите 8 фиксаторов и снимите верхнюю панель консоли.
- УКАЗАНИЕ:
- Конец отвертки перед использованием следует изолировать защитной клейкой лентой.
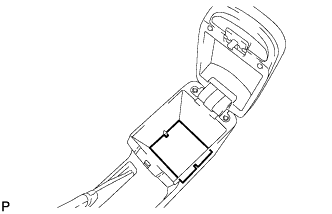
| 10. REMOVE CONSOLE BOX CARPET |
Снимите коврик вещевого ящика в облицовке туннеля пола.
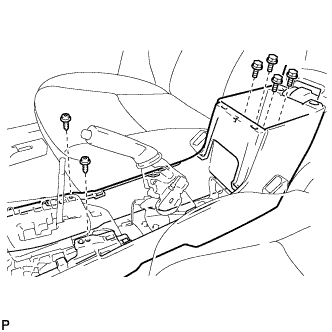
| 11. REMOVE REAR CONSOLE BOX ASSEMBLY |
Выверните 4 болта и 2 винта.
Выверните 2 винта и снимите вещевой ящик в облицовке туннеля пола в сборе.
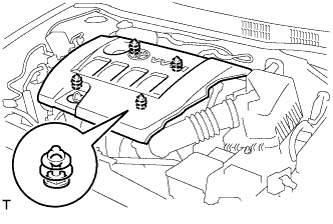
| 12. REMOVE NO.2 CYLINDER HEAD COVER |
Hold the rear of the cover and raise it to disengage the 2 clips on the front of the cover. Continue to raise the cover to disengage the 2 clips on the front of the cover and remove the cover.
- ПРИМЕЧАНИЕ:
- Attempting to disengage both front and rear clips at the same time may cause the cover to break.
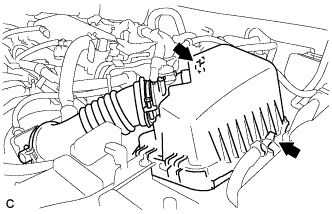
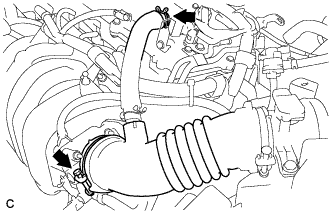
| 13. REMOVE AIR CLEANER CAP SUB-ASSEMBLY |
Disconnect the mass air flow meter connector.
Disconnect the 2 clamps.
Disconnect the band and ventilation hose, and remove the air cleaner cap sub-assembly.
| 14. REMOVE AIR CLEANER CASE |
Separate the air cleaner filter element from the air cleaner.
Remove the 3 bolts from the air cleaner case.
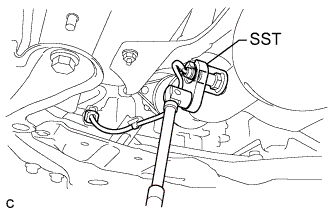
Disconnect the oxygen sensor connector.
Using SST, remove the oxygen sensor from the front exhaust pipe assembly.
- SST
- 09224-00010
- ПРИМЕЧАНИЕ:
- Do not damage the oxygen sensor.
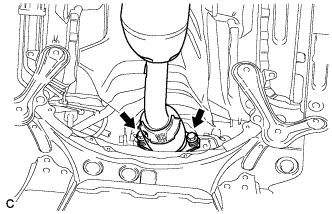
| 16. REMOVE FRONT EXHAUST PIPE ASSEMBLY |
Remove the 2 bolts and 2 compression springs.
Remove the 2 bolts and 2 compression springs.
Remove the exhaust pipe support, and then remove the front exhaust pipe assembly.
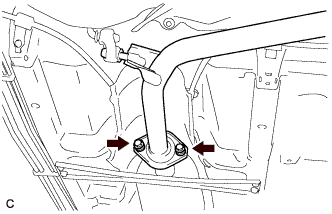
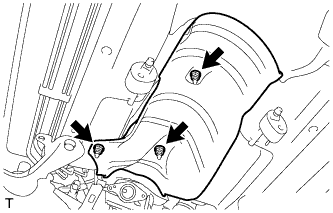
| 17. REMOVE NO. 1 FRONT FLOOR HEAT INSULATOR |
Remove the 3 nuts and the No. 1 front floor heat insulator.
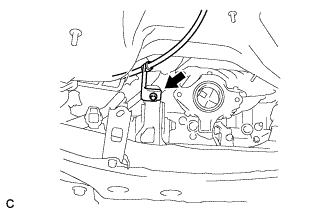
| 18. REMOVE TRANSMISSION CONTROL CABLE ASSEMBLY |
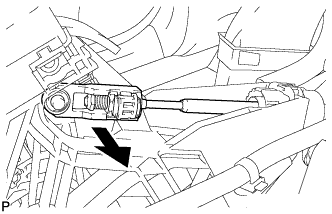
Move the shift lever to the N position.
Disconnect the end of the transmission control cable assembly from the shift lever assembly.
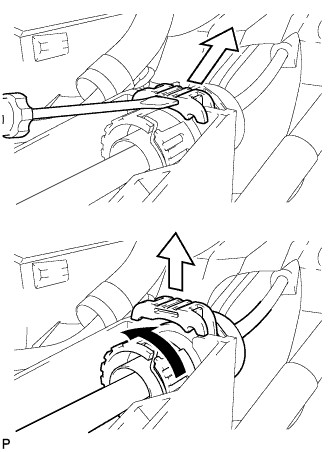
Using a screwdriver, pull out the stopper of the transmission control cable.
- ПРИМЕЧАНИЕ:
- Do not remove the stopper. If the stopper is removed, reinstall it to its original position.
Rotate the nut counterclockwise approximately 180° and, while holding the nut in that position, disconnect the transmission control cable from the shift lever retainer.
- ПРИМЕЧАНИЕ:
- Do not over-rotate the nut as it will come off the interior spring and the transmission control cable will not be reusable.
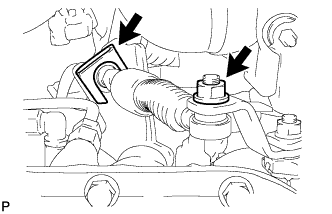
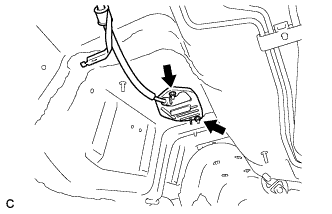
Remove the clip and disconnect the transmission control cable assembly from the control cable bracket.
Remove the nut and transmission control cable assembly from the control shaft lever.
Remove the bolt and separate the transmission control cable assembly support from the rear engine mounting insulator.
Remove the 2 bolts and separate the transmission control cable assembly from the body.
Pull out the transmission control cable assembly from the body.