Engine Assembly -- Removal |
| 1. DISCHARGE REFRIGERANT FROM REFRIGERATION SYSTEM |
Запустите двигатель.
Переведите выключатель системы кондиционирования в положение ON (ВКЛ).
Включите компрессор системы кондиционирования при частоте вращения коленчатого вала двигателя около 1000 об/мин на 5-6 мин., чтобы прокачать хладагент и собрать оставшееся в компонентах компрессорное масло в компрессоре.
Выключите двигатель.
С помощью SST выпустите газообразный хладагент.
- Специальный инструмент (SST):
- 07110-58060(07117-58060,07117-58070,07117-58080,07117-58090,07117-78050,07117-88060,07117-88070,07117-88080)
| 2. DISCONNECT CABLE FROM NEGATIVE BATTERY TERMINAL |
- ПРЕДОСТЕРЕЖЕНИЕ:
- Wait at least 90 seconds after disconnecting the cable from the negative (-) battery terminal to prevent airbag and seat belt pretensioner activation.
| 3. REMOVE NO. 1 ENGINE UNDER COVER |
Remove the 4 bolts, 12 clips and under cover.
| 4. REMOVE ENGINE UNDER COVER REAR RH |
Remove the 2 clips and under cover.
| 5. REMOVE ENGINE UNDER COVER REAR LH |
Remove the 2 clips and under cover.
| 6. REMOVE NO. 2 ENGINE UNDER COVER |
Remove the 2 clips and under cover.
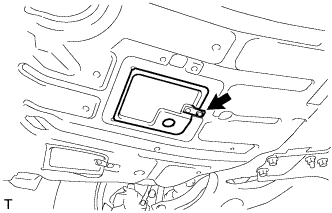
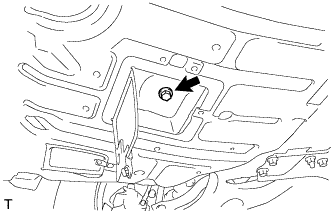
| 7. REMOVE FRONT FLOOR COVER |
Remove the nut, bolt, 3 clips and floor cover.
 |
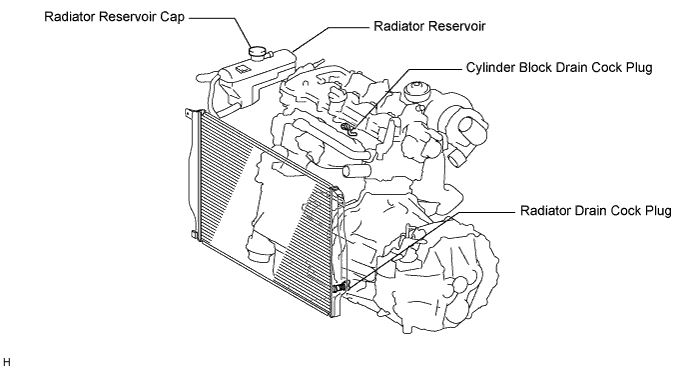
| 8. DRAIN ENGINE COOLANT |
Loosen the radiator drain cock plug.
- УКАЗАНИЕ:
- Collect the coolant in a container and dispose of it according to the regulations in your area.
Remove the radiator reservoir cap.
- ПРЕДОСТЕРЕЖЕНИЕ:
- Do not remove the radiator reservoir cap while the engine and radiator are still hot. Pressurized, hot engine coolant and steam may be released and cause serious burns.
Loosen the cylinder block drain cock plug.
| 9. DRAIN ENGINE OIL |
Remove the oil filler cap.
Remove the clip and open the oil pan drain service cover.
 |
Remove the oil drain plug and gasket, and drain the engine oil into a container.
 |
| 10. DRAIN MANUAL TRANSAXLE OIL |
Remove the filler plug and gasket.
Remove the drain plug and gasket, and drain the oil.
Install a new gasket and the drain plug.
- Момент затяжки:
- 49 Н*м{500 кгс*см, 36 фунт-сила-футов}
| 11. DRAIN TRANSFER OIL |
Remove the drain plug and gasket, and drain the oil.
Install a new gasket and the drain plug.
- Момент затяжки:
- 49 Н*м{500 кгс*см, 36 фунт-сила-футов}
| 12. REMOVE HOOD SUB-ASSEMBLY |
Выверните 4 болта и снимите капот.
 |
| 13. REMOVE NO. 1 ENGINE COVER |
Detach the 4 clips and remove the engine cover.
 |
| 14. REMOVE RADIATOR SUPPORT OPENING COVER |
Снимите 2 фиксатора.
 |
Частично снимите крышку кронштейна радиатора.
- УКАЗАНИЕ:
- Нет необходимости снимать крышку кронштейна радиатора полностью. Частично снимите ее так, чтобы можно было снять накладку бампера.
| 15. REMOVE BATTERY CLAMP SUB-ASSEMBLY |
 |
Remove the bolt and loosen the nut.
Detach the 2 wire harness clamps.
Detach the hook of the battery clamp from the battery bracket front, and then remove the battery clamp.
| 16. REMOVE BATTERY |
| 17. REMOVE FRONT BATTERY BRACKET |
Detach the 2 wire harness clamps.
 |
Remove the 4 bolts and bracket front.
| 18. REMOVE BATTERY BRACKET REINFORCEMENT |
Remove the 2 bolts and bracket reinforcement.
 |
| 19. REMOVE AIR CLEANER CAP SUB-ASSEMBLY |
Disconnect the mass air flow meter connector.
 |
Disconnect the wire harness clamp.
Unhook the 3 hook clamps, and then remove the air cleaner cap.
Remove the air cleaner filter element from the air cleaner case.
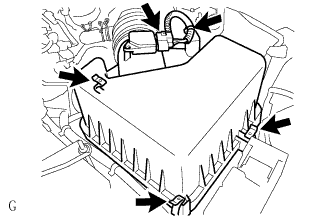
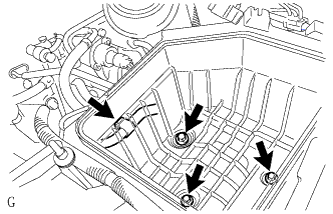
| 20. REMOVE AIR CLEANER CASE |
Disconnect the wire harness clamp and remove the 3 bolts and air cleaner case.
 |
| 21. REMOVE FUEL FILTER ASSEMBLY |
Disconnect the level warning switch connector.
Disconnect the 4 hoses indicated in the illustration.
Remove the bolt and fuel filter.
| 22. REMOVE AIR CLEANER BRACKET |
Remove the glow plug relay.
 |
Disconnect the fuel filter level switch connector.
Disconnect the 2 wire harness clamps.
 |
Disconnect the 2 fuel hoses from the bracket.
Remove the 3 bolts and bracket.
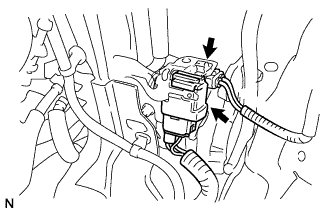
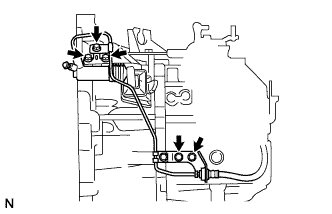
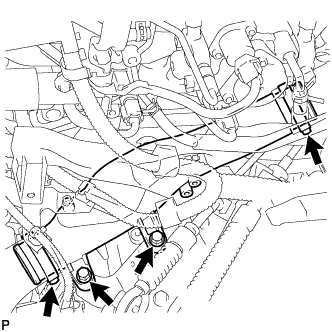
| 23. DISCONNECT HOSES AND CONNECTORS |
Remove the engine room junction block cover (upper).
Remove the nut and disconnect the engine room junction block cover (side) with 3 connectors and wire.
Remove the nut and disconnect the starter wire.
Disconnect the 2 injector driver connectors.
Disconnect the vacuum pump hose.
Disconnect the 2 fuel hoses.
Disconnect the 2 heater hoses.
Disconnect the 2 ECM connectors.
Remove the 3 bolts, vacuum switching valve bracket and vacuum transmitting pipe.
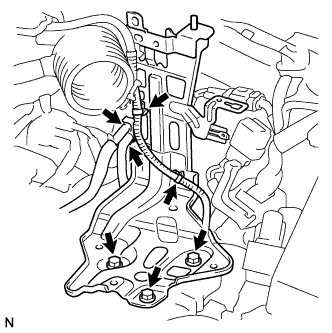
| 24. REMOVE ECM |
Remove the 3 bolts holding the ECM brackets.
 |
Disconnect the 2 ECM connectors.
Raise the 2 levers while pushing the locks on the 2 levers, and remove the 2 ECM connectors.
 |
Remove the ECM.
Remove the 4 screws and 2 ECM brackets.
 |
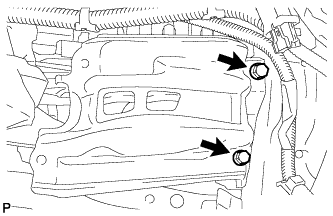
| 25. REMOVE RADIATOR RESERVE TANK ASSEMBLY |
Remove the 2 bolts and reservoir.
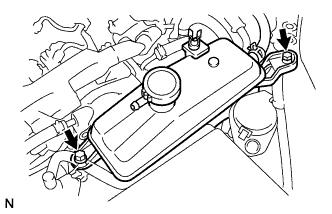 |
| 26. REMOVE FRONT BUMPER |
Remove the front bumper (see page RAV4_ACA30 RM0000015RJ004X.html).
| 27. REMOVE FRONT BUMPER REINFORCEMENT SUB-ASSEMBLY UPPER |
Отсоедините 2 разъема звукового сигнала.
Выверните 2 болта и снимите усилитель.
| 28. REMOVE RADIATOR SUPPORT UPPER BRACKET |
Выверните 2 болта и снимите 2 кронштейна.
 |
| 29. REMOVE COOLER CONDENSER ASSEMBLY |
Снимите конденсатор системы кондиционирования.
 |
| 30. REMOVE HOOD LOCK ASSEMBLY |
Выверните 3 болта и снимите защелку замка капота.
 |
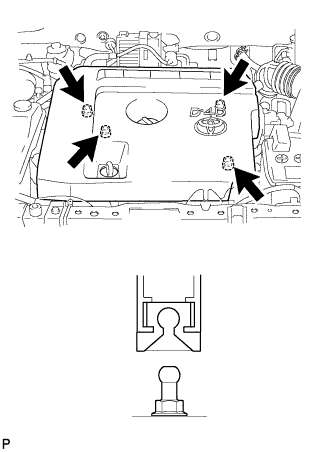
| 31. REMOVE RADIATOR SUPPORT UPPER |
 |
Remove the 4 bolts and radiator support upper.
| 32. DISCONNECT RADIATOR HOSE INLET |
 |
Disconnect the inlet radiator hose from the engine.
| 33. DISCONNECT RADIATOR HOSE OUTLET |
 |
Disconnect the outlet radiator hose from the engine.
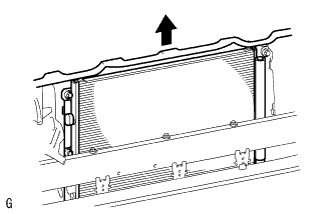
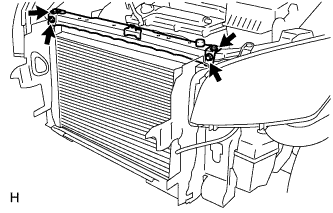
| 34. REMOVE RADIATOR AND INTERCOOLER |
Loosen the 2 clamps.
 |
Disconnect the No. 2 and No. 3 air hoses from the engine.
Remove the radiator (with intercooler) from the vehicle.
Loosen the 2 clamps.
 |
Remove the bolt.
Remove the No. 2 air tube from the intercooler and No. 3 air hose.
Loosen the clamp. Remove the No. 2 air hose from the intercooler.
 |
Remove the 4 bolts, and then separate the intercooler and radiator.
 |
| 35. REMOVE DISCHARGE HOSE SUB-ASSEMBLY |
Выверните болт и отсоедините трубопровод высокого давления на выходе компрессора от компрессора системы кондиционирования.
 |
Снимите кольцевое уплотнение с трубопровода высокого давления на выходе компрессора.
- ПРИМЕЧАНИЕ:
- Для предотвращения проникновения влаги и загрязняющих веществ герметизируйте отверстия отсоединенных деталей с помощью виниловой ленты.
| 36. DISCONNECT SUCTION HOSE SUB-ASSEMBLY |
Выверните болт и отсоедините трубопровод низкого давления кондиционера от компрессора системы кондиционирования.
 |
Снимите кольцевое уплотнение с трубопровода низкого давления кондиционера.
- ПРИМЕЧАНИЕ:
- Для предотвращения проникновения влаги и загрязняющих веществ герметизируйте отверстия отсоединенных деталей с помощью виниловой ленты.
| 37. DISCONNECT TRANSMISSION CONTROL CABLE ASSEMBLY |
 |
Remove the 2 clips and disconnect the cable ends of the control cable.
Using a screwdriver, release the cable locks of the shift cable and select cable.
 |
Turn the lock nuts 180° counterclockwise and hold them in that position. Remove the shift cable and select cable while holding them.
 |
Remove the shift cable from the floor shift shift lever assembly while holding the lock nut.
Repeat the step above for the select cable.
- ПРИМЕЧАНИЕ:
- Do not push in the cable locks.
| 38. DISCONNECT CLUTCH RELEASE CYLINDER ASSEMBLY |
Disconnect the 5 bolts, release cylinder and flexible hose bracket.
 |
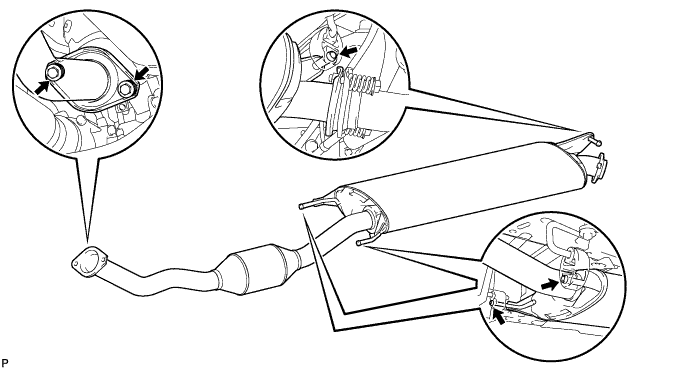
| 39. REMOVE FRONT EXHAUST PIPE ASSEMBLY |
Remove the 2 bolts and 2 compression springs.
Disconnect the 3 exhaust pipe supports, and remove the front exhaust pipe.
Remove the gasket from the exhaust manifold.
| 40. REMOVE PROPELLER WITH CENTER BEARING SHAFT ASSEMBLY |
Отверните 2 болта, снимите 2 регулировочные шайбы и отсоедините карданный вал с валом центрального подшипника.
- ПРИМЕЧАНИЕ:
- При разборке не прилагайте избыточных усилий к карданному шарниру.
- При демонтаже, транпортировке и хранении карданного вала с валом центрального подшипника на допускайте, чтобы угол шарнира № 2 был больше 20°.
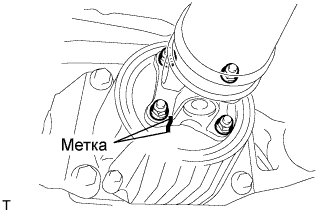
 |
Нанесите сборочные метки на корпус дифференциала и карданный вал.
 |
Отверните 4 гайки, снимите 4 шайбы и отсоедините карданный вал и корпус дифференциала.
Нанесите сборочные метки на раздаточную коробку и карданный вал.
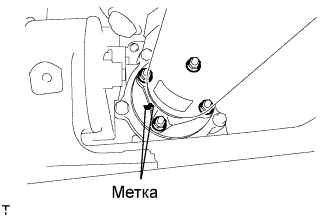 |
Отверните 4 гайки, снимите 4 шайбы и отсоедините карданный вал от раздаточной коробки.
| 41. REMOVE FRONT WHEELS |
| 42. REMOVE FRONT AXLE HUB LH NUT |
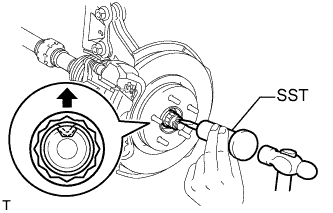 |
С помощью SST и молотка раскерните накерненную часть гайки.
- Специальный инструмент (SST):
- 09930-00010
- ПРИМЕЧАНИЕ:
- Полностью освободите накерненную часть гайки, иначе можно повредить винт приводного вала.
Нажав на тормоз, снимите стопорную гайку ступицы колеса.
| 43. REMOVE FRONT AXLE HUB RH NUT |
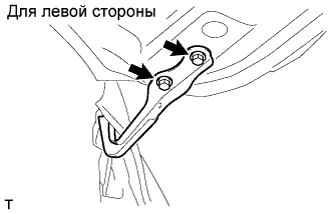
| 44. DISCONNECT FRONT STABILIZER LINK ASSEMBLY LH |
Отверните 2 гайки и снимите стойку стабилизатора.
 |
| 45. DISCONNECT FRONT STABILIZER LINK ASSEMBLY RH |
Remove the stabilizer link (see page RAV4_ACA30 RM00000228C000X_01_0010.html).
| 46. DISCONNECT STEERING INTERMEDIATE SHAFT |
(see page RAV4_ACA30 RM000000UNK00DX_01_0054.html).
| 47. DISCONNECT TIE ROD END SUB-ASSEMBLY RH |
- УКАЗАНИЕ:
- Порядок выполнения работ для правой и левой сторон одинаков.
| 48. DISCONNECT TIE ROD END SUB-ASSEMBLY LH |
Снимите шплинт и корончатую гайку.
При помощи SST отсоедините наконечник тяги от поворотного кулака.
- Специальный инструмент (SST):
- 09628-62011
- ПРИМЕЧАНИЕ:
- Не допускайте повреждения пылезащитной крышки рулевой тяги.
 |
| 49. REMOVE FRONT DRIVE SHAFT LH |
Remove the drive shaft (see page RAV4_ACA30 RM00000226Q000X.html).
| 50. REMOVE FRONT DRIVE SHAFT RH |
Remove the drive shaft (see page RAV4_ACA30 RM00000226Q000X.html).
| 51. REMOVE ENGINE WITH TRANSAXLE |
Install the No. 1 and No. 2 engine hangers with the 2 bolts as shown in the illustration.
- Момент затяжки:
- 40 Н*м{408 кгс*см, 30 фунт-сила-футов}
Part name Part No. No. 1 engine hanger 12281-26050 (None)
or
12281-26060 (Green)No. 2 engine hanger 12282-26010 (None)
or
12282-26020 (Green)Bolt 91552-81025
or
90105-W0042- УКАЗАНИЕ:
- Insert the claw of the No. 1 engine hanger into hole of the cylinder head.
- Fit the fork part of the No. 2 engine hanger onto the rib of the cylinder head.
 |
Install an engine sling device to the engine and hold the engine with a chain block.
- ПРЕДОСТЕРЕЖЕНИЕ:
- Do not raise the engine more than necessary. If the engine is raised excessively, the vehicle may also be lifted up.
Set an engine lifter underneath the engine.
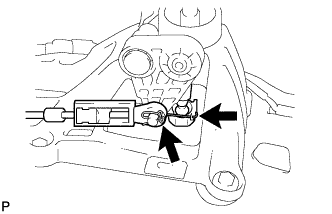
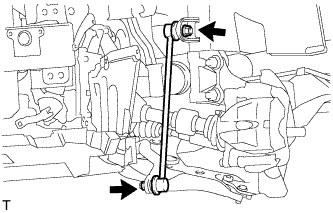
Remove the column hole cover. Loosen the bolt holding the intermediate shaft, and slide the intermediate shaft.
Put matchmarks on the intermediate shaft and pinion.
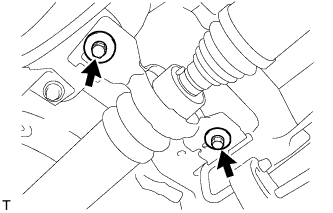
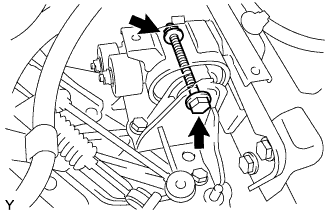
Remove the 2 bolts and 2 nuts and disconnect the engine mounting insulator RH.
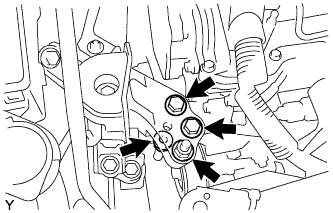 |
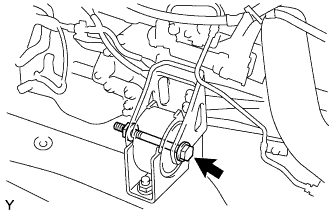
Remove the bolt and nut, and disconnect the engine mounting insulator LH.
 |
Remove the 6 bolts and the front suspension member brace rear RH and LH.
 |
Remove the 6 bolts, crossmember and suspension member.
Using the chain block, slowly remove the engine from the vehicle and the intermediate shaft from the pinion. Then set the engine on the engine lifter.
- ПРИМЕЧАНИЕ:
- Make sure that the engine is clear of all wiring and hoses.
- While lowering the engine from the vehicle, do not allow it to contact the vehicle.
- УКАЗАНИЕ:
- Place the engine on wooden blocks or equivalent so that the engine is level.
Remove the sling device from the engine.
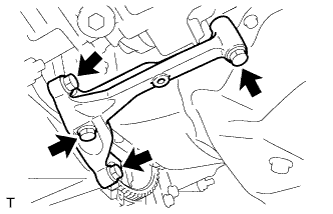
| 52. REMOVE FRONT CROSSMEMBER SUB-ASSEMBLY |
Install a chain block.
Remove the bolt, nut and crossmember.
 |
| 53. REMOVE FRONT SUSPENSION CROSSMEMBER SUB-ASSEMBLY |
Remove the bolt and suspension crossmember.
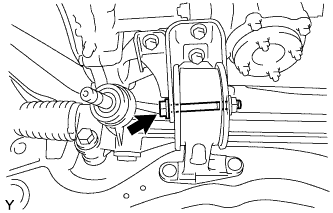 |
| 54. REMOVE NO. 1 AIR TUBE |
Remove the 2 bolts and disconnect the wire harness.
 |
Remove the 2 bolts and loosen the 2 clamps.
 |
Remove the No. 1 air tube.
| 55. REMOVE ENGINE WIRE |
Remove the engine wire from the engine.
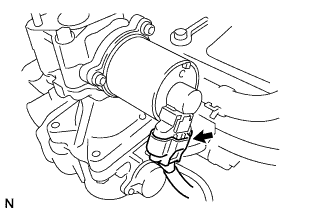
| 56. REMOVE STARTER ASSEMBLY |
Disconnect the starter connector.
 |
Open the terminal cap, remove the nut and disconnect the starter wire.
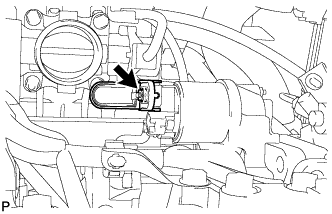 |
Remove the 2 bolts and starter.
 |
| 57. REMOVE OIL PAN INSULATOR |
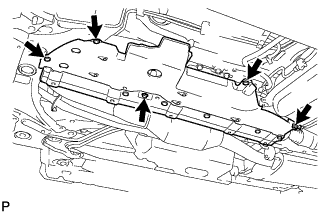
| 58. REMOVE STIFFENER PLATE RH |
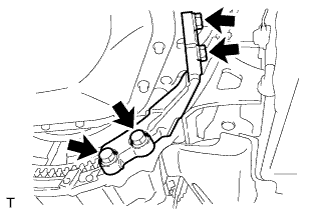 |
Remove the 4 bolts and stiffener plate from the engine and transaxle assembly.
| 59. REMOVE STIFFENER PLATE LH |
 |
Remove the 4 bolts and stiffener plate from the engine and transaxle assembly.
| 60. REMOVE MANUAL TRANSAXLE ASSEMBLY |
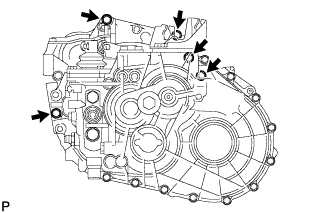 |
Remove the 5 bolts.
Separate and remove the transaxle from the engine.
| 61. REMOVE CLUTCH DISC ASSEMBLY |
- ПРИМЕЧАНИЕ:
- Не допускайте попадания масла и посторонних частиц на вкладыш диска, прижимную пластину и поверхность маховика.
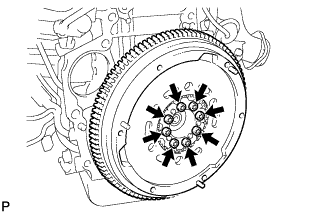
| 62. REMOVE FLYWHEEL SUB-ASSEMBLY |
Hold the crankshaft with SST.
- Специальный инструмент (SST):
- 09213-58013
09330-00021
 |
Using a T55 "torx" socket wrench, remove the 8 bolts and the flywheel.
 |
| 63. INSTALL ENGINE STAND |
Remove the sling device and chain block from the engine.
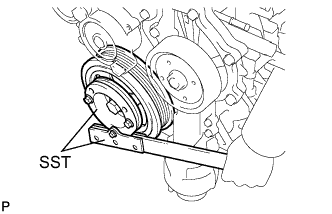
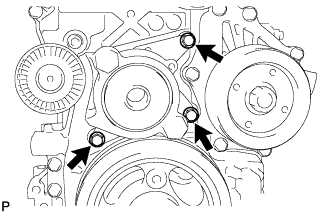
| 64. REMOVE FAN AND GENERATOR V BELT |
Using SST and 22 mm wrench, rotate the tensioner pulley counterclockwise to loosen the belt tension. Then remove the V-ribbed belt.
- Специальный инструмент (SST):
- 09216-42010
- ПРИМЕЧАНИЕ:
- Make sure SST is installed as shown in the illustration. If not, SST and/or the V-ribbed belt may not be able to be removed.
 |
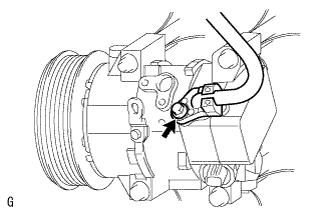
| 65. REMOVE COMPRESSOR WITH PULLEY ASSEMBLY |
Отсоедините разъем.
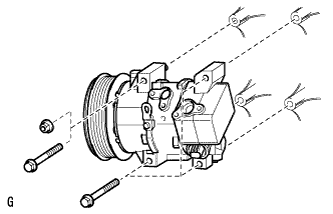 |
Без шпильки:
Выверните 4 болта и снимите компрессор системы кондиционирования.
При наличии шпильки:
Выверните 3 болта, отверните гайку и снимите компрессор системы кондиционирования.
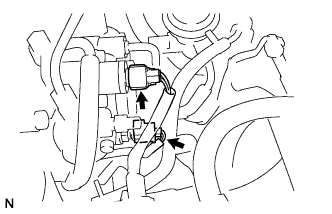
| 66. REMOVE GENERATOR ASSEMBLY |
Disconnect the generator connector.
 |
Remove the terminal cap.
Remove the nut and bolt, and disconnect the generator wire.
Remove the 3 bolts and generator.
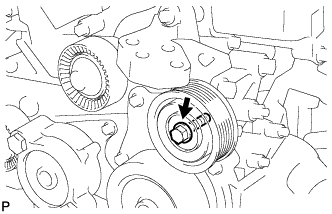
| 67. REMOVE NO. 2 IDLER PULLEY SUB-ASSEMBLY |
Remove the bolt, plate and idler pulley.
 |
| 68. REMOVE NO. 1 IDLER PULLEY SUB-ASSEMBLY |
Using a screwdriver, remove the idler pulley cover plate.
 |
Remove the bolt and idler pulley.
 |
| 69. REMOVE TRANSVERSE ENGINE MOUNTING BRACKET |
Remove the 4 bolts, 2 nuts and engine mounting bracket.
 |
| 70. REMOVE V-RIBBED BELT TENSIONER ASSEMBLY |
Remove the 3 bolts and tensioner.
 |
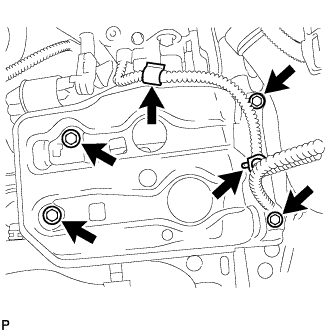
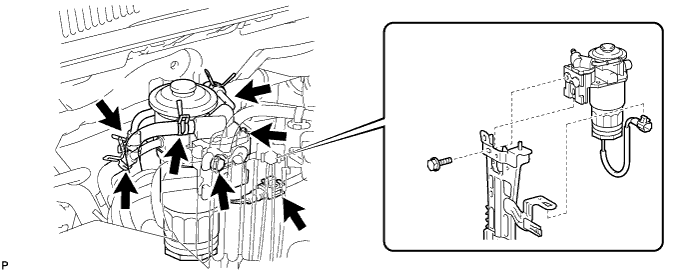
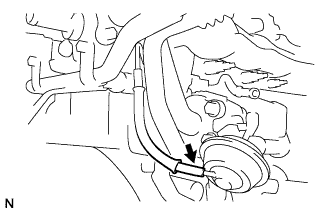
| 71. REMOVE VACUUM PUMP ASSEMBLY |
Отсоедините 2 вакуумных шланга.
 |
Выверните 3 болта и снимите вакуумный насос.
Снимите 2 кольцевых уплотнения с вакуумного насоса.
| 72. REMOVE INJECTION OR SUPPLY PUMP ASSEMBLY |
Disconnect the fuel temperature sensor connector.
 |
Disconnect the suction control valve connector.
Remove the 2 bolts to remove the supply pump, O-ring and supply pump drive coupling from the cylinder head.
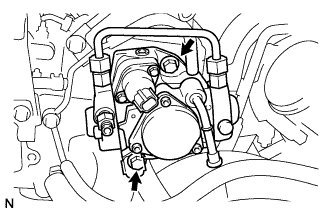 |
Remove the O-ring from the supply pump.
| 73. REMOVE OIL DIPSTICK GUIDE |
Remove the 2 bolts and oil dipstick guide.
 |
Remove the O-ring from the dipstick guide.
| 74. REMOVE NO. 2 EGR PIPE SUB-ASSEMBLY |
Remove the 2 bolts.
 |
Remove the 2 nuts, EGR pipe and 2 gaskets.
 |
| 75. REMOVE EGR VALVE ASSEMBLY |
Disconnect the EGR valve connector.
Disconnect the EGR valve connector.
 |
Remove the 2 bolts, EGR valve and gasket.
 |
| 76. REMOVE ENGINE COVER BRACKET |
Remove the bolt and pressure sensor.
Remove the 2 bolts and engine cover bracket.
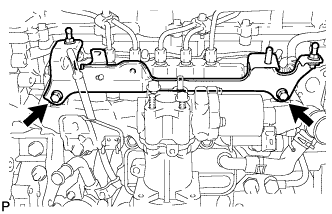 |
| 77. REMOVE COMMON RAIL ASSEMBLY |
Remove the common rail (see page RAV4_ACA30 RM0000015BX002X.html).
| 78. REMOVE INJECTOR ASSEMBLY |
Remove the injector (see page RAV4_ACA30 RM0000015BP002X.html).
| 79. REMOVE DIESEL THROTTLE BODY ASSEMBLY |
Disconnect the throttle position sensor connector.
 |
Disconnect the throttle motor connector.
Remove the 2 nuts and 2 bolts, and then remove the diesel throttle body and gasket.
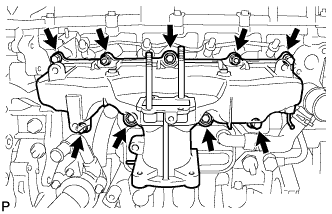
| 80. REMOVE INTAKE MANIFOLD |
Remove the 7 bolts, 2 nuts, intake manifold and gasket.
 |
| 81. REMOVE OIL COOLER ASSEMBLY |
Disconnect the oil cooler hose.
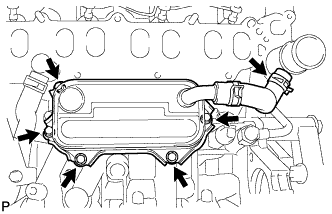 |
Remove the 5 bolts, 3 O-rings and oil cooler.
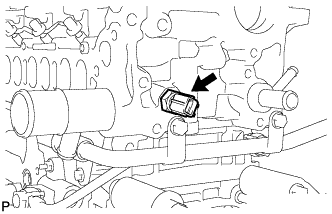
| 82. REMOVE DIESEL ENGINE COOLANT TEMPERATURE SENSOR |
Remove the engine coolant temperature sensor.
 |
| 83. REMOVE NO. 3 WATER BY-PASS PIPE |
Remove the 2 bolts, O-ring and by-pass pipe.
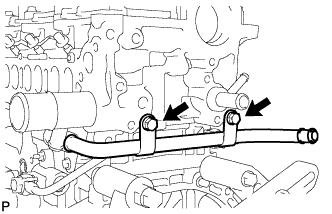 |
| 84. REMOVE NO. 1 TURBO OIL PIPE |
Remove the 2 union bolts, 2 gaskets and oil pipe.
 |
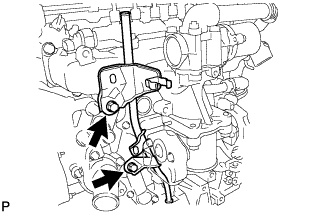
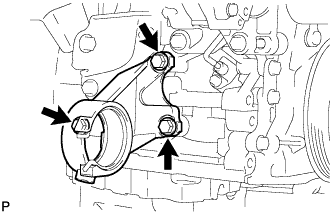
| 85. REMOVE NO. 1 OIL COOLER BRACKET |
Remove the 6 bolts, nut and oil cooler bracket.
 |
Remove the 3 O-rings.
| 86. REMOVE WATER INLET HOUSING |
Remove the 2 bolts, O-ring and by-pass pipe.
 |
Disconnect the hose.
Remove the 3 nuts, gasket and inlet housing.
| 87. REMOVE GLOW PLUG ASSEMBLY |
Remove the 5 grommets.
 |
Remove the 5 nuts and glow plug connector.
Remove the 4 glow plugs.
| 88. REMOVE TURBOCHARGER SUB-ASSEMBLY |
Remove the turbocharger (see page RAV4_ACA30 RM0000019S8007X.html).
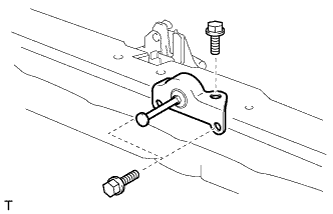
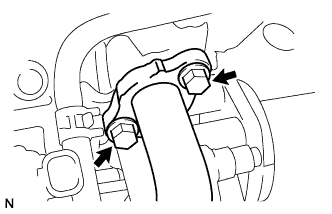
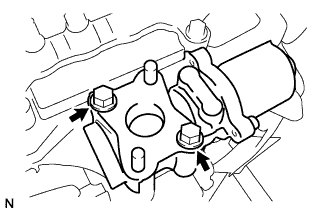
| 89. REMOVE DRIVE SHAFT BEARING BRACKET |
Remove the 3 bolts and bearing bracket.
 |
| 90. REMOVE EGR COOLER ASSEMBLY |
Disconnect the vacuum hose from the No. 2 EGR valve.
 |
Remove the 4 bolts.
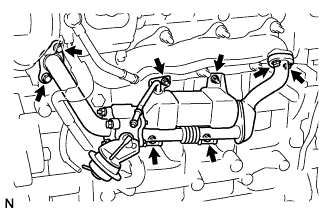 |
Remove the 2 bolts, 2 nuts, EGR cooler, 2 gaskets and O-ring.
Remove the 2 bolts and 2 nuts.
 |
Disassemble the No. 1 EGR pipe, No. 2 EGR valve, EGR cooler and 2 gaskets.
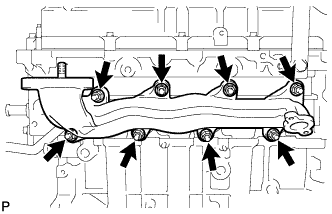
| 91. REMOVE EXHAUST MANIFOLD |
Remove the 8 nuts, 8 collars, exhaust manifold and gasket.
 |
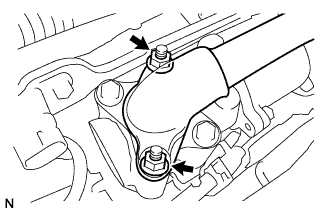
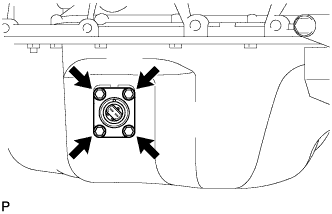
| 92. REMOVE ENGINE OIL LEVEL SENSOR |
Remove the 4 bolts and level sensor.
 |